Plasticine hare: step-by-step master class on sculpting a plasticine hare with children in step-by-step photographs.
Plasticine is an amazing material for creativity. It not only gives children the opportunity to realize their creative potential and helps develop aesthetic taste, but also teaches them to live in harmony with nature. After all, children must express their feelings, emotions and imagination, their attitude towards the world around them.
Every child can easily master this technique and sculpt the desired figures and objects. To do this, you just need to correctly structure the modeling lesson and observe the necessary sequence in the work.
Which plasticine is best to choose for sculpting a hare? Good plasticine in bright colors, elastic, kneads easily in your hands and does not stick to them, does not leave stains on your hands or work surface.
The master class from this article was prepared by Vera Parfentyeva, a reader of “Native Path”. Vera is the leader of a children's art group, a technology teacher, and a participant in our Internet Workshop of educational games “Through play - to success!”
The main secret in sculpting a hare is the basic elements from which you can make the body of any animal or bird.
The craft - a plasticine hare - consists of three elements: plasticine balls, rollers and cakes.
Composition options based on theme
Modeling on the theme “Child with a kitten” in the preparatory group is traditionally carried out in November. As an option, you can offer preschoolers to sculpt a puppy instead of a kitten.
Children can do this according to their choice: some will want to create the image of a cat, and others of a dog.
The main thing is that the craft has a storyline: the person and the animal are interconnected with each other, and not just standing side by side on a stand. You can suggest the following composition options to the guys:
- A child strokes a kitten (or puppy).
- A child holds a kitten in his arms.
- The child sits on the floor and shows the kitten a toy.
- The child walks and beckons the kitten to follow him.
The teacher’s task is to suggest to the children possible plots for the craft.
Master class “How to make a hare from plasticine step by step”
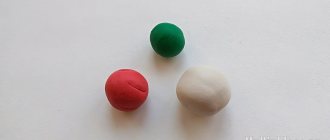
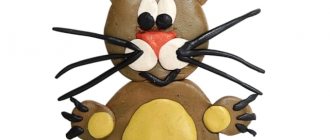
Take yellow, white, green, black and gray plasticine. By the way, the latter is quite often absent from sets. But you can make it yourself: crush part of a black bar and add a light one there, mix. As a result, you will get the desired shade.
Soften the gray plasticine and divide into three parts. From the first, roll out a round head, from the second - a pear-shaped body, and leave the third for now, it will be used to create small details.
You can start sculpting the long ears of a hare. You need to roll sausages from a piece of gray plasticine, flatten them, you get two oval ears. On top they need to be decorated with red inserts of the same shape.
Now you can start decorating the bunny’s face. Form two round eyes from black plasticine and stick them to the white pancake pupils. At the bottom, stick the cheeks and chin in the same shade as the pupils, after drawing a mouth on them. Then you need to attach a red button nose, and long ears on top.
Take the shape of the body and stick a white chest and tummy on top of it.
Make the hare's feet from gray plasticine, like his entire body. Mark the fingers with claws using a plasticine knife.
Gather all the parts together, you can attach a white or gray tail to the back.
To prevent the gray baby from starving, “give” him a carrot made of red plasticine and leaves made of green plasticine into his paws.
Make another carrot and place it near the bunny. This is his supply in case he gets hungry.
So you have a beautiful bunny. Now you know how to make a hare from plasticine step by step, which means you can easily make different figures of these animals with your baby. Perhaps your child will even decide to “settle” a whole family of rabbits in his room, and you will help him with this.
Plasticine bunny step by step
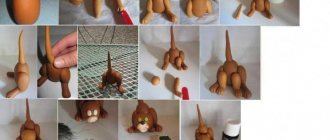
Knead the plasticine and roll into balls to later make important parts of the animal out of them. You will need:
- One largest ball for the body of a plasticine bunny;
- One smaller ball is for the head;
- 6 balls for paws and ears. You can make larger balls for the ears;
- It’s not shown in the photo, but the bunny also has a tail.
Roll out the balls for the paws, making them elongated. Roll the ears into carrots. Subsequently, they need to be pressed a little. Make the body pear-shaped.
Stick white balls with black ones in the center onto the round ball head to make the bunny's eyes. Also roll two white balls, flatten them and make impressions with a knife. Glue the cheeks onto the head and a round red nose on top. Complete the head with yellow or white teeth.
See also: Crafts from plasticine: TOP step-by-step works.
Attach the head to the pre-stretched body, add ears, paws and tail. The plasticine bunny is almost ready.
It remains to add a few touches in the form of a red belly and the same red additional details elongated in the shape of the ears. If desired, you can make small straight impressions on the feet using a stack.
It is possible and even desirable to choose the colors of plasticine at your own discretion, thus developing creative thinking and imagination. In addition, each child can bring something of their own to the work, add various little things, for example, a bow, spots, carrots, expressing their individuality, imagination, and bringing their creative finds to life.
Step-by-step execution of individual compositions
Let's consider the step-by-step creation of images that a child can play with.
Kitten: modeling using the sculptural method
- From a plasticine ball we draw out parts of the kitten’s body: four legs of the same size, a long tail and a large head.
The paws should be the same size and the tail should be long.
- We work on the image: we give the ears a triangular shape, stretch them out, and playfully bend the tail at the end, smoothing out all the irregularities.
We work on the image in more detail, smooth out unevenness
- The final stage is to make the cat’s eyes. To do this, we flatten two small white balls and mark the pupils with black.
The final stage is making the kitten’s eyes
Kitty: modeling using constructive method
- From plasticine of the same color we prepare two large balls and six small ones.
The basis of the work is plasticine balls of two sizes
- From one large ball we form an oval (the body of the cat), from the other we separate a small part and roll out a sausage (tail), the rest will become the head. Four small balls are transformed into paws, the fifth into ears, the sixth into cheeks and nose.
We use balloons to make all the details of the cat’s image.
- We fasten the parts together. To connect the head to the body, we use a match or a toothpick; all other elements are simply pressed and glued to each other. By the way, using matches you can also attach the legs - then they will be movable.
To connect the parts you can use matches, by the way, then the legs will be movable
- We complement the image with green eyes with black pupils and a pink tongue. Cute kitten is ready. We give him some pose, for example, he licks his paw.
We work on the kitten’s face and give it a certain pose
Funny puppy sitting: step-by-step modeling in a constructive way
- The basis of the image will be a large head. We fashion it from a brown ball, add expressive details on top - a white tubercle and a semicircle. We also make small triangular ears separately.
The puppy will have a big head
- We assemble a curious face: we attach ears to the head, a small white spot, black eyes, and add a brown nose. We form the mouth with a stack.
Assembling the face and decorating it using small parts
- Let's move on to the rest of the body. We remember that the head should be larger than the body - this will make the puppy seem cuter and funnier. We make an oval body from white plasticine, white legs (they will be brown at the tips) and a small brown tail.
The dog's body should not be larger than its head
- We collect body parts. We fasten the head and body with a match, simply press the paws and tail to the body. Add brown pads to the bottom of the paws. We give the puppy a touching pose and defiantly hold out its tail.
We give the dog a cute pose and set its tail beautifully
Video: how to make a dog from plasticine
Video: making a cat from plasticine
Motivating start to class
Of course, for any visual activity of preschoolers it is necessary to create motivation. In this case, you can start from the image of an animal (after all, children usually love them very much):
- Ask the children to tell about their pets.
- Talk about the variety of breeds of dogs and cats, show the corresponding pictures.
You can talk about the variety of dog breeds, look at pictures
- Game motivation. For example, preschoolers receive a letter from the queen of a fairyland. All the dogs there disappeared - they were kidnapped by an evil witch. The teacher invites the children to create a dog and a person who will play with it.
- Go from the work of art. The following options are suitable:
- R. Kipling “The cat that walked by itself”
- Mordovian fairy tale “How the dog was looking for a friend” (a very good option, since here in the end it was the person who turned out to be the best friend for the dog, the teacher invites the children to fashion their own best friend and play with him),
The theme of the lesson can be played out by reading the fairy tale “How a dog was looking for a friend”
- Stories about animals by V. Bianki, E. Charushina.
You definitely need to choose an exciting physical education program and finger gymnastics.
Table: dynamic pauses on the topic of the lesson
| Words | Movements |
| Finger gymnastics “Pussy” | |
| In our kitchen, under the table, there is a jug of milk. | make a circle from the thumb and all other fingers of the left hand |
| The cat approached the jar | “go” with the index and middle fingers of the right hand |
| I drank cream on top | Using your index finger, make “lacking” movements in a circle representing a pot |
| She stuck her head deeper into the pot: “I’ll drink some milk for future use!” | put your finger deeper into the pot circle |
| What's happened? Oh oh oh! The cat turns its head | we turn our heads |
| She's drunk too much milk - she can't get out of the pot! | trying to pull your finger out of the circle |
| The pot didn't come off my head. She ran away into the forest with him! | by stamping the fingers of both hands on the table, we show how the cat ran away |
| Physical school | |
| Now the window has opened | hands to the side |
| The cat came out onto the ledge | cat's smooth gait |
| The cat looked up | threw his head up |
| The cat looked down, then looked to the left, followed the flies with her gaze, stretched, smiled, and sat down on the ledge. | children make appropriate movements. |
On the topic: methodological developments, presentations and notes
Date: February 21, 2012 Participants: children of the preparatory group Conducted by: educational psychologist Panova M.M. Purpose: to promote formation.
How to make a volumetric applique.
The use of non-traditional means in applique classes with children of senior preschool age.
Integrated lesson in the younger group of kindergarten.
GCD for drawing in the second junior group based on the nursery rhyme “Cucumber, Cucumber.” GCD in the middle drawing group based on the nursery rhyme “Magpie, Magpie” Plan – summary of the GCD in the senior drawing group on the so-called.
Children observe how magnetic forces pass through water, paper, and cardboard.
Lesson notes for the middle group “Dangers around us.” Goal: formation in children of conscious safe behavior in life and everyday life. Objectives: - consolidate knowledge about the source.
Modeling techniques on this topic
Modeling in the preparatory group reaches a qualitatively new level:
- Preschoolers already have more developed fine motor skills.
- Observing the objects of the surrounding reality, they notice their characteristic features, and are able to more or less accurately convey them through visual activity.
- The children are better oriented in space, and therefore understand how to arrange the elements of the craft relative to each other.
- Children develop a desire and ability to more accurately convey the proportions of objects; they are fascinated by the process of creating details that complement the image.
In the preparatory group, a lot of attention is paid to the sculpting of a person, the most difficult object to depict. At the same time, it is proposed to depict it in dynamics, as well as in the context of the plot composition. So, in addition to the topic that interests us (“Child with a kitten”), preschoolers create images of dancing children, a girl playing ball (or other crafts at the discretion of the teacher).
In the preparatory group, a lot of attention is generally paid to sculpting a person in motion
Children already understand that to depict a step or other actions, you can not only position the legs and arms of the figures, but also bend them, due to which the images become more expressive.
The “Child with a Kitten” sculpture (it could be a puppy) involves a fairly large amount of work. After all, a preschooler must sculpt individual elements of the composition (a person and an animal), supplement them with the necessary small details, and then give them the desired position (convey dynamics) in order to obtain a complete composition.
The initial task of working on this topic is to sculpt a human (child) figure. The guys already know that this can be done in various ways:
- Sculptural (sculpting body parts from a single piece of plasticine using the pulling method).
When sculpting, body parts are formed from a single piece of plasticine
- Constructive (by sculpting each body part and clothing separately, and then connecting them to each other).
The cloning method involves sculpting each part of the body, elements of clothing, and then assembling the image
- Combined.
Modeling using a constructive method takes longer, but is easier for preschoolers. The difficulty of the sculptural method lies in the fact that you need to determine by eye the amount of material needed for a particular part of the body.
Examples of step-by-step sculpting of a person in the preparatory group can be found in the article “Sculpting “Man in Motion” in the preparatory group: composition options and a variety of working techniques.”
Similarly, the animal with which the child plays can be sculpted using sculptural and constructive methods.
An animal, like a person, can be depicted in sculpting in different ways.
You can also use a combined method: sculpt the body and legs from a single piece of plasticine, and work out the remaining parts separately.
From a single piece you can sculpt, for example, only the body and legs of an animal
How to make a hare from plasticine: animal master classes step by step with photos
Are you looking for detailed instructions on how to make a hare from plasticine step by step? In this master class you will find photos and descriptions of each step in sculpting a cute animal.
Every kid knows that these animals' fur coat color changes depending on the time of year. We suggest you make a gray bunny. But you can show your imagination and turn him into a pink toy rabbit or make Krosh from the cartoon “Smeshariki”, the owner of blue fur. The main thing is that your baby is happy.