Modeling techniques for the composition “Cockerel with his family”
According to the Federal State Educational Standard, the topics of modeling lessons are repeated annually, but differ in the level of complexity of techniques for making crafts. Children 6–7 years old:
- develop the skill of turning “sausages” into flagella, for example, to show the feathers on the tail of a rooster;
Children of the preparatory group learn to convey the plot in the poses and movements of the figures
- improve the skill of forming “peas” from “balls” for the eyes of birds;
- practice the skill of smoothing seams when pinching parts, for example, a neck with a head and torso;
- learn to pull back plasticine to get pointed elements, for example, a rooster's beak;
- reinforce the skill of creating identical parts in shape and size, for example, bird wings;
- choose the colors of plasticine for the figures themselves;
Using certain shades of plasticine, children should rely on a familiar image: fairy-tale or real
- They use stacks to give the elements of the craft a relief.
How to make a family tree: design methods and templates
Searching for information about relatives
It is better to use different methods of collecting family information: documents, photographs, videos. Then you can double-check the accuracy of the collected data.
Use any type of information: documents, videos or photos
Family and city archives
Start with your family and friends - organize meetings, go to visit and ask them to tell their family memories. If they live in another city and it is not possible to visit them in person, then call them by phone or have a video conference.
Submit a request to the city archives of the city where the parents were born. But in order to receive papers about relatives, you will have to prove your relationship. Since 1918, all records of births, deaths and marriages are registered in the registry office. If you are looking for older information, check with your local churches; prior to 1918, such records were usually kept there.
Each city has an archive with data on citizens living or having lived
Search on the Internet
There are many sites with historical documents on the Internet. Among Russian resources:
Information about foreign citizens can be found here:
MyHeritage online service If you are new to creating a family tree, it is better to limit yourself to a few family branches to begin with. The further you go into your family history, the more difficult it is to find accurate and detailed information. Try first making a simple chart going back a few decades. Over time, you can add more data to it as you find it.
What types of modeling are suitable for the theme “Cockerel with his family”
To embody the theme, plot modeling is used. However, other types are also involved in the work.
Subject modeling
Combining birds sculpted using object technique into a common mise-en-scène makes it possible to develop entire scenes where the figures are presented not only statically, but also dynamically, that is, with wings spread for flight, with a bowed head, an outstretched neck, etc.
For plots, children sculpt figures with heads turned and wings in different positions.
Object modeling
Children convey the image of a rooster, hen and chicks as accurately as possible, focusing on the picture or their own ideas about the bird. Then the individual figures are combined into an overall composition. In this type of modeling, children actively use stacks and sticks to add texture to the wings, that is, they make the image realistic.
Object modeling involves the creation of individual figures, which are then combined into an overall composition, that is, a plot
Decorative modeling, that is, the creation and decoration of crafts based on folk crafts, is connected to the theme “Cockerel with his family” if the figurine of the “head of the chicken family” is stylized as a Filimonovsky or Dymkovo cockerel.
Decorative modeling in the preparatory group involves painting clay bases, that is, a very labor-intensive process, so this type of modeling is usually practiced in circle classes
Plasticineography
Elements of a plasticine drawing on the theme “Cockerel and his family” are used, as a rule, to decorate the background for the mise-en-scène, which is prepared in advance, for example, during the children’s independent activities on the eve of class. Or they represent a separate type of fine art - plasticineography.
In compositions for modeling, plasticineography is used to design the base.
Modeling techniques
The theme “Cockerel and his family” is realized using five modeling techniques.
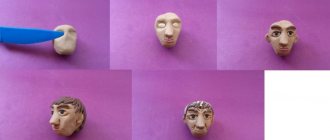
Sculptural (plastic)
The figurine is created from one piece of plasticine by stretching, smoothing or pinching elements. Children 6–7 years old practice precision manipulation with plasticine, trying to make the details as naturalistic as possible: a pointed beak, a thin crest, an elongated neck that smoothly turns into a body, claws on the paws, etc.
Sculptural modeling in the preparatory group is complicated by the active use of stacks to add texture to the image
Constructive modeling
This technique consists of combining finished parts into a single composition. So, to create a chicken, children separately form an oval-shaped body, a round head, an elongated ball turning into a cone for the beak, “sausages” of legs, elongated “pancakes” for the wings, and a rounded shape for the tail.
Particular emphasis is placed on the accuracy of smoothing and smearing of elements.
In constructive modeling, all the details are first prepared, and then a solid figure is assembled from them.
Combined technique
The combination of sculptural and constructive modeling is called a combined technique. For example, using a sculptural method, a torso is made from one piece of oval-shaped plasticine and the neck and head are extended from it. And the wings, paws, tail, comb and beard are attached from separately sculpted elements made using constructive techniques.
In a combined technique, children usually sculpt their torso and head.
Modular technology
Modeling is based on combinations of modules - separately sculpted figures, representing 2-3 independent plots, which are complemented by details and combined into a single composition. For example, a cockerel, a hen, a chick in the framework of crafts on the theme “Poultry” are supplemented with grass, a house, and an appropriate description and the craft “Cockerel with his family” is obtained.
In this composition, the modules are cockerels, which were combined into one plot: birds peck grain
Modeling according to shape
Waste material is used in the sculpting of bird figurines, for example, toy cases in Kinder Surprise, which are covered with plasticine and supplemented with separately sculpted wings, tail and beak. This technique produces funny yellow chickens.
The shape of chickens is familiar to children from the middle group; in preparatory crafts they are complicated by the use of additional materials - ready-made eyes, which need to be carefully and symmetrically glued on
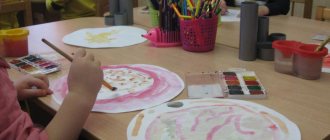
Creating the Foundation
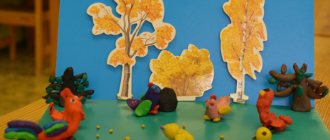
Thin cardboard serves as a backing for the composition “Cockerel with Family”. If it is assumed that not only birds, but also other elements will be placed on the base: a fence, a lawn with grass, a well, etc., then the base must be made in advance. Usually, children are allocated time for independent activity after nap time for this work. Preschool children cover the substrate with plasticine, sculpt details of the surroundings - a fence, a house, etc. - and choose a suitable place for them on the base.
Cardboard family tree
Since the child started school, we have already made a family tree three times. Our teachers love to assign such creative tasks, but it’s okay if you have a good imagination and the Internet at hand. Exactly a year ago, the whole family made the painting “Family Tree,” which took second place in a school competition.
This time we were asked to make a tree for our family for an English lesson. Children go through a topic in which they learn new words on family topics. Today the child went to school with a tree and a family photo to introduce the teacher to all the members of our small family.
Since many of Alimero’s readers have or will have schoolchildren, I decided to prepare a small master class that may be useful to you if you complete creative school assignments.
This craft is very fun and enjoyable to do with your child. Such activities allow you to maintain the connection that makes the family closer. Then close people can really be called family.
To make a family tree, you need the following materials and tools:
- 1 sheet of brown cardboard - 1 sheet of green paper - scissors - pencil and pen - glue stick
Preparation time:
20-30 minutes Difficulty:
quite easy and fun
For work, we will prepare brown cardboard (A4 sheet) and green colored paper. Draw a tree on brown cardboard. We duplicate the lower part of the tree by cutting it straight. Cut out a tree from cardboard. If the cardboard is not too thick, you can glue the same tree or thicker cardboard to the back. We cut the tree and the additional lower part of the trunk. We make such cuts so that they can be inserted one into the other and the tree can stand.
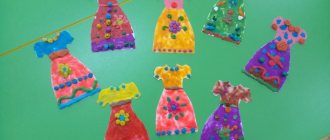
Cut out leaves of any shape from green paper. Their size depends on the size of the tree and what you will write on them. We sign the leaves (my signatures are in English, since the tree is intended for an English lesson). The number of leaves depends on how many family members you have.
Glue the leaves to the tree trunk using a glue stick. We assemble the trunk from two parts, and now the tree stands on the desktop and makes everyone happy, reminding you of what a big and friendly family you have. Our tree did not return to us - it went to an exhibition. I'll have to make one more for the children's room. But this is even good, because I really like to do this kind of creativity with my child.
To receive the best articles, subscribe to Alimero's pages on Yandex Zen, VKontakte, Odnoklassniki, Facebook and Pinterest!
Materials for modeling
The leading material for creating the “Cockerel with Family” craft is plasticine; clay and salt dough can also be used. In this case, the modeling can be supplemented with origami details. For example, the cockerel and hen are made of plasticine, and the chickens are made of yellow paper. Another option for decorating crafts is adding natural materials. Thus, the tail feathers can be made from natural bird feathers.
Natural feathers for decorating the tail can be pre-painted with paints
Modeling tools
When organizing a workspace for modeling, you need to ensure the availability of:
- frames - sticks of different lengths/thicknesses (or toothpicks) for fastening parts or supporting structures;
- stacks (pointed and rounded);
- special board or mats for work.
With your own hands
For those who decide to create a tree themselves, it will be interesting to consider master classes on making two different options.
Option I
Follow the step-by-step instructions to create a unique gift for those who honor family traditions.
- Take felt, draw a tree using soap, cut it out.
- Prepare a piece of wallpaper measuring 50 by 60. Glue it to the cardboard using double-sided tape.
- Print out the photos.
- Attach green yarn foliage to the tree.
- Use a glue gun to attach the photos to the tree.
- Glue the family tree onto the prepared cardboard with wallpaper.
- Insert the finished product into the frame.
Such a gift is not expensive, but will be the best at the holiday, as it keeps the warmth of memories.
Option II
This option will be an excellent decoration for the interior. This tree is made like a topiary.
Make branches from wire and connect them into a trunk, leaving the roots free. Take a flower pot, preferably a plastic one, fill it with plaster or clay and “plant” a tree there. Wait until the topiary dries and is firmly in the pot.
Paint the item in any color you like best. Silver or gold will look good - these are classic colors suitable for any interior.
Make photo medallions from twisted wire. Decorate them with beads, rhinestones, ribbons or seed beads. Print out the photos and place them in lockets. Don't forget to laminate your photos to make them last longer.
A gift made with your own hands will allow you to transfer the warmth of your hands through the years. This is a great option for original congratulations on any holiday.
Options for implementing the topic in the educational process
According to the calendar and thematic plan of the educational direction “Artistic and Aesthetic Development”, modeling classes are supposed to be once every two weeks. The theme “Cockerel with his family” is usually implemented as part of a modeling lesson in the fall or spring, based on personal impressions from a holiday in the village or the story of the same name by K. Ushinsky studied in younger groups.
At the same time, the creation of crafts can be correlated with the topics of other educational courses. For example, acquaintance with folk crafts in classes on familiarization with the environment is realized in January by sculpting a Filimonovsky cockerel, and in the spring, using the same technology, children can sculpt a cockerel with its family as part of a craft project.
Modeling can be a reinforcement of topics for various educational courses
Forms of organization and individual approach
As for the form of organization of work, the theme “Cockerel with his family” can be implemented as an individual or collective craft. In the first case, children prepare the substrate in advance and sculpt birds during the lesson. In the second case, the teacher divides the children into subgroups of 4-5 people and, depending on their proficiency in modeling skills, and also taking into account the wishes of the children, distributes the “front of work”: one subgroup is engaged in sculpting roosters, the second - chickens, the third sculpts chickens, and the fourth is in the process of coming up with designs for the backing. At the same time, children try to make birds in different poses.
Usually in the first and fourth subgroups there are guys who show a special interest in modeling. They can also be given the task of choosing additional material to decorate the craft or compose a story based on the composition.
Collective modeling implies the distribution of responsibilities in the preparation of the substrate: drawings, modeling from natural materials, etc.
One of the forms of implementing an individual approach is to practice modeling techniques. For example, rolling a pencil between the palms to practice the speed of movements of the palms and fingers when forming plasticine parts. And also a good training would be the creation of “flagella,” “pancakes,” and other elements that would correspond to the samples made by the teacher.
Modeling can be an option for organizing independent activities for children who show interest in this type of visual activity.
We “grow” a family tree with our own hands! Craft for school
Hello everyone! It's raining in Lipetsk. Moreover, it is so strong that it is impossible to go for a walk. You can go for a walk or swim) But for some reason we don’t have a boat, so today the kids and I decided to do something interesting, creative and useful. Let's try to make our own family tree with our own hands, sometimes gold, sometimes silver.
Moreover, this craft will be useful to Artem in the next school year. He is going to 1st grade in September and will probably have to do a project on the topic “My Family.” And our family tree will be an excellent addition to this project.
So here we go!
As always, first prepare the necessary supplies.
We will need:
- a sheet of paper (for example, a sheet of Whatman paper, since we didn’t have Whatman paper in our bins, we took a piece of old wallpaper measuring 70x60 cm);
- gouache;
- pencil;
- colored cardboard;
- tassels;
- scissors;
- Velcro tape (the same one that is used as a fastener on clothes and shoes);
- glue.
First, on paper with a pencil, we will try to draw a tree, as well as grass, flowers, clouds and the sun.
We color the picture with paints. We started with the sky, sun and clouds.
And this is a fully painted picture.
To make the tree more beautiful, small leaves were painted with light green paint.
Now we cut out leaves from colored cardboard. We decided to make them colored to visually separate the different levels of our tree:
- yellow leaves are three children;
- green ones are mom and dad;
- orange ones are grandparents.
We lay out the leaves on the tree and try them on, so to speak.
Under each leaf we make a mark in the form of a cross with a pencil so as not to forget where it should be.
We cut the soft (fluffy) part of the Velcro tape into squares, approximately 1.5x1.5 cm in size. There should be as many squares as there are leaves. We have 9 of them.
We round the corners of the squares, we get circles.
If the tape were red, then the mugs could be immediately glued to the tree. But we only had white tape, so we colored the circles with felt-tip pens.
Using super glue, we glued the circles to the tree in the places where we drew the crosses. Now they look like berries or apples, and not like white spots. This is actually why we painted them.
Let's start designing our cardboard leaves. First, cut the half of the Velcro tape on which the hooks are located into pieces approximately 3.5 cm long. You also need 9 such pieces.
Using super glue, glue the strips to the back of the leaves.
And on the front side we glue photographs of all members of our family.
We can say that our craft is ready. We place our leaves on our tree. First the kids.
Then their parents.
Well, and then grandparents.
This is the family tree we have. Of course, it was possible to simply glue the leaves with photographs to whatman paper, but we chose the option with Velcro. This was done on purpose.
After all, we expect that Artem will use this craft to defend the “My Family” project at school. And it will be great and interesting if, while talking about one of us, he simultaneously attaches a piece of paper with a photograph to the drawing. Gradually, in the process of protection, the family tree will grow right before the eyes of his classmates.
Well, now you know how to make such a beautiful craft that is suitable for both school and kindergarten.
We hope that you liked our master class and that it is useful to you
Thank you for your attention! As always, we welcome comments
We wish you creative success!
Always yours, Artem, Alexandra, Evgeniya.
How to motivate children
The productivity of preschoolers depends on the quality of motivation, which is implemented by a number of techniques at the introductory stage of the lesson.
Table: motivational techniques for modeling classes on the theme “Cockerel with his family” in the preparatory group
| Reception and features of its use | Example |
| Pictures and posters that allow you to most accurately and proportionally convey the shapes of bird body parts. | |
| Conversation | The teacher invites the children to remember what kind of poultry they saw in the village or zoo, what their habits were observed, how the hen takes care of the chickens, what she teaches them, etc. |
| Poems, riddles that allow children to remember the main features of domestic birds (external, lifestyle). |
|
| Cartoon based on the story by K. Ushinsky “Cockerel with his family” for inventing the plot of the composition | Since Ushinsky’s story is studied in the second junior group, in the preparatory group the children repeat the plot and come up with situations where Cockerel could still reconcile all members of his family. For example, when all the chickens began to offend one, the smallest one. |
| Surprise moments for uniting guys in a common cause | Cockerel comes to visit the children and tells how he went for a walk with his family to the pond, but was so enchanted by his reflection in the water that he fell behind the hen and her chicks. And now he asks the children to help him return home by sculpting the composition “Cockerel with his family.” |
| Games |
|
To find differences you need to select bright and memorable images
Video: cartoon based on the story by K. Ushinsky “Cockerel with his family”
When is the best time to give a surprise?
A family tree would make a great wedding gift.
A young couple will certainly want to plunge into the history of their family. An idea for such a surprise could be two woven trees: one will show relatives on the husband’s side, the other on the wife’s side. Newlyweds can be presented with a family tree in the form of a gift album, in which they can place photographs of their children and grandchildren. Such a gift is passed down from generation to generation, supplemented with new information.
Giving a family tree as an anniversary gift to your grandmother is a great idea. Grandma will be happy to look at a collage of photographs of her relatives.
It’s safe to say that you can’t go wrong with such a souvenir. Grandma will certainly tell interesting stories from the past that will appeal to all guests.
Drawing up notes for a sculpting lesson “Cockerel with his family”
The modeling lesson includes three stages of working on the topic:
- introductory, motivating children to work - up to 5 minutes;
- the main one, which includes determining the scheme for completing the craft, the modeling itself, physical education and/or finger gymnastics - up to 20 minutes;
- final, that is, the assessment of the children’s activities by the teacher and reflection - up to 5 minutes.
The purpose of the lesson is specified by the type and technique of creating the craft, for example, creating a plot composition using a constructive technique based on the content of the story by K. Ushinsky “Cockerel with his family.”
The formulation of the tasks implies techniques that will be practiced in the lesson:
- teach children to create, through collective efforts, a simple scene from sculpted figures;
- achieve greater accuracy in conveying the basic shape and characteristic details;
- develop the ability to collectively think about the placement of birds on a stand.
Table: Churakova O.A. Summary of the lesson on collective modeling “Cockerel with his family” based on the story by K. D. Ushinsky in the preparatory group
| Stage | Content |
| Introductory | Educator: - Guys, look at the pictures. Who is depicted there? Children: - Hen, chickens, rooster Educator: - Yes, let's remember what story we recently read, where these heroes are present? Children: - Cockerel with his family Educator: - Well done. Let's remember in more detail what happened in this story by watching the cartoon. (watching a cartoon, talking) Educator: - The chickens ran away, and the rooster and hen went to look for them. Come on, we, too, will go with the cockerel. |
| Basic | Physical education (In accordance with the text, children take steps in place, holding their hands behind their backs. Then they make circular movements with their hands, squat, shake their fingers, bend forward). |
| Children sit down. Teacher: - Guys, we have already been divided into groups, let’s remember who will sculpt what and start sculpting. Children with a teacher look at a model sculpted by the teacher. The teacher pays attention to the color and shape: the body is a big ball, the head is a small ball, the beak (small, sharp). | |
| Educator: - I take a small piece of plasticine and what do I do? I roll out the ball. This will be the chicken's head. Then I take a large piece of plasticine and also roll out the ball. This will be the body of the bird. Now we fasten the two balls by pressing them against each other. And now we make a beak, pinch it with two fingers. | |
| Finger gymnastics: Our cockerel suddenly woke up and turned straight to the sun. Crowed once, twice, three times! Don't oversleep today. | |
| Doing work by children. Individual assistance for children. | |
| Final | Placing finished works on a stand, examining and evaluating children's works. |
| Quote from: https://www.maam.ru/detskijsad/konspekt-nod-lepka-petushok-s-semei-po-raskazu-kd-ushinskogo-kolektivnaja-kompozicija.html | |