Skills Required for Drawing Animals in Intermediate Group
Before starting a drawing lesson, you need to take into account the skills that, according to the Federal State Educational Standard, are practiced by children 4–5 years old in this type of creativity:
- precision of brush strokes when painting, in particular, children learn to make thin strokes with the tip of a brush to draw the face, paws, tail - and intensive ones with the application of the entire pile to fill the color of the animal’s body;
Children of the middle group practice the skill of uniformly painting elements of a composition
- uniform hatching directions - from left to right, from bottom to top - with adjustment of the stroke span depending on the area of the surface being painted;
- varying the size of the strokes by changing the position of the pencil or brush, so if you tilt it closer to the paper, you will get wider lines, but placing the pencil almost vertically will help make small elements.
Materials for drawing in the middle group
The materials that children will work with play a decisive role in preparing a drawing lesson.
What to draw on
As in the previous year, the optimal basis for the drawing is a sheet of A4 paper. For painting with paints, it is better to take watercolor sheets: they are denser, so even if the child heavily wets the brush, the image will not “float.” To depict an animal the size of the entire sheet, you can use thin cardboard.
Unlike the second younger group, even for small pencil pictures you should not use a smaller sheet format: firstly, children practice harmoniously arranging the composition on the base, and secondly, the kids’ muscles are already developed enough so as not to get tired when performing monotonous pencil movements for drawing large elements.
If the drawing involves individual work, then the sheet should not be larger than A4 format, otherwise it will be inconvenient for the child to work
How to draw
To make images of animals more expressive, children use gouache. In the middle group, the guys try to mix colors themselves (!) to obtain shades, for example, red and yellow, to get the orange of the required intensity to depict a squirrel or fox. The number of basic colors for drawing one composition expands to 6.
Gouache still remains the most favorite material for fine art.
Squirrel brushes Nos. 10–14 are used, including those with medium-length handles for making thin strokes to show the texture of the animal’s fur.
In the middle group, children switch to drawing with pencils of standard thickness. The number of colors increases to 12. At 4–5 years old, children combine pencils and wax crayons in their drawings.
What materials to supplement a drawing on the theme of animals?
Animalistic themes open up wide opportunities for including elements of other types of artistic activities into the composition. For example, when depicting cows in a meadow, children make an applique of grass: a strip of green paper is folded several times, cuts are made, unfolded and glued, leaving the “fringe” free - the composition acquires volume.
Applique motifs can be used to decorate designs: a paper bow for a cat, apples for a hedgehog, etc.
In addition to appliqué, plasticineography can be used in animal-themed drawings. For example, make a sun from plasticine twisted into a rope, and also add plasticine eyes and a nose to the image of the animal. Drawings in which parts made of plastic material alternate with drawn ones look original. For example, some of the hedgehog’s needles are drawn with pencils or wax crayons, and some are made with thin plasticine flagella.
Typically, to combine drawing and plasticine, templates with an image of an animal are used, which children paint and then complete with plasticine parts.
How to personalize a task
Individualization in drawing is based on the child’s level of proficiency in this type of artistic activity, as well as on the characteristics of the development of thinking and memory processes. So, if a child, due to underdeveloped motor skills of his fingers, is unable to make thin strokes with the tip of a brush, then during independent work hours in the afternoon he should be given an additional task to practice this technique. For example, add thin needles to the hedgehog on the template. In addition, to develop motor skills, you need to be given tasks to sort small objects, for example, buttons by color, size, or string beads on a thread.
For those guys who complete tasks quickly and efficiently, individualization consists of choosing additional tasks. For example, make eyes for a drawn fox out of plasticine or snow out of cotton wool around a bear’s den, etc.
Drawing can be one of the options for organizing independent activities for children
Drawing techniques in the middle group
At 4–5 years old, children practice both traditional and non-traditional drawing techniques.
Traditional painting techniques
As for classical techniques, in the middle group they are presented:
- drawing with a simple pencil - most often to indicate the contours of the image;
- drawing with colored pencils - children color the elements of the composition, trying to act exactly within the boundaries of the contours, while the direction of the strokes in the image of individual details does not change;
- drawing with wax crayons to obtain a rich color scheme of the picture;
- drawing with felt-tip pens - to practice coloring without going beyond the boundaries of the outline;
- drawing with gouache - not only for coloring pencil templates, but also for drawing the contours of animal images with paints;
- painting with watercolors - in particular, children practice multi-layered images, that is, they draw an element, let it dry, and then detail it with a different color (for example, they paint the body of a squirrel orange, and then draw the abdomen with yellow).
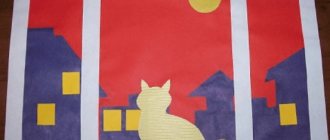
Photo gallery: examples of finished works in traditional techniques
In the drawing of a squirrel, children detail the face without first drawing contours
The drawing of the kids is done without a pencil outline; children show the boundaries of the image with lines made with a thin brush. In the middle group, drawings of animals in various poses are made from life
To depict the texture of a cat's fur, children sketch with small zigzag lines.
Felt-tip pens can be used to create drawings using non-traditional techniques, but they are rarely used in classical techniques, since they do not provide an opportunity for children to practice pressure force, as when working with pencils
Non-traditional drawing techniques in the middle group
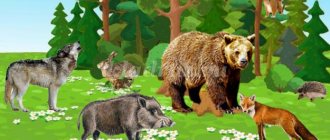
In the middle group, drawings are practiced to depict wild and domestic animals using non-traditional techniques:
- with their palms, for example, when introducing the topic “Exotic Animals”, children draw a giraffe;
- poking with a semi-dry brush to depict animal fur;
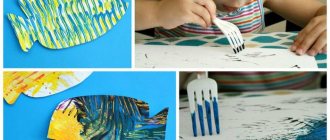
- a fork for detailing needles or conveying the hard texture of an animal’s skin;
- an imprint with a crumpled piece of paper, for example, to show the volume of a bear cub’s fur.
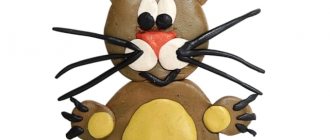
Photo gallery: examples of drawings in non-traditional techniques
The texture of a hedgehog's spines can be shown by the imprint of a fork.
The stiffer and thinner the brush, the fluffier the kitten will be.
Children use a handprint to make the body, legs and tail of a giraffe, and paint the head with a brush.
The bear's face is detailed after the body is drawn with a poke of a brush.
In the middle group, the repetition of the drawing technique mastered last year by poking with a cotton swab is carried out by painting the goat template
Unconventional technique of drawing animals
NON-TRADITIONAL TECHNIQUES FOR DRAWING ANIMALS
PREPARED BY:
TEACHER OF SUROOK KINDERGARTEN “SOLNYSHKO”
GRIGORYEVA T. A.
2019
The use of visual activities of the animal world in the process of teaching children confirms the need to instill a love for animals from childhood, to draw the child’s attention to the beauty of the animal, to its benefits, to maternal care for the cubs, to the feeling of affection with which it responds to any kind attitude. Introducing preschool children to the animal genre allows them to solve both cognitive (the appearance, habits and behavior of animals, their character) and educational tasks (love and an attentive, sensitive attitude to the animal world, the desire to protect and preserve nature).
Drawing animals is a very interesting and at the same time complex process. Using only traditional techniques when depicting animals does not allow children to develop their creative abilities more widely. They do not contribute to the development of imagination and fantasy. Drawing with unusual materials and original techniques allows children to experience unforgettable positive emotions. The result is usually very effective and almost does not depend on skill and ability. Non-traditional methods of depiction are quite simple in technology and resemble a game. What child wouldn’t be interested in finger painting, making a drawing with his own palm, putting blots on paper and getting a funny picture? .
FINGER PAINTING
Material:
Tinted or white paper, gouache paints, brushes (for additional elements), rags
(
for wiping hands
)
.
Progress:
The kid dips his finger into the gouache and puts dots and spots on the paper.
PALM DRAWING
Material:
Tinted or white paper, gouache paints, brushes (for additional elements), rags
(
for wiping hands
)
.
Progress:
We dip the child's palm in paint and make an imprint on the paper. You can “paint” your palm in different colors with a brush. To develop imagination in older preschool age, you can invite children to print a palm, then carefully examine the drawing and think about what it looks like, how the drawing can be transformed, changed by adding the missing details. And create a new image.
PALM DRAWING
DRAWING WITH THE “POKE” METHOD
Material:
A lead pencil with an eraser at the end, a white bristle brush, a felt-tip pen tube with inserted foam, white paper, a plate, gouache.
Progress:
Gouache is poured into plates. Then, using the manufactured “poke”, paint is applied to the image, first along the contour, then the internal image. Using a bristle dry brush, you can use a poke to paint animal fur. The variety of images depends on the chosen material for the poke.
POINTILLISM
Pointillism
- a very interesting and unusual direction of painting in the form of a manner of painting pictures with separate strokes of a regular, dotted or rectangular shape.
Material:
cotton swabs, felt-tip pens, gouache, stencils.
Progress:
We take felt-tip pens of the required colors and begin to fill the entire drawing with “bubbles” (circles).
We take a cotton swab, first dip it in water, then in gouache and use the “poke” method to fill the entire drawing with the corresponding colors.
PAMPING
Material:
foam rubber, liquid gouache paints, plate.
Progress:
The ink pad serves as a palette. To change the color, you need to take a different foam. Using this technique, it’s good to draw something fluffy, light, airy, and transparent.
DRAWING WITH A CANDLE
Material:
Candle, paper, brush, paints.
Progress:
Place the drawn outline drawing under a thin landscape sheet. Trace the outline with a candle on top, then apply paint.
DRAWING WITH WAX CRAYONS
Material:
wax crayons, paints, paper
Progress:
First you need to draw a “wax” picture, and then paint over it with watercolor paint. The watercolor rolls off the thick brushstroke of the pastel and remains only on a blank sheet of paper. The emerging pattern is very bright, all the strokes and lines are visible.
SPRAY
Material:
old toothbrushes, gouache, paper, silhouettes.
Progress:
A little paint is collected on the tip of the brush. Tilt the brush over a sheet of paper and run the cardboard or comb over the pile. The splashes will scatter across the clean sheet. You can also cut out any silhouette and place it on a piece of paper and spray paint. Then remove the silhouette and you will be left with a trace; you can supplement it by painting on the missing lines with a brush.
SPRAY
DRAWING ON CRUMPSED PAPER
Material:
paper, gouache, brushes, a jar of water, pencil.
Progress.
Crumple a clean sheet of paper with your hands and smooth it out. Draw the intended drawing. This technique is interesting because in the places where the paper is folded, the paint becomes more intense and darker when painted (mosaic effect).
DRAWING WITH CRUMPLED PAPER
Material:
paper, a piece of paper, gouache, a plate, a jar of water.
Progress:
crumple a piece of paper, dip it into a plate with gouache, then apply the drawing using the dip, complete the missing details of the drawing.
DRAWING WITH PLASTICINE
Material:
thick paper or cardboard, plasticine, modeling board, pencil.
Progress.
Draw an outline on a thick sheet of paper or cardboard with a pencil. We roll out a long rope of plasticine of a certain color, twist it in a circle, transfer it to cardboard, and press it lightly.
DRAWING WITH PLASTICINE
DRAWING ON SALT PAPER
Material:
paper with a pattern, salt, PVA glue, brushes, gouache paints, water, napkin.
Progress:
Stage 1: drawing the base with PVA glue and adding salt, leaving it to dry completely until the next lesson.
Stage 2: painting salted paper with gouache paints, choosing colors as you wish
DRAWING ON SEMOLANA
Material:
paper with a pattern, semolina, PVA glue, brushes, gouache paints, water, napkin.
Progress:
Stage 1: glue semolina onto the base with glue and leave to dry completely until the next lesson.
Stage 2: paint the base filled with semolina with gouache paints, choosing colors as you wish.
The use of unconventional techniques when teaching children to draw animals contributes to the development of fine motor skills and tactile perception; spatial orientation on a sheet of paper, eye and visual perception; attention and perseverance; visual skills and abilities, observation, aesthetic perception, emotional responsiveness. In addition, in the process of this activity, the preschooler develops control and self-control skills.
THANK YOU
FOR YOUR ATTENTION!
Forms of organizing drawing on an animalistic theme in the middle group
In long-term planning for visual activities for the middle group, the animalistic theme is presented in close connection with modeling. So, in the second semester, children sculpt a baby goat and then draw it. The same procedure applies to the “Homeless Hare” theme.
In addition, the work plan includes drawing on the following topics:
- “Bear” - can be in the form of a drawing of a character from your favorite cartoon “Masha and the Bear”;
- “Teddy Bear” - drawing from life (using a toy as a model);
- “Three Bears” - creating illustrations for a fairy tale;
- “Hedgehog” - based on the fairy tale by V. Suteev “The Magic Wand”;
- “Squirrel”, “Fox” - drawing according to plan (children remember the characteristic features of the animal’s appearance and depict it from memory);
- “Squirrel with a mushroom” - plot composition;
- “Cheerful Puppy” - based on S. Mikhalkov’s poem “My Puppy”;
- “Dog in a booth” - plot drawing;
- “Sister Fox and the Gray Wolf” - based on a Russian fairy tale;
- “The Three Little Pigs” - illustration for a fairy tale;
- “Wolf” - drawing characters from the fairy tale about Little Red Riding Hood;
- “Giraffe”, “Porcupine” - consolidation of material on familiarization with the environment on the topic “Exotic animals”.
In addition to individual work, the teacher can organize group drawing. Children are divided into groups of 4-5 people, each receives the task of depicting one animal, for example, a cow for the composition “Farm” or “Summer in the Country” on a silhouette of an animal cut out by an adult. After the teacher explains the algorithm of work, the children color the template and glue it onto an A3 size substrate. The teacher controls the correct arrangement of the elements. Children who have good drawing skills complete the elements of the environment: a fence, lawn, houses, etc. Alternatively, kids can draw animals as illustrations. For example, to the fairy tale “Wintermovie”.
Photo gallery: examples of collective work
Collective compositions can be created using non-traditional techniques, for example, drawing elephants and giraffes with palms
An option for designing a collective composition with polar bears could be tracing the contours and coloring the templates with semolina
An option for collective drawing could be a composition template with exotic animals, which children color
How to motivate middle school students to work
For middle preschool age, drawing is a rather complex activity that requires concentration and attention - you need to tune in to it. Therefore, the teacher’s task is to choose the best option for motivating children, which would be suitable for the topic and would be accessible and interesting to children.
| Reception of motivation | The essence | Examples |
| Pictures, videos | They are used in life drawing classes - children see what the animal looks like and have the opportunity to look at it from different angles. | |
| Fairy tales | Children listen to a fairy tale or remember an already familiar plot, look at the pictures, and then draw their own illustrations based on them. |
|
| Cartoons | The creation of a drawing can be based on the plots of animated films. | To depict a polar bear, children review excerpts from the cartoon “Umka” |
| Surprise moment | A character comes to visit the group and presents a task. |
|
| Poems | Rhyming lines attract the children's attention and focus them on one type of activity. |
|
| Puzzles |
| |
| Music | Helps create the right atmosphere. | Paul Mauriat “In the World of Animals”, C. Saint-Saens “Carnival of the Animals”, etc. |
| Physical education minute | Used to change activities, carried out in the middle of a lesson, usually before drawing. |
|
One of the motivation techniques is the mandatory presence of pictures of animals.
Summary of the drawing lesson “Helping the Hedgehog”
Summary of the drawing lesson “Helping the Hedgehog”
(middle group)
Target:
Teach children to name the signs of autumn, changes in the weather, and use figurative words and expressions for autumn;
learn to compare the essential features of phenomena. Expand children's horizons about natural changes in autumn and the life of wild animals. Develop children's speech, memory, thinking, imagination. Evoke positive emotions in children. To cultivate attention, love of nature, caring attitude towards animals, birds, positive character traits. Materials and equipment:
Paintings depicting autumn, wild animals, autumn leaves, cut out silhouettes of hedgehogs, felt-tip pens.
Methodical techniques:
observation; conversations; viewing illustrations and paintings; learning poems and songs.
Preliminary work:
conversation about autumn, about forest animals; drawing on the theme “Autumn has come”; learning poems about autumn; reading works of fiction on the theme “Autumn”.
Progress of the lesson
- Psycho-gymnastics “It’s time to get up”
Educator:
The sun has risen in the morning! It's time for you to wake up.
Is everyone awake? Stretch, smile.
Hello!
Children:
Hello!
Educator:
Now say hello to our guests.
Children:
Hello! Salemetsiz be!
- Organizing time.
Educator:
Now let's get started. Are you ready for it?
Children
(in chorus):
Every day - always, everywhere,
In class, in play
We speak loudly and clearly
And we sit quietly.
III . Conversation about autumn, about wild animals.
Educator
:
reads the poem
Tired sun, you warm sparingly.
Yellow and scarlet leaves are spinning. Our autumn garden is rustling and rustling. There are colorful heaps on the paths. - Children, who can say, who knows when this happens? Children
: Autumn!
Educator
: Look carefully at the picture, what is depicted on it?
Children:
The painting shows a forest. This is an autumn forest.
Educator:
Take a close look at the autumn forest.
How many trees and plants are there? What trees grow in the forest? What kind of leaves are on the trees? (yellow, red, orange) What happens to the leaves in the fall? (they turn yellow and fall off)
What is this phenomenon called?
(leaf fall)
What kind of sky is there in autumn?
( it’s gray, covered with clouds)
What kind of sun is there in the fall?
(it warms weakly, the light is dim, it often hides behind the clouds.)
What happens to the grass?
(the grass withers, dries, turns yellow, dies, disappears)
Educator:
Who lives in the forest?
Children: Wild animals live in the forest.
Educator: Why are they called wild? Children:
Wild animals take care of themselves: they make their own housing, find their own food.
Educator:
How do wild animals prepare for winter?
Children:
Wild animals are preparing for winter; they change their summer coats to winter ones, which are warmer and fluffier. Some animals hibernate until spring. The rest of the animals prepare supplies for themselves for the winter, so that during the winter cold they have something to eat.
Educator:
Today we will visit one of the inhabitants of the forest. Who will you find out from when you listen to the poem?
I met a hedgehog. He carried the mushrooms on his back.
-Good afternoon, prickly hedgehog! How far do you live?
The hedgehog's eyes sparkled and quickly turned into the bushes.
He rustled the dry leaves, inviting him into his house.
Who is this poem about?
Children:
About the hedgehog
Educator:
The hedgehog was very busy, so he didn’t even talk. Why?
Children:
He has no time. Winter is coming, and he needs to stock up.
Educator:
What was the hedgehog carrying on his back?
Children:
Mushrooms.
- Report the topic of the lesson.
Educator:
Today we will help the hedgehog make provisions for the winter. What else, besides mushrooms, does a hedgehog store?
Children:
Berries, apples.
Educator:
Today we will draw, or rather, complete the picture we heard.
I will give you sheets of paper on which the silhouette of a hedgehog has already been drawn, and you will draw the sharp needles and mushrooms that he carries on his back. Children look at the picture.
But first we'll take a little rest.
- Fizminutka
The hedgehog stomped along the path (they walk in place)
And he carried a mushroom on his back. (hands behind your back, leaning forward slightly)
And a bunny is jumping towards you - (palms above your head)
Long-eared jumper. (jumping in place)
In someone's garden cleverly
I got hold of a slanted carrot. (sit down).
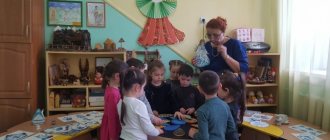
- Independent work of children + individual assistance from a teacher.
Children draw, and the teacher prompts and helps individual children.
- Demonstration of children's works.
Educator:
look how many hedgehogs we made! And how many reserves they will make for themselves for the winter!
- Summary of the lesson.
Educator:
What did you do in class today?
Name the wild animals that store food for the winter. (As the children answer, the teacher hangs up pictures of wild animals).
Why do animals store supplies?
Well done! Our lesson has come to an end. Let's say goodbye to our guests.
Children:
Goodbye!
Development of notes for a drawing lesson in the middle group
The drawing lesson includes three stages of working on the topic:
- introductory - up to 3 minutes - the teacher motivates the children to work, that is, updates their knowledge on the topic;
- main - up to 12 minutes - the teacher describes the procedure for completing the task, the children draw, to relieve muscle tension in the middle of the creative process, finger exercises and/or physical education are performed;
- final - up to 3 minutes - the teacher organizes a spontaneous exhibition of works, praises the kids for their drawings, children evaluate their works according to the “like/dislike” criterion and try to say why.
Table: Antonova M.V. Summary of a drawing lesson on the topic “Kitten” in the middle group
| Stage | Content |
| Introductory | Educator: - Guys, a guest came to us today, he asked not to name him. He wants to play the game “Recognize by Voice” with you. Let's try to recognize our guest? I turn on a recording of the cat's voice. A cat appears. Educator: (on behalf of the cat) - Hello, guys! Let's introduce ourselves, my name is Dymok. (Children say their names.) Teacher: (on behalf of the cat) - I came to you today for a reason. I want to ask you for help. My cat friends have a birthday soon. I wanted to please them, to draw them holiday cards with my friends on them. But I have many friends, but little time. Maybe you guys can help me? Educator: - What, guys, should we help Dymka? (Yes, we will help.) Educator: (on behalf of the cat) - Thank you very much for not refusing my request. Educator: - Smokey, but we don’t know what your friends look like. Educator: (on behalf of the cat) - I have photographs of them. Look! I place pictures of cats with different colored fur on the easel. Children look at the “photos”. |
| Basic | Educator: - Guys, go to the tables and choose pictures with pictures of kittens. Children sit at tables and choose coloring pictures. |
| Educator: - Guys, so that the fur of our kittens is fluffy, we will paint with a glue brush. Touch it, what does it feel like? (Hard, solid, rough) Educator: - Guys, look at how we will draw the kittens’ fur. We hold the brush correctly, the handle of the brush should be directed upward, the movements should be jerky. First, we use a poke to draw the shape of the cat along the contour, then, using a poke, we paint over the entire body of the cat. We put a little paint on the brush. When the cat is painted with a soft brush, you can complete the postcard as you wish. It could be: the sun, grass, flowers, sky, butterfly. Do you guys all understand how to draw? Then start drawing. Children draw, the teacher controls the drawing process, helps children in need. | |
| Final | Educator: - Guys, Dymka liked all your cards. And as a farewell, he wants to play the game “Cat and Mice” with you: Children stand in a circle, holding hands. The teacher sits on a chair in the center of the circle with a cat toy. Children walk in a circle and say words. The mice are dancing in a circle, The cat is dozing on the bed - Quiet the mouse, don’t make noise, Don’t wake Vaska the cat! When Vaska the cat wakes up, he will break up the whole round dance! The cat catches up with the children, the children run away to the chairs. |
| Quote from: https://ped-kopilka.ru/blogs/marija-vasilevna-antonova/konspekt-nod-po-risovaniyu-v-srednei-grupe-kotenok.html | |
Video: open lesson on drawing with a poke on the theme “Bear” in the middle group
Abstract of OOD on drawing in the middle group “Animals of the Magic Forest”
Summary of OOD on drawing in the middle group
"Animals of the Magic Forest"
Tasks:
— Expand your understanding of the animal world; — Learn to depict animals by tracing ready-made templates of various geometric shapes; — Develop coordination of movements, fine motor skills of the hands; — Cultivate the desire to be successful and win; — Ability to solve riddles; - Happy to help someone; - Enjoy your work.
Preliminary work
: conversation about domestic and wild animals, naming and showing their body parts.
Material for
activities: landscape sheet, a set of geometric shapes of different sizes (templates, a set of colored pencils, cut-out pictures of animals for the game
(4-piece puzzles)
.
Move
The teacher and children stand in a circle. Vl: Children, let's say hello to the guests. – Good morning to you, good morning to us, good morning to all friends!
V-l: Guys, name what animals you know. (Children's answers)
.
– What two groups of animals can we divide them into? (Wild and domestic)
. - Well done!
Finger gymnastics
- This finger is a big elephant - This is a young bear - This is a little fox - This is a beautiful squirrel - And this little finger is our little bunny friend!
Now, listen to my riddles and guess:
1. In the summer he wanders without a road between the pines and birches, and in the winter he sleeps in a den and hides his nose from the frost (a bear)
2. What kind of forest animal is this that stands like a column under the pine tree? and stands among the grass - ears larger than head (hare)
3. The neighbors know everything about her, because they live in the same forest. Wolves and bears know about the liar (fox)
4. Gray, scary and toothy, caused a commotion, all the animals ran away, scared those animals (wolf)
-Guys, which of you wants to make your own riddle about animals? Please!
“A bear, a squirrel, a wolf, a hare - in one word, all of these are ANIMALS! (in unison)
Surprise moment
A balloon with a letter flies in. - Oh, guys, we have a letter. Let's read. “Dear guys, the mistress of a magical, fairy-tale forest is writing to you. We're in trouble! An evil witch flew in and bewitched all the animals in my forest. They became motionless and if you draw animals, they will come to life again. Help me please!" V-l: Well, guys, can we help? Certainly! "Friend is known in trouble"
. After all, you and I are friends of the forest.
V-l: And now let's get to work.
Finger gymnastics
- The animals walked through the forest
(fingers walk on the table)
- They plucked fresh grass
(they pinch on the table)
- They jumped, frolicked and everyone had fun together.
(they jump with their fingers on the table)
-Suddenly, the witch galloped up
(hands in the castle, jumps on the table)
-She bewitched all the animals
(spread their hands)
-To disenchant them, you need to draw them!
Educator: Guys, you all know the body parts of animals. Independent work of children. Individual assistance, advice. The teacher also draws his animal. He also wants to help disenchant all the animals of the magical forest. We hang the finished drawings on the board and examine them. Children talk about their animal, as it is called, its body part. Call the teacher's phone. Educator: Hello! Are you the mistress of the forest? Hooray! She says that all the animals of the forest have come to life, thanks you. Well done guys, you did a very good job!
Technological maps for the execution of drawings
When depicting animals, it is very important to clearly formulate for children the order in which the contours of the drawing should be completed.
Table: description of the procedure for working on animalistic topics for the middle group
| Subject | Operating procedure |
| "Bunny" |
|
| "Hedgehog" |
|
| "Little Bear" |
|
| "Giraffe" |
|
| "Squirrel" |
|
| "Wolf" |
|
| "Kid" |
|
Photo gallery: animal drawing schemes
The drawing of a kid can be supplemented with applicative elements: a sun made of plasticine, grass made of colored paper
When drawing hedgehog needles, it is important to draw children’s attention to the unidirectionality of the “layers” of needles
In the drawing of a squirrel, children complete some elements from memory, for example, the shape of the ears, claws
To make the color of a giraffe richer, you can use wax crayons of suitable colors. To color a polar bear, you can use semolina, and a brown bear, buckwheat.
The hare drawing is based on three geometric shapes: two ovals and a circle
To learn how to convey the elegance of the curves of a wolf’s body, children need to repeat the contours of a finished drawing several times, that is, trace a stencil with a pencil
Video: master class on drawing a cat
Video: master class on drawing a hedgehog
Plan - summary of the drawing lesson “Drawing wild animals”. Sketch
Lesson topic: “Drawing wild animals”, sketch
Target:
Learn to draw images of animals, make sketches that capture the characteristic pose of the animal.
Tasks :
Subject:
Acquaintance with the works of animal artists, the concepts of “animalist”, “animalistic genre”
Metasubject:
Learn to extract the necessary information that expands your understanding of drawing techniques;
find a solution to a creative problem.
Personal:
Cultivating interest in the subject, a sensitive and caring attitude towards animals.
Equipment:
projector
Materials:
albums, pencils, erasers
Visual range:
drawings of animals, birds and insects, methodological tables (sequence of drawing, color design of the work).
DURING THE CLASSES
1. Organizational moment.
- Hello!
We look at the table. Today we need a sketchbook for class. Don't forget about a pencil and eraser.
There are so many beautiful and interesting things in our world. Explored and unidentified. Hundreds of thousands of animals, insects, birds, and fish, known and unknown to humans, live on our planet.
And today we continue to get acquainted with .... (animal world).
But not just animals, but a certain group. These are wild animals and birds.
But first, let’s remember what happened in the last lesson (who was the first to depict animals, animal artists, who are they).
- Today in class we will not only learn how to draw wild animals and birds, but also convey in the drawing the features of their character.
2. Work on the topic of the lesson.
— There are many wild animals and birds in the world. If we list them all, we will not have enough of this activity. They are all beautiful and interesting in their own way. Is it difficult to choose which animal or bird to depict?
I have a small task for you, look at the animals that I show and explain the pattern.
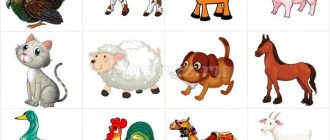
- What groups can they be divided into? — Wild animals, pets and insects. — We will find pets among our guests. - Horse, pig, cow. - Let's name the insects. — A wasp, a butterfly and a mosquito. (The teacher hangs them separately)
— Among insects, butterflies are especially beautiful. They are called fresh flowers. Children love to catch them because of their beauty. This cannot be done, because butterflies are very delicate; from our touch they are injured and die. We need to remember this and not offend butterflies.
- Now let’s name wild animals and birds. — Fox, wolf and crow. (The teacher hangs them up separately) - Guys, do you remember the topic of our lesson. Who will remind you? — We draw wild animals and birds. - Right. So, there are extra groups here, this is....? Who will name them? — The extra groups are insects and domestic animals. - Right. We leave drawings of wild animals on the board and remove unnecessary ones. (The teacher removes drawings of insects and domestic animals)
-We have two tables. So let us divide into two groups, and each of us will draw our own animal.
— Our first table draws a fox, the second table draws a crow. (The teacher pins the corresponding drawings on the board in front of the group, which animal they will draw.)
— Every animal or bird is different in some way from the others. Let's describe them using adjectives. Who among us knows more about their animal or bird?
- Let's look at them carefully. If we generalize the entire shape of the beast, we can roughly see a geometric figure. Using this figure we will draw the animal.
So, the fox is an oval and a circle. The crow is also an oval and a circle.
But before we get started, let’s remember about preparing the album sheet for drawing. Who will remind you? Please.
— Before we start drawing, look at the drawing. If the height of the drawing is greater than the length, then we place the landscape sheet vertically; if the width of the picture is greater than the length, then we place the landscape sheet horizontally. And then we find the middle of the sheet and mark it.
— We all open the albums and prepare them for work. (The guys prepare the album sheets for drawing.)
- Now let's rest a little. They stood up quietly.
A minute of rest
They sat down, stood up, sat down, stood up. Like crows we flew, We ran like wolves, Like a fox we sat down quietly,
And they looked at the leaves.
— Today in class we are learning to draw a sketch of a fox and a crow. We will need the ability to draw these animals in the next lesson when depicting a wolf and an eagle.
3. Independent work of students.
— Each group draws its own animal. At home you will try to draw other wild animals in the same way, so listen to all my explanations carefully.
In the middle of the album sheet we place an oval and, without pressing the pencil, draw an oval with light lines. This will be the torso. Those who draw a fox and a crow place and trace a circle on the right side. This is the head. Then everyone draws lines according to the diagram for drawing their animals.
After completing the drawing, remove the extra lines. If there are no questions, let's get to work. Table 1
4. Shutdown.
5. Lesson summary.
At the end of the lesson, a child from each group shows their drawings. Works are assessed both by the teacher and the students themselves.
Well done boys! You all did a great job today. Do you think geometric shapes helped you when drawing animals and birds? Do you remember who the animal artists are?