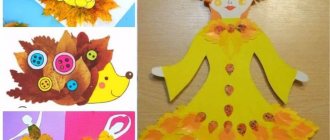
Each child is unique, you just need to find your own approach to him. Creating applications with your child can be an interesting and entertaining activity. Such creativity not only makes you fantasize, but also promotes the development of fine motor skills, which is important for the mental development of the baby.
Also, during the lesson on appliqué, perseverance and accuracy are developed. By creating “Vegetables” applications from paper with your baby, you open up a huge world of fantasy and creative thinking for him.
If you choose the right materials and take into account the child’s age, you can create original crafts for each age group of the kindergarten. When making crafts, it is important to consider the age of the child and the materials from which you will create your work of art.
Materials and tools needed for work
- Colored paper single-sided and double-sided
- Glue stick
- Scissors must have blunt ends
- White paper
- White and colored cardboard for the base
- Ruler
- Simple pencil
- Markers or felt-tip pens
Straw applique
This material is very durable and beautiful. It's interesting to work with him. Every craft and composition turns out beautiful.
Before starting to work with this type, soak the straws in hot water. After this, it will become stronger, more elastic, and will bend well. The cereal tubes are carefully cut lengthwise into flat strips. Smooth out each piece on all sides with a blunt object. When the straw dries, dry it by ironing it with scissors from the front side. Next, we apply a drawing of the future masterpiece to the base. We try to glue the tapes to each other without gaps, creating our own splendor. The completed work is ironed with a hot iron and put away under the load.
Vegetable applications for kindergarten
The applique involves cutting out and gluing vegetable shapes from paper onto a base. Carrying out activities with children can be done in different ways:
- simple sticking of shapes
- gluing the figure to the middle of the part
- production of volumetric applique
- using different techniques.
Application "Vegetables" for kids
Before starting classes, interest your child in work in a playful way. You can use poems, riddles, songs, fairy tales. The child should be interested, then he will be happy with the result.
Sharp objects should not be used with small children, so scissors will not be useful for them. When creating an applique, you can use two technologies for making crafts:
- use ready-made templates that parents or teachers cut out for children themselves
- Use the technique of tearing paper or crumpled paper to create a three-dimensional craft.
The main thing when creating crafts with young children is to teach them how to correctly place objects on a sheet, to introduce the children to the colors and shapes of vegetables.
The guys should know that vegetables grow on the ground. Tell them about their color and size: round red tomato, oval green cucumber, yellow round onion, orange triangular carrot, etc.
Tomatoes and cucumbers grow in the garden bed, onions, beets, carrots grow in the middle of the bed, potatoes in the ground. At the end of the lesson, be sure to praise the guys for their work.
You can make a stand of crafts for children in the younger group so that children and parents can see their creativity.
Application “Vegetables in a jar” for the middle group
For children of the fourth year of life, scissors are introduced to work. Before starting, it is imperative to have a conversation on safety precautions when working with sharp objects. Show children how to hold scissors correctly and how to use them.
The outcome of correct, safe and accurate work depends on this. This exercise will help you avoid injuries. Organize a comfortable workplace for them: cover the table with oilcloth, remove unnecessary items from the table, prepare a sufficient amount of paper.
It will be interesting to make the “Vegetables in a Jar” applique with children. For this you can use various materials:
- jar or any other transparent container,
- a can shape cut out of cardboard.
As you work, you need to decide what you want to do with your child. Children at home often see canned vegetables: tomatoes, cucumbers, peppers, carrots, cabbage, etc. They master the shape of an object, color and size.
To make their work easier, children are given preparations of future vegetables in the form of a square, rectangle, or triangle. You can make a voluminous application of vegetables. So, for example, on a cut out orange triangle - the base of a carrot - stick orange strips, crumpled by hand and slightly smoothed.
Stripes will give the voluminous vegetable appliqué an interesting look. The top of the work is decorated with a fringe of green paper. To do this, cut out a trapezoid from paper and make cuts from top to bottom, slightly short of cutting the part to the end. It turns out carrot tops.
By combining both parts of the carrot, a voluminous vegetable applique is obtained. Add a tomato to the composition, attaching a green sprig to the red circle; cucumber, drawing thorns on it.
Cabbage can be made by gluing several green circles at the bottom edge onto the stalk base and drawing veins on the leaves with a pencil. Other vegetables for work can be prepared using similar methods.
To complete the work, children place their applications in a glass jar or glue them onto a cardboard imitation jar. You can make a craft “Vegetables in a pan”, while complicating the task for children. For example, advise making and placing vegetables in a pan for borscht, vinaigrette or salad.
This task will contribute to the all-round development of the baby. With children in the middle group, you can make a vegetable bed by placing the vegetables correctly. This can be either individual or group lessons for children.
Application “Vegetables” in the senior group
By cutting out vegetable blanks for their crafts in the older group, the child masters the technology of cutting out paper folded in half. Objects cut out in this way turn out to be symmetrical and neat in appliqué.
For work in the older group, you can use mosaic or cutting techniques for working with paper. The child draws with a pencil the vegetable he wants to make and pastes squares of torn colored paper onto his drawing. You can cut out pieces for a mosaic.
Such work will be more accurate. An interesting and original craft will inspire children to make further applications. You can make a large collective applique “Vegetables on a plate”. Each group member makes his own vegetable, and together the children form a plate of vegetables.
For a plate, take a round or oblong template. You can also place voluminous appliqués of vegetables on it by cutting out three parts of the object for this purpose. All parts must be glued together to form a triangular shape. Then the vegetables are placed on a plate.
You can place crafts in a basket, because the child can see how vegetables and fruits are stored. The box can be made from strips of paper or cardboard of the appropriate color.
Making an autumn forest, trees and nature
But the most important advantage of autumn is the colorful trees. They just brighten up this slushy time. Therefore, we cannot do without images of forests and nature.
Let's start first with single trees.
Master class on making this curly tree.
You need strips 15*1 cm long. They need to be fanned out on the base. And having fastened one end to the trunk, begin to twist the strip so that it looks like a wave. We also fix the second end.
Glue pieces of colored paper onto them.
There is still a forest in front of you. Absolutely any texture and color of blanks will do.
Below is an applique postcard.
Try to depict the forest and nature with leaf prints. To do this, you need to apply gouache to one side of it. Press the painted side onto the paper, transferring the pattern of veins.
The same technique can be used for the “Autumn Outside the Window” master class.
Autumn will swirl you in these applications. And gouache will depict the wind.
Leaves glued in rows on top of each other are very similar to a forest of birches and fir trees.
Look at the variety for creativity.
Birch trees also look beautiful with their own yellow birch leaves.
The trunk can be drawn or glued from cardboard.
Next, the work “Wind”. It's also not difficult to repeat.
Also create an abundance tree with your own hands!
Use candied fruits, nuts, dried fruits, seeds.
The crown of the pumpkin seed tree is very iridescent and bright. The kids will love it.
Did you like the ideas? Below are diagrams and templates that you can use as a basis.
Application "Vegetables" for schoolchildren
In elementary school, children already know how to use scissors, know vegetables and colors. They master many techniques for making appliqués, using not only paper, but also napkins, cotton pads, and natural materials.
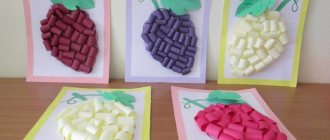
They are able to cut out parts without templates in compliance with proportions, compose plot pictures and place parts correctly. Work using the quilling technique will be unusual.
Using this technique you can make appliqués of vegetables and fruits. A bunch of grapes made using the quilling technique looks original.
The craft “Vegetables in a Basket” can be interesting and unusual for children. The basket itself can be made from natural materials:
- birch bark,
- nut shells,
- plasticine,
- straw,
- yarn.
The basket is made separately, the strips of material are intertwined with each other, and then glued to cardboard if it is half of the basket. You can completely weave a basket and fill it with any vegetables made using different techniques and from different materials.
When creating large applications, you can organize work in pairs. The kids take turns cutting out and pasting the vegetables onto the base. This kind of work helps strengthen the team and fosters a sense of responsibility.
In any case, when creating applications of vegetables and fruits with children, it is necessary to take into account the child’s age, his skills. It is important not only to interest him in the work, but also to introduce him to vegetables and how to grow them.
In such classes, children consolidate their knowledge of geometric shapes and study colors and shades. Be sure to master different techniques for working with paper and other materials. Constantly challenge and develop your child's creativity. Give him the opportunity to show his imagination.
Support him in his endeavors by using literary material for development: riddles, poems, songs about vegetables, and then you will get a comprehensively developed child. Be sure to hold exhibitions of children's handicrafts.
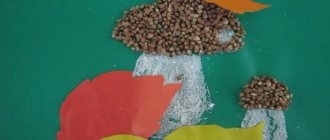
Pictures of cereals and seeds for children
The fastest and most colorful work. Small children enjoy doing it. For this work, it’s a good idea to stock up on templates with large drawings. Coloring books are suitable for little ones.
There are several options for attaching seeds, choose which one suits you best:
Option 1. You can apply plasticine onto the prepared base and press seeds and cereals into it.
My two-year-old daughter made this abstract rug for a cat BY MYSELF.
Crafts made from a cut out template look very impressive.
The most interesting thing remains - decorate with grains, seeds, and pasta.
This is the 3D picture in the shape of a hedgehog.
"Amanita"
Kersten T.
Fly Agaric boasted in the grove: “Oh, the dress I’m wearing is beautiful!” Any red hat with fringes will be the envy of anyone!
What would a forest be without this beauty? After all, he is the first one that catches our eye when entering the grove. Therefore, he also needs to pay attention. It's easy to do. The hat folds like an accordion. You already know how to do this very well, but I won’t repeat it. If you don’t know how, please look at the article above.
We will need:
- cardboard
- colored paper
- glue
- scissors
Progress:
We fold the future mushroom cap like an accordion.
Fold it in half. Glue the middle together.
We bend the bottom of the accordion, as shown in the photo. We turn the corners so that everything is neat. We fix them with glue. We turn the workpiece over and connect it to the base. Cut out a leg from white paper.
We make two accordions from the strips. Glue them to the leg under the hat. These are our skirts.
Next we decorate the head with white spots. Decorate with leaves and grass. He turned out to be such a cute guy. We won't put it in the basket, but it's nice to look at.
Pictures made of pebbles, shells, sand
Don't limit yourself to just dried flowers. Try making a picture using pebbles, sand, river and sea shells.
How to prepare shells:
Collecting shells is a fun activity. But first of all, you need to make sure that no one lives inside. And in order to avoid unpleasant odors in the future, they must be properly processed. First you need to remove organic particles that will be a source of stench.
The most effective method that does not require special tools or skills. Cooking and boiling help to easily remove all excess.
1. Place the collected material in a pan with water. Make sure they are completely immersed in liquid.
2. Then place the container with the contents on the fire. Cook after boiling for 5-10 minutes, it depends on the shape and number of shells.
Next, when removing products from boiling water, be careful not to get burned.
How to paint stones
Dense, smooth, light-colored pebbles are the best basis for drawings. They need to be washed thoroughly with soap and soda solution. Then dry. You can paint with gouache, watercolor or acrylic.
The first two types are quickly washed off with water. Acrylic paints dry better and are more durable. Before painting, first apply a primer to the stones. It provides good adhesion of paint to the surface.
We draw strokes and details with felt-tip pens or an outline. The final touch to give the product brightness is to varnish it.
How to paint sand?
White sand will make stylish beautiful paintings. This material is sold in specialized stores for creativity. Colored sand can also be purchased, but it is very easy and simple to color it yourself at home. For this you will need: coloring matter (colored crayons, dry tempera, liquid food coloring), plastic containers (for mixing paints, storing dry material), paper towels.
Dry tempera painting method:
Start painting with small volumes. Mix a glass of sand and 1 teaspoon of dry paint. Add it until you get the desired shade. Experiment with different colors and get your own color scheme.
Second method with food coloring:
Pour water into a convenient container. So much so that the sand is barely hidden in it. If there is more liquid, then you will need to add more bulk material.
Add dye 1-2 drops at a time. Mix and add it in small portions until you get the shade you want.
Then drain the water through cheesecloth. Let the sand dry by scattering it on napkins.
Create your masterpiece.
Volumetric applique “Basket with mushrooms”
We also need a basket. We will collect everything we find in the forest.
For the craft we will need:
- colored paper in two shades
- glue
- colored cardboard
- scissors
Progress:
We cut strips of paper 1.5 x 21 cm wide. Then we divide them into 3 equal parts. We will glue each one into a ring.
Children will enjoy cutting and gluing the blanks.
We will glue them onto the base in a checkerboard pattern. Let's make the first row a semicircle.
There is nothing complicated here, all you need is perseverance. Therefore, adult help will be needed.
Place mushrooms in the basket. Decorate with paper leaves if desired. You can draw it yourself or use templates. They can be found at the end of the article.