Modeling figures from plasticine is a common type of children's creativity. They begin to do this at the age of 1-2 years, the meaningful process begins at 4-5 years. Modeling develops creative imagination and improves fine motor skills of a child's fingers.
The flexibility of the material allows you to create products of any shape. For example, you can make a flat applique from plasticine on cardboard.
Donut
You will need: plasticine of bright colors, a stick, a plastic spatula.
Master Class
- Roll out a ball of yellow plasticine.
- Flatten the workpiece and press the center with the round tip of the stack-bulk.
- Trim off excess plasticine from the back side.
- Make a cake from pink plasticine.
- Attach the doughnut to the donut base and make a hole in the center.
- Roll plasticine flagella in bright colors.
- Place the flagella in the freezer for 5 minutes.
- Remove and cut the frozen flagella into small pieces.
- Decorate the donut by adding sprinkles.
The plasticine donut is ready!
Husky
You will need: plasticine of gray, white, black, blue, red and yellow, toothpick, stacks.
Master Class
- Roll a ball of gray plasticine.
- Stack 2 triangles at the top of the ball.
- Attach 2 flat triangles of white plasticine.
- Cover the bottom of the ball with white plasticine.
- Roll out an oblong oval from white plasticine and attach it as a muzzle.
- Roll the nose out of black plasticine and attach it to the muzzle.
- Make eyes from blue, black and white plasticine and attach them to white triangles.
- Make a tongue out of red plasticine and secure it.
- Make the lower part of the mouth from white plasticine and attach it under the tongue.
- Make 2 triangles from gray plasticine and attach them as ears.
- Work out the features of the muzzle with a stack.
- Make a body out of gray plasticine, insert a toothpick and secure the head.
- Cover the dog's belly with white plasticine.
- Roll 2 sausages from gray plasticine and attach them as front legs.
- Make 4 white plasticine cakes and attach them to the paws as shown in the image.
- Roll a sausage out of gray plasticine and mold a crescent-shaped tail.
- Stack the ponytail, adding fluffiness, then attach it.
- Make a collar from blue plasticine, and make a clasp from yellow plasticine, then make holes with a toothpick.
- Draw the ears, muzzle and paws with a stack.
Plasticine husky is ready!
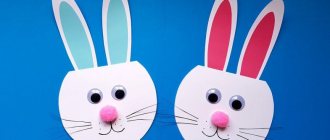
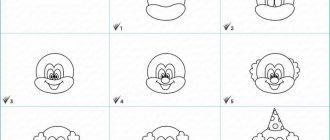
Hare Krosh
If a child is interested in the cartoon "Smeshariki", then he will be happy to make one of the characters - the hare Krosh. Take a modeling board and a set of plasticine, which usually includes the necessary tools. It is important that the material is of high quality, safe, and easy to remove from surfaces.
Read also: Signalman on the railway
You will need plasticine in these colors:
- blue and black;
- white and pink.
Plasticine figures: Pixabay
Here's how to sculpt from plasticine:
- Divide a piece of blue plasticine into two parts - large and smaller.
- Make a ball out of the larger portion by rolling it in your palms and smoothing it out with your fingers.
- From the smaller part, take a little plasticine and make Krosh’s front and back legs. To do this, form balls and press them lightly so that they look like droplets.
- Make ears from the rest of the blue plasticine.
- Roll two “sausages”. Make one side of the “sausage” wide and the other narrow. This detail should resemble a petal.
- Attach all the parts to the ball - Krosh’s body.
- What to make from plasticine next? Tail. Take white plasticine, pinch off six small pieces and roll them into balls.
- Place them together to make a daisy and attach them to your body.
- Using white and black plasticine, form the hare’s eyes (two ovals with pupils), teeth and eyebrows (small “sausages”). Roll the nose out of a pink ball.
- Transfer the blanks to the hare's face.
Plasticine crumbs: YouTube/TYAP-LYAP
Your favorite character is ready! Surely the child will be happy with the result and want to sculpt the rest of the cartoon characters.
A pineapple
You will need: yellow, green, dark green and any color plasticine, stack, toothpick.
Master Class
- Roll a ball of brown plasticine (you can use leftover plasticine of any color for the base).
- Give the ball a pear shape and make the base stable.
- Roll out a ball of dark green plasticine, then roll it into an oval shape.
- Make a larger cake from yellow plasticine.
- Combine the green and yellow cakes, then roll them out.
- Turn the workpiece over with the yellow side up and draw a grid with a stack.
- Wrap the brown pineapple with a yellow tortilla.
- Trim off excess plasticine and smooth the joints with your fingers.
- Make oblong leaves from green plasticine and cut out the jagged outline.
- Stick the leaves to the top of the pineapple as shown in the image.
Plasticine pineapple is ready! Also check out the champagne and candy pineapple.
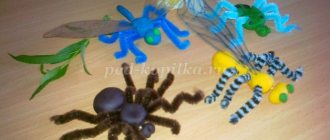
Sausages with spirals
Preschoolers can already make simple plasticine compositions. To do this, you need to roll the material into thin rods. This requires maximum patience, attentiveness and accuracy - such character qualities are developed by such activities. By combining multi-colored stripes, children depict cosmic pictures with stars, a winter forest, the underwater world, and autumn trees. You can make beautiful canvases if you place three-dimensional drawings.
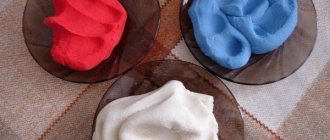
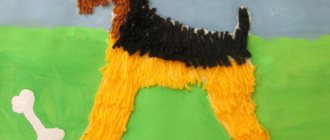
A more complex form of creativity is the rolling of plasticine flagella into a spiral reminiscent of flowers. Using such blanks, you can put together a chic bouquet, depict a fluffy dog or a curly birch tree.
The palette in such drawings will be much richer, the work will be much more beautiful when plasticine of similar shades is rolled together, but without achieving color uniformity. To obtain a festive candy, you will need to carefully twist a pair of thin bright flagella (obtained by squeezing out of a syringe). Then they need to be rolled into a spiral.
Panda
You will need: black, white and green plasticine, toothpicks, stacks.
Master Class
- Roll a ball of white plasticine.
- Push through two holes for the eyes.
- Roll balls of black plasticine, then attach and flatten them.
- Roll out a flat oval of white plasticine and attach it to the bottom of the head.
- Attach the black spout.
- Make eyes from white, green and black plasticine, then attach them.
- Make black ears and attach them to the top of the head.
- Roll out a roll of black plasticine, flatten it in the center and bend the ends.
- Roll a ball of white plasticine and glue it to the black blank.
- Connect the workpiece and the head using a toothpick.
- Mold and attach the black lower legs.
- Roll balls of white plasticine and attach them as pads to the paws.
- Draw in eyebrows with a toothpick.
- Roll a ball of black plasticine and attach it in place of the tail.
- Make a bamboo stick from green plate and attach it to the panda’s body.
The plasticine panda is ready! I recommend watching this video!
We sculpt Smesharik Krosh from plasticine. Cartoon. Kikoriki made of plasticine.
Useful tips
The most important thing in the process of sculpting with young children is not only to teach them how to perform basic sculpting techniques.
The main thing is that they should have fun. Perhaps some of the children will quickly get tired of modeling and will gladly switch to another game. Some people, on the contrary, are very passionate about creative work. Before sculpting, it is important to ask a child who is four or five years old what he wants to sculpt. You can offer your own option and not interfere with him, if he expressed a desire to make the figure himself, choosing an animated character as the theme, perhaps it will be some kind of fixie, and perhaps even an animatronic Freddy
Plasticine sculpture develops children's creative potential, and we should refrain from any negative criticism, on the contrary, they will encourage creativity as much as possible
If a child is experiencing frustration, it is important to address this by encouraging more practice and experimentation.
In addition to being engrossed in play, a child begins to understand cause and effect when he picks up play dough and manipulates it to change shape. This stimulates the child's creativity and tickles his intellect. From a scientific point of view, sculpting creates many new synapses in the brain, activating neurons through the senses used at work.
Apple
You will need: red, green, black, white and brown plasticine, stacks, toothpick.
Master Class
- Roll out a ball of red plasticine.
- Shape the ball into an apple shape.
- Prepare a strip of brown plasticine and cut fine fringe.
- Make a small indentation in the apple for the stamens.
- Cut a small piece of the stamens, twist them and attach them to the apple.
- Make a stalk out of brown plasticine as shown in the image.
- Make a small indentation in the apple and stick the stem.
- Make 2 leaves from green plasticine and draw lines using a stack and a toothpick.
- Stick the leaves to the base of the cutting, then give them a curved shape.
- Make a droplet of white plasticine, flatten it and stick it to the apple as a highlight.
- Roll 5 balls of green plasticine and form a caterpillar.
- Roll 2 very small balls of black plasticine and stick them on as the caterpillar's eyes.
- Stick the caterpillar to the apple.
The plasticine apple is ready!
How does modeling affect a child’s development?
Modeling from plasticine is a fascinating artistic activity that is not just great entertainment for children. Her goals are much bigger. The possibilities of the material as an artistic project are diverse and important for the social, cognitive, emotional, and physical development of the child.
Health and emotional background of the individual
Playing with plasticine is one of a number of sensory games that play an important role in a child’s development. Sight, smell, hearing, touch, taste are all included in sensory play. In fact, it is more than just touch, sensory exploration is a child's way of exploring, discovering, classifying and making sense of the world.
Playing with plasticine helps develop fine motor skills in a child. During modeling lessons, small muscle groups in children's fingers, hands and wrists are trained and strengthened, helping to facilitate the process of learning to write. The control over finger movements used when modeling from plasticine is actually the same as the ability to hold a pen and write with it. Without well-developed fine motor skills, a child may have difficulty not only learning to write, but also performing other tasks such as turning the pages of a book, cutting, drawing, squeezing glue out of a tube, tying shoelaces, or zipping up a zipper.
Modeling calms a child during an “emotional crisis” - it helps regulate internal discomfort, be it boredom, anxiety or another type of excitement. Creating figures, be it a bunny or a kitten, or any other animal, allows kids to feel competent and proud of their achievements (“I can roll out”, “I made a smesharik”). During modeling classes, children communicate with each other, describe what they are doing and how, observe the actions of their comrades and compare actions and objects, which teaches interaction with each other and joint actions.
Mental and Personal Development
Through playing with plasticine, children express their ideas, satisfy their curiosity, analyze and solve problems, and learn symbolic thinking. While playing with play dough, children listen and talk to peers or adults, which helps them expand their vocabulary as they describe their actions, make up stories about their creations, use ideas from books they read with their parents, and refer to what they see in Everyday life.
Psychologists say that children live to play; they learn to understand the world through play. When they play, they explore, control or change their environment, and learn to concentrate on something - all of which provide a preparatory stage for later academic achievements. A child's learning depends very much on his ability to feel and touch.
Chamomile
You will need: white, yellow and green plasticine, stacks, boule, skewer.
Master Class
- Make a drop of white plasticine, then flatten it into a petal shape.
- Draw a stack of lines.
- Make 20 white petals.
- Roll up the yellow center of the flower.
- Prepare a strip of yellow plasticine and cut through the fringe.
- Stick a strip around the circle of the yellow center.
- Stick the white petals in a circle, placing them in a checkerboard pattern.
- Cover the skewer with green plasticine, leaving the tip free.
- Make a cake from green plasticine and sculpt a receptacle.
- Stick the bud to the receptacle.
- Draw a mesh texture on the yellow center.
- Make a leaf, draw the texture and stick it to the stem.
The plasticine chamomile is ready!
Pendant "Snowman"
You will need: a sheet of cardboard, a simple pencil, scissors, string, tape, plasticine in white, orange, brown, black, blue, purple and green, skewer, stack.
Master Class
- Draw a circle on a piece of cardboard, then cut it out.
- Cover one side of the circle with white plasticine.
- Make oval legs from purple plasticine, then attach them to the bottom of the circle.
- Roll out an oval nose from orange plasticine, then attach it.
- Make eyes and a smile for the snowman from black plasticine.
- Roll 2 buttons from blue plasticine, attach them and use a skewer to make 2 holes in the buttons.
- Roll the purple and blue plasticine into sausages, then form a hat as shown in the image.
- Roll a ball of white plasticine and attach it as a pompom, then use a skewer to create a “fluffy” texture.
- Make stick handles from brown plasticine, then attach them to different sides of the circle.
- Make highlights on the nose and eyes from white plasticine.
- Draw a knitted pattern onto the hat using a skewer.
- Draw lines on the legs as shown in the image.
- Make 3 leaves from green plasticine and roll 3 orange berries, then decorate the hat.
- Attach the string to the back using tape.
The plasticine “Snowman” pendant is ready!
Girl in a boat
When the swimming device is ready, we move on to making the girl. Using strokes we create her face and hand, and then we lay out her hair and dress with plaits. And again you need to remember about light and shadow. The hair on the right will be darker and the hair on the left will be lighter. The dress should be made in layers, and you should start making it from the end, that is, from the hem. We apply strands tier by tier, creating the effect of voluminous ruffles. Let's move on to the final part - “drawing” the sea. The waves will look like swirling snails. They also need to be made in layers to create the effect of background and foreground. Some circles can be emphasized with white stripes - these will be highlights. We make a frame from the strands, and on top you can depict a wave to show the infinity of the water element.
Ice cream
You will need: plasticine of bright colors, a spatula, a stack, a wooden skewer, beads and rhinestones.
Master Class
- Roll a ball of brown plasticine.
- Flatten the ball into a flat cake.
- Draw lines with a stack, creating a waffle texture.
- Twist the workpiece to form a cup, then secure the edges.
- Roll balls of bright colors of different sizes.
- Use a skewer to process the halves of the balls as shown in the image.
- Place the balls into a waffle cup.
- Decorate the ice cream by attaching beads and rhinestones.
- Make a cherry and attach it to the top of the ice cream.
Plasticine ice cream is ready! I recommend watching this video!
DIY Making Play Doh Ice Cream Popsicles
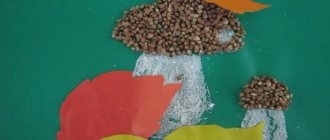
Hedgehog
A small forest animal with thorns will end up right on your table. Even a small child can make a cute rodent. Modeling from plasticine for children is incredibly exciting fun.
How to make:
- Prepare the materials necessary for work. Make a small ball from a brown base.
- Now you need to stretch the resulting workpiece a little; the ball should turn into a drop-shaped figure.
- Next, we sculpt a nose and eyes for the hedgehog from plasticine with the children. Attach everything to the body.
- You will need to place the seeds on the surface of the sculpted figure with the pointed part facing up. Attach the “needles” in the same way as shown in the photo.
- When the empty spaces on the body of the forest animal are filled with seeds, place the plasticine figurine on the cardboard. All is ready!
Crocodile
You will need: green, dark green, white, black and red plasticine, a glass stack, a toothpick, a napkin with a pattern.
Master Class
- Roll a sausage out of green plasticine.
- Cut the blank in half and create three parts from green plasticine: a carrot, an oblong oval and a ball.
- Take the green oval and make a cut, forming the mouth of a crocodile.
- Slap red plasticine into the mouth.
- Roll the sausage out of white plasticine, flatten and cut the cloves, then attach them to the red plasticine.
- Roll 2 green balls and make eyes by attaching white and black plasticine, then attach the blanks to the crocodile's head.
- Treat the body and head of the crocodile with a napkin, giving it a patterned texture.
- Connect the body and head of the crocodile using a toothpick.
- Roll 4 balls of green plasticine and attach them to the paws.
- Make notches on the paws with a stack.
- Roll a sausage from dark green plasticine, flatten it, cut the teeth and attach it to the back of the crocodile.
- Attach highlights to the eyes using white plasticine.
The plasticine crocodile is ready!
Grape
You will need: purple, brown and green plasticine, glass stack, thin wire.
Master Class
- Make a rope from purple plasticine.
- Cut it into pieces.
- Roll each piece into balls.
- Make a cone out of purple plasticine.
- Cover the cone with grapes, leaving the top part free.
- Prepare a piece of thin wire and cover it with brown plasticine, as shown in the image.
- Draw the lines to create a branchy texture.
- Attach a wire twig to the top of the grape, then stick the grapes around it.
- Make a cake from green plasticine.
- Outline the outline of the leaf and cut it out, then draw the texture.
- Roll out a thin strip of green plasticine, carefully twist it and stick it to the grapes.
Plasticine grapes are ready! I recommend watching this video!
Air plasticine for children, learning to sculpt roses
Fox made of pine cones and plasticine
You will need: pine cone, orange, green, white and black plasticine, stack, autumn leaves.
Master Class
- Make ears and an elongated muzzle from orange plasticine, roll up a black nose and attach all the parts to the pine cone.
- Make a tongue out of orange plasticine, then attach it.
- Make crescent-shaped eyes from white plasticine and attach green pupils.
- Make eyelashes from cuttings - the tails of leaves.
- Attach the eyes to the pine cone.
- Mold 2 legs and a tail from orange plasticine and make cuts with a stack, as shown in the picture.
- Attach the paws and tail to the pine cone.
- Lay out the leaves and plant the fox.
The fox made from pine cones and plasticine is ready!
Crow
You will need: plasticine, toothpick, glass.
Master Class
- Roll a small ball of dark gray plasticine.
- Roll a smaller ball of light gray plasticine.
- Flatten the light gray ball into a flat cake.
- Make cuts in a circle.
- Cut off pieces of plasticine to make a star.
- Connect the ball with the star.
- Using a round stack, press 2 holes on the ball.
- Make an oval-shaped bird's body from dark gray plasticine.
- Make the wings of the bird in the shape of flattened drops of dark gray plasticine.
- Make a wavy outline on the wings using a stack.
- Attach the wings to the body.
- Make the crow's paws and attach them.
- Make 3 thin little sausages and attach them to the top of the bird's head.
- Make the eyes of a crow from black and white plasticine.
- Draw the eyebrows of the crow in a stack.
- Attach a small tail to the crow.
- Make a toothpick pattern on the raven's neck.
The plasticine raven is ready! I recommend watching this video!
WE MAKE iPhone X - iPhone 10 FROM PLASTICINE | Video Modeling