Application is an excellent activity designed to comprehensively develop a child. Break applique is a separate direction. All age groups can use this technique, but it is most useful and interesting for children of primary preschool age. At this age, the development of fine motor skills is important for the development of a child, which this activity does an excellent job of. Let's look at examples and operating principles.
Bunny made of paper
To create such a craft, pre-prepared templates with images of animals are perfect. In the photo of the broken appliqué you can see a bunny; thanks to the use of this technique, an interesting texture is created, the character looks more voluminous.
To create beautiful crafts, you can take templates by cutting them out of magazines, old coloring books, or print them from the Internet. You can also draw the figure yourself on paper or cardboard.
Crafts technique:
- Tear off the paper strips and then finely tear them into pieces.
- Glue these elements like a mosaic onto a pre-printed or drawn image.
- Try to make small distances between the pieces so that they do not overlap each other.
- The nose and eyes can also be torn from dark-colored paper or drawn on.
- Makes a great craft!
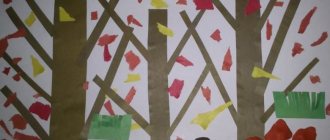
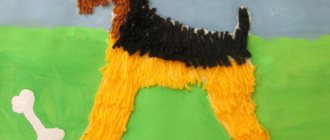
Craft Lion. Advantages of the cut-off appliqué method
The advantage of broken appliqué is precisely the technique of preparing parts.
Torn paper produces a jagged, natural edge that is perfect for simulating moving water or waves, a horizon line or the shape of clouds, or animal fur. The advantage of this method of work lies in the technique of preparing the parts itself.
The “Lion” craft combines broken and regular appliqués.
Materials:
- A4 size sheet of cardboard or watercolor paper for the base of the applique;
- a large piece of sand or light brown paper, about half the size of a base sheet;
- scraps and pieces of colored paper of various shapes in all varieties of brown, yellow and orange;
- paper of dark brown, black and yellow or green colors, for the nose, eyes and eyebrows.
The cut off method is used here to create the mane. To achieve maximum effect, it is important not to use scissors. Using scissors, cut out the face, ears, nose, and eye details. But for the mane they only tear the paper.
First, a lion's face is cut out of a large piece of sand paper. The shape of the muzzle can be viewed on the Internet, again using the word “coloring book,” or better yet, “children’s coloring book.”
Having attached the muzzle blank to the center of the base, its length and width are outlined with a pencil.
The mane is collected from paper strips, it is good when they taper towards one end. All pieces are glued from the outer edge of the mane, gradually moving towards the middle of the sheet. They use strips of different colors, the colors are arranged in a chaotic order.
At the last stage, the head is glued on top of the mane. Finish the craft with small details of the muzzle.
To give the craft volume, you can glue the mane strips only with the end closest to the center. In this case, the strips should be shorter so as not to sag.
Even from this dry summary one can understand that another strong point of the cut-off method is the multi-color and texture of the resulting craft.
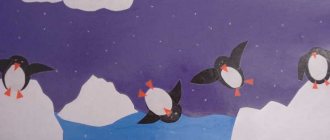
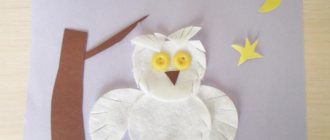
Using this method, the plumage of motley birds is imitated. Against the background of a broken appliqué, the huge yellow eyes of an owl or a riot of tropical greenery look great.
Snowman
Prepare a sheet of white paper and draw snowdrifts on it.
- Tear them off with your hands, following the drawn line.
- Now cut it into two parts.
- Blue or light blue cardboard will play the role of a background; stick snowdrifts on it.
- Attach different parts on top of each other to make the result look more realistic.
- Make templates with snowman parts from white paper.
- Carefully tear off the blanks along the pencil outline.
- You can glue the resulting circles to make a snowman; try to put the bottom border on the snowdrift to “put” the snowman on the snow.
- Cut out a headdress for a snowman from colored paper, buttons and parts of the face can be drawn with felt-tip pens.
- Decorate the craft further as you wish.
MAGAZINE Preschooler.RF
Abstract of the GCD “Break application” - “Porcini mushroom” in the middle groupGoal: to introduce children to a new technique of working with paper: tearing, performing work using the tearing appliqué technique.
Tasks:
Educational:
- introduce children to the technique of cut appliqué
- master the technique of cut appliqué
- expand children's knowledge about various methods of appliqué
Educational:
- develop children's imagination
- develop fine motor skills of hands
- develop interest in artistic creativity
- develop observation, memory, imagination, attention, logical thinking.
Educational:
- continue to develop emotional responsiveness in children
- cultivate interest in nature and aesthetic feelings.
Equipment and materials for carrying out GCD:
- cardboard with an outline image of a mushroom
- colored paper:
- brown (mushroom cap)
- beige (mushroom stem)
- green grass)
- glue
- glue brushes
- oilcloth - lining
Conducting GCD:
Organizational stage
Educator: - Hello children.
Children: - Say hello
Educator: Guys, this morning I met a forest dweller near the kindergarten. Want to know which one?
Children: Yes
Educator: then guess the riddle: “Under the pines, under the fir trees there lies a bag of needles . (Hedgehog)
Educator: That's right, well done.
Educator: The hedgehog told me a very sad story, he didn’t notice at all how autumn had come, but after autumn the cold season of the year, winter, will come. All the inhabitants of the forest have been collecting berries and mushrooms for a long time, but he has not collected anything. So a hedgehog came to our kindergarten to ask the children to help him collect mushrooms for his family, which they really like to eat in winter.
Educator: Guys, do you agree to help the hedgehog?
Children: Yes
Educator: Well then, today we will go to the forest where the hedgehog lives and we will collect only edible mushrooms, namely the white mushroom, because the white mushroom is the largest mushroom in the forest.
Physical education minute:
Kolya walked and walked and walked and found a porcini mushroom. One - fungus Two - fungus
Three - fungus, I put them in the box.
We looked at everything around us, there are no mushrooms anywhere anymore
And everyone sat down quietly. The teacher reads a poem, and the children imitate the movements of a mushroom picker: they walk,
bend down and put the mushrooms in the box.
Educator: Guys, look at what parts does the porcini mushroom consist of?
Children name the parts of the mushroom (leg, cap)
Educator: Well done.
The teacher shows pictures of mushrooms and an application with the image of a mushroom (ceps).
Children: Looking at pictures
Educator: Today we will make a mushroom (ceps)
To produce our works, we will use a very interesting and unusual type of applique: “Break applique”
You and I will not cut the paper, but tear it off, that’s why it’s called “BREAKING”.
Let's repeat it again:
Tear applique is obtained because we tear the paper and do not cut it with scissors.
Educator: Children, there is cardboard in front of you, and what do you see on the cardboard?
Children: Image of a mushroom.
Educator:
That's right - this is the outline of our mushroom. You also have colored paper on your table - brown, beige and green.
Educator: The paper needs to be torn into small pieces to design our application.
And now we will prepare our fingers for work.
Finger gymnastics “Mushrooms”
Amanita muscaria is a dangerous mushroom Children threaten with their index finger
And the second is a fox, a red-haired sister. Children extend their fingers one by one.
Third fungus mushroom, pink ear
And the fourth mushroom is the bearded old man morel
The fifth mushroom is white
Eat it with confidence!
Educator: Well done! We are ready to get to work.
Educator: First, you need to tear up pieces of paper.
We will tear off small pieces of brown paper from a sheet of paper, then beige and green.
Pieces of paper should be placed in different plates:
- brown (mushroom cap)
- beige (mushroom stem)
- green (grass)
Before we begin, we must review the safety rules when working with glue.
Next stage: Gradually fill in the silhouette of the mushroom with colored pieces.
Apply glue to the silhouette of the mushroom and gradually fill in the inner contours of the mushroom pattern (brown for the cap, beige for the stem, green for the grass) in a mosaic style.
Educator: What beautiful work you have done!
The work was done neatly and beautifully.
Hedgehog: Guys, what big porcini mushrooms you managed to find and make for my whole family. Thank you very much, now we will be full all winter.
Educator: Guys, what a great fellow we are, how many mushrooms we collected today. What mushrooms were we looking for for the hedgehog today?
Children: porcini mushrooms
Educator: Our porcini mushrooms are enough for the winter not only for the hedgehog’s family, but also for all the animals in the forest, let’s take the mushrooms to the clearing.
Children and the teacher organize an exhibition in the group or reception area.
Educator: This concludes our lesson.
| Next > |
Other application options
You can create entire paintings using the cut appliqué technique. This technique is perfect for children in the preparatory group of kindergarten.
You can tear off pieces, cut them and arrange them randomly. You can also beautifully outline the contours with markers or felt-tip pens and design an applique inside the image.
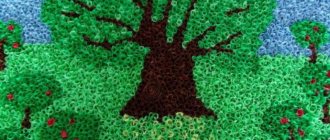
Technology lesson notes (2nd grade). Topic: Broken applique “Birch tree”
Topic: Broken applique “Birch tree”
Target:
1) creating conditions in the lesson for organizing students’ activities to acquire knowledge “break-through application”;
2) make a torn appliqué “Birch Tree” Objectives: 1. Subject:
• To introduce students to a new technique of working with paper: “tearing”;
perform work using the cutting appliqué technique • Develop fine motor skills of the hands; • Develop the ability to work in a team and respect for nature. • Encourage students to make gifts with their own hands and present them not only on significant dates, but also simply to express their good feelings • Foster accuracy and hard work 2. Meta-subject Cognitive UUD
• Analyze and read graphic images (drawings, simple drawings and sketches , diagrams) and carry out work according to them • Plan a sequence of practical actions to implement the plan, the assigned task
Regulatory UUD
• Organization of the workplace, rational placement of materials and tools at the workplace • Setting an educational task • Rational use and consumption of materials.
Communicative learning skills
• Be able to listen and engage in dialogue, participate in collective discussion • Productively interact and collaborate with peers
Personal learning skills
• Compliance with safe work practices • Exercise self-monitoring and adjustment of the progress of work and the final result • Form careful use and economical use of materials • Form interest in work
Teacher equipment:
finished product, presentation, samples of various types of applications.
Student equipment:
pencil, glue, colored paper, cardboard, eraser.
Lesson progress 1. Organizational moment.
Teacher. Hello guys! Sit down. Let's start the lesson. Let's check if you have everything ready for the lesson. You should have on your tables: glue, colored paper, cardboard, eraser.
Well done! Everyone is ready, let's get to work. Children check if they have everything on their desks (Colored paper, pencil, glue, cardboard.) 2. Setting goals and objectives for the lesson.
Teacher
.
Look at the work you see on your desks and on your screen. What technique was used to perform this work? Presentation slide No. 1
: various types of applications are projected onto the screen.
Student.
These works were made using the “applique” technique. Guys, how many of you know what applique is?
Appliqué translated from Latin means “attachment”. This is a very ancient form of art, an interesting type of artistic activity, when figures are cut out of pieces of leather, fabric or paper and then glued onto a base, that is, a background. In this case, the base can be cardboard, wood or thick paper. Applique belongs to decorative and applied arts. Guess the riddle: Green, not a meadow, White, not snow, Curly, but without hair. (Birch) Teacher. Children, look at the screen and at my work, what technique are these birch trees made in? Slide No. 2 of the presentation:
two images of a birch tree are projected onto the screen, made using the technique of “Break applique” and “Cut applique”
Student.
Using the “application” technique
Teacher
.
Did you notice anything interesting? Student.
Yes, they noticed.
In the first work the edges of the parts are not very uneven, but in the second the edges of the parts are even. Teacher.
You already know that with the help of scissors you can cut out various objects, shapes, figures, flowers and make patterns with them.
What do you guys think, is it possible to do without scissors? It turns out you can use your hands instead of scissors. What do you think this type of application can be called? Student
.
Torn, broken. Teacher. That's right, today in the lesson we will get acquainted with an interesting and unusual type of applique: “Break applique” How are such applications made? Student.
You don’t need to cut the paper, but rather tear it off to get this applique.
Teacher.
How to get jagged edges?
Student
.
Such edges can be obtained if you tear off the edges of the part, and not cut them out with scissors, that is, we will tear out all the details of the applique from a sheet of paper, and not cut them out with scissors. Teacher
.
What do such uneven edges give to the applique? Student.
The edges turn out fluffier, and the work seems voluminous.
3. Drawing up a work plan. Analysis. Teacher.
Review the sample.
Teacher.
What material is the product made of?
Student.
From paper.
Teacher
.
What tools will we need when working? Student
.
When working we will need: cardboard, colored paper, glue, pencil. Teacher
.
What parts does the work consist of? Student
.
From the trunk and leaves Teacher.
Let's practice tearing paper.
To begin, take a small piece of colored paper and try to tear it in different directions (lengthwise and crosswise). If you tear the paper along the grain, the edge will be smoother; if you tear it across, it will be more “spontaneous”, with a white halo. Now let's try to draw up a work plan. Guys, what kind of work plan will we draw up? What will we do first and so on. (Children's answers). Next, the teacher helps to draw up a unified work plan with the children. Work plan:
1. First, we need to choose a suitable background (blue cardboard).
2. Then we draw a birch trunk on white paper, approximately 4 cm wide. 3. After this, we cut off the trunk along the contour lines. 4. Next, draw black longitudinal and transverse stripes on the white side of the black paper. 5.After that, draw leaves on the white side of the green paper and tear off the excess paper along the contour. 6. Then we lay out the applique on the base. 7. Then glue all the parts onto the background and draw branches and buds with a black marker. Slide No. 3 of the presentation:
a work plan is projected onto the screen.
Work plan for making mushrooms: 1. Draw 5 brown ovals, and each subsequent oval should be smaller than the previous one. The first oval is the largest and yellow. 2.Tear off excess paper along the outline. 3.Take the yellow oval as a basis and gradually stick it on it, shifting the remaining ovals to the left or right in descending order. The product is made according to the sample. 4. Physical education minute.
To the words of the chant “Khomka”
5. Practical work of students
Students, with the help of the teacher, begin to do the work.
6. Analysis and exhibition of works. Teacher.
What great work you have done! A whole birch grove. Let's create an exhibition of our works and take pictures around it. I looked at your work and I think that you tried hard today and can use your work as a gift. I am sure that no matter who you present your work to, this person will definitely be happy, since your work was done with your own hands. And the best gift is a gift made with your own hands.
7. Summing up.
Teacher.
Guys, what was the topic of our lesson? What new did you learn? What have you learned? (Teacher's assessment of the work of the entire class.) 8. Cleaning workplaces.
Teacher. The lesson is over. We are cleaning all our work areas.
Using napkins for applique
If you tear a napkin into small pieces and stick it on, you will create a volume effect and the craft will turn out airy.
If you are doing a craft with the image of trees, the trunks are cut out or drawn, and the leaves will be light, made from napkins. Pieces of napkins can also be rolled into balls.
Examples of finished works
The finished cut-out appliqué looks very much like a mosaic, especially if there is little space left between the pieces of paper. Here are examples of such applications:
For older children or schoolchildren, you can choose more serious subjects. In Ancient History lessons, the teacher may well suggest making Egyptian frescoes out of paper!
In general, cut-out applique as a type of children's creativity is quite suitable for kindergartens, aesthetic centers, and lower grades of school.
An alternative material for making cut-out appliqué can be multi-colored double-sided tape or adhesive-backed note paper. Scotch tape, of course, is a more expensive method, but the baby will not need to get dirty with glue. Simply tear off a piece, remove the base and stick it on paper. Ideal for kindergarten!
Application using cotton wool
- You will need a piece of cotton wool or cotton pads.
- You can give the children the task of tearing the cotton wool into small pieces.
- Draw images on a piece of cardboard.
- Pre-paint the cardboard or take a colored sheet.
- Decorate the background by gluing pieces of colored paper or painting it.
- Lay out and glue pieces of cotton wool inside the outlines drawn in pencil.
Using this technique, you can also create more complex images, where all the details of the composition, even the smallest ones, are made of cotton wool.
Lesson notes on the “Carrot” appliqué, cf. gr
Lesson notes on the “Carrot” appliqué, cf. gr
Target. Creating a “Carrot” applique using the cutting method.
Tasks. Continue teaching children how to work using the cut-out appliqué technique to create a simple “Carrot” composition. Teach children to identify familiar objects by touch (models of vegetables). To consolidate children's knowledge of where vegetables grow. Strengthen the ability to politely express your request. Develop tactile perception and fine motor skills of the fingers. Develop imagination and the ability to make assumptions. Develop independence, accuracy and consistency in performing your work.
Material. Toy hare, dummies of vegetables, teaching aid “Wonderful Bag”. Supplies for applique for each child: half a sheet of colored cardboard with a drawn silhouette of a carrot and glued tops, a small piece of red/orange paper, glue, glue brushes, rags or paper napkins.
Preliminary work: role-playing game “Fruit and Vegetable Store”; didactic game “What grows where?”; guessing riddles on the topic “Vegetables”; appliqués using the cutting method: “Turnip”, “Kolobok is rolling along the path”; outdoor game “Wolf and Hare”; finger game “Visiting the big toe.”
GCD move.
Educator: Guys, do you like it when guests come to you?
Children: Yes, we love it!
Educator: Do you like to visit?
Children: Yes
Educator: Let's play our familiar game, which is called “Visiting the Thumb.”
Finger game “Visiting the big finger” Visiting the big finger (Put your thumbs up.) Came straight to the house (Join the fingertips of both hands at an angle “roof.”) Index and middle, Ring and last. The little finger itself (called fingers, alternately connect with the big one, lightly massaging them, on both hands at the same time.) Knocked on the threshold. (Clench your fists, put your little fingers up, move them.) Together your fingers are friends, They cannot be without each other. Strong, friendly - (Rhythmically clench and unclench your fingers on both hands.) Everyone needs them so much! (Children clap their hands.)
Educator: Well done guys, they played well, it was fun! Game situation “Letter”
Educator: Look at what a beautiful envelope we have on our shelf, and next to it an interesting bag. Let's read the letter from the envelope. (One of the children opens the envelope and hands the letter to the teacher.) The teacher reads the letter: “Hello, guys, I am your unfamiliar friend. I really want to come visit you, but I won’t be able to do this until you guess what’s in this wonderful bag...”
Educator:
What do you think might be in it? Presumable answers of the children: “There are toys in the bag”; “...dishes”, etc.
The teacher continues to read: “My bag opens very easily. He must be politely asked about this and the appropriate magic word must be said. But don't look into it! Otherwise I won’t be able to get to you! You simply put your hands into the bag, take any one object and try to recognize it without taking your hands out of the bag, by touch. If you guess correctly and name all the objects, I can come to visit you and play with you. Your unknown friend."
Educator: Do you want a guest to come to us?
Children: (Yes, we want!)
Educator : Then let's politely ask the bag to open. Several children ask the bag to open using the accepted form of address. (Pouch, please open. Pouch, please open.)
Didactic game “Wonderful bag”. Children try to determine by touch what is in the bag. All correctly named items are placed on a separate table.
Educator: Look how much was in the bag, this is - ..., and - ... Let's think, how can all this be called in one word? Individual appeals to children: “What do you think? What do you think?" There is no need to rush to confirm the child’s correct answer so that other children have a reason to think. After several correct answers, the teacher praises the children, confirming that they are right: “Well done, guys, of course, these are vegetables!”
Educator: Do you know where vegetables grow? (“Vegetables grow in the garden.” We try to get complete answers from the children.)
The teacher draws attention to the toy hare. Look, there’s a little white bunny sitting right there, looking at us from the shelf, that’s the joker, where’s he hiding? Bunny: Hello, guys, I’m very glad that I was able to visit you! Because you correctly identified all the vegetables and said where they grow. Let's play my favorite game "The Hunter and the Hare".
Outdoor game "Hunter and the Hare". Two players are chosen - a hare and a hunter. The rest of the children stand in a circle and join hands. The bunny player is in the circle, and the hunter player is behind the circle. (Imitation of the movements of a hunter and a hare.) Children walk in a circle with the words: A small bunny is jumping around the rubble. The bunny jumps quickly! Catch him! On the last line, the children stop and raise their hands up (they are “forest”). The hunter begins to catch up with the hare, running through the forest. The game ends if the hunter catches up with the hare or if the game drags on and the hunter cannot catch the hare for a long time. During the game, the hare toy is given to the child who plays this role. The game is repeated 1-2 times.
Educator: Did you like playing with the bunny? Let's do something nice for our guest. What do you think bunnies like? Presumable answers from children: “Hares love cabbage”; “Hares love to play,” etc. Let's make a carrot for him out of colored paper? Will he be happy with such a gift? (Yes, he will be delighted.) Then go to the tables, and let’s start making a gift for our cheerful guest.
Work takes place at tables. The teacher reminds you of the sequence of work and gives instructions for accuracy: - first you need to tear a piece of colored paper (red/orange) into many small pieces carefully over a plate (check with the children what color the paper is for carrots); - then generously smear the drawn carrot silhouette with glue, trying not to go beyond it; - after this, very quickly apply pieces of paper (so that the glue does not have time to dry) to the silhouette of the drawn carrot with the colored side up, starting from the edges and ending in the middle; - when the entire image (without gaps) is glued, you need to take a cloth and apply it to the resulting carrot to remove excess glue. One of the children repeats the steps of completing the task, after which they begin to work.
At this time, you can turn on low, calm music. If a child fails at something, the teacher helps him cope with difficulties. After the work is done, the children give their “carrots” to the bunny.
Educator: Guys, were you interested in playing with the Bunny? What else did you like? Do you want Bunny to stay in our group?
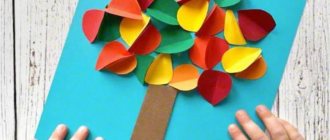
Applique tree
In order to make such a magical tree, prepare colored paper, a glue stick or PVA glue and cardboard or a sheet of thick paper.
- To begin, draw the trunk and branches of a tree on a sheet of paper and color them; you can print the finished image from the Internet or trace it using a template.
- Now tear off small pieces of colored paper and glue them in the form of leaves.
- You can use various shades of paper - your tree can turn out to be both autumn and magical.
- The applique will look neater if the pieces of paper are the same.
- You can apply glue to the sheet of paper itself so that you don't have to apply colored paper to each piece.
Cut-out applique pond with baby frogs, step by step with photo
Material:
- Colored paper
- PVA glue
- Pencil
Progress:
- Prepare small rectangles that will make up the parts of the frog’s body.
- In the background, mark the silhouettes of frogs with a simple pencil.
- Finely tear the green paper and glue the leaves to the silhouette.
- Make eyes and mouth from pieces of a different color.
- Using the cutting technique, prepare a lot of small blue pieces of paper.
- Apply glue to the area under the pond and glue blue pieces of paper.
Landscape made of paper
In order to create an entire landscape using the cut-out appliqué technique, you will need several sheets of colored paper, as well as pencil glue and a sheet of cardboard as a base.
- Now the most fun part of the job is tearing and crumpling colored paper.
- If you use crumpled paper to create a composition, it will look even more interesting and voluminous.
- Now you can collect parts for a future application.
- Develop your child's imagination by asking him what a piece of paper looks like.
- This way you can find creative and unexpected solutions.
- In addition, for children this is a real game, so the creative process will become even more interesting. If you have already outlined the elements of the picture on a sheet of paper, you can safely glue the details to the base.
- Attach the corners first so you can experiment by moving the paper pieces around.
When the picture is ready, carefully glue all the parts and let them dry thoroughly. The picture is ready, you can decorate it if you want and put it in a frame.
Broken applique fourth grade, details with photo
Winter Material:
Progress:
- Using the cutting technique, make a tree trunk. Glue to the background. When choosing a background, avoid white.
- Paint the house with paints.
- Finely tear the white paper - it will appear as snow.
- Using glue and small white pieces, cover the trees, house, and street with “snow.” You can glue small pieces throughout the picture, creating the appearance of snow falling on the city.
Decoration of the composition
When the painting is ready, you can decorate it using all kinds of materials to give it a finished look and make the work unique.
- A few shells, dried flowers and leaves, ribbons, bows, buttons, beads, beads, rhinestones are perfect for this (adults should supervise the children’s work, especially if small parts are used in the process of creating a masterpiece).
- The resulting creation can be inserted into a beautiful frame. And then the child can safely participate in competitions with his works.
All these ideas will help you and your children create real masterpieces using a minimum of materials. And most importantly, this is a very fun and interesting process that can become leisure time for the whole family.
The finished work can become a wonderful interior decoration, and you can also present it at any children's craft competition. Such educational crafts will be very useful for teaching in kindergarten.
There are a lot of different techniques of varying complexity; you can choose something suitable for the creativity of children of different ages, from the youngest to the preparatory group.
Craft options
There are a huge variety of design options for crafts and techniques for making them.
Age restrictions
There are no age restrictions for this method and crafts. If the baby cannot apply glue, the mother will apply it to the surface, and the child will simply stick the parts on top.
A piece bruised during work with uncertain hands will add texture to the craft. It’s just that the younger the age, the larger the applique details should be, the simpler the drawings.
For 2 years
There is no need to print out a picture from the Internet for a homemade craft with your baby. Blue scraps of paper crumpled by a child will become the sea.
It’s good to take blue, cyan, and green paper. The sea will sparkle with vibrant colors. A piece of any non-blue paper that is round or triangular in shape will become a fish.
Several triangular scraps are glued completely or only with one, preferably the narrower end, to the body of the fish. Partially glued, they will turn into a movable, almost real tail fin.
Craft for 3 years old. Break mosaic
At 3 years old, children are just learning to hold scissors correctly, but they can already assemble a mosaic from individual pieces. During this period, they like to imitate adults and do crafts according to the model.
Unfortunately, it will not be possible to use self-adhesive paper in crafts; the thick base will not allow you to tear the sheet.
The theme for creating a mosaic will be a printed image of a character from your favorite cartoon or book. It’s better to immediately indicate in the search bar that you need a coloring, this makes it easier to find a large image.
A mother can cut a large sheet of paper into strips, which the child will later tear, or can start working together by tearing a large sheet of colored paper into strips.
At the first stage of working together, it is good to prepare many small pieces of different colors and arrange them in piles or containers by color. The adult controls the dimensions of individual parts by the width of the strips that he prepares for tearing.
This craft is very suitable for a three-year-old master; he can do a lot here and decide for himself.
During this lesson, he chooses a picture, dashingly tears strips of paper, doing what adults usually do not allow, breaking prohibitions. And at 3 years old, a child strives for exactly this: independence and playing by his own rules.