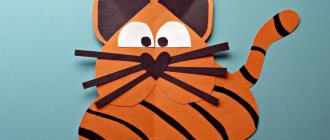
Applique is an activity that promotes the all-round development of a child, and paper cut-out applique is one of the areas of creativity. Not only children, but also adults can work in this technique using various templates. Preschoolers and schoolchildren will find this application especially interesting. It will contribute to the development of fine motor skills, which is important for those who are just getting ready or starting to go to school.
Craft options
There are a huge variety of design options for crafts and techniques for making them.
Age restrictions
There are no age restrictions for this method and crafts. If the baby cannot apply glue, the mother will apply it to the surface, and the child will simply stick the parts on top.
A piece bruised during work with uncertain hands will add texture to the craft. It’s just that the younger the age, the larger the applique details should be, the simpler the drawings.
For 2 years
There is no need to print out a picture from the Internet for a homemade craft with your baby. Blue scraps of paper crumpled by a child will become the sea.
It’s good to take blue, cyan, and green paper. The sea will sparkle with vibrant colors. A piece of any non-blue paper that is round or triangular in shape will become a fish.
Several triangular scraps are glued completely or only with one, preferably the narrower end, to the body of the fish. Partially glued, they will turn into a movable, almost real tail fin.
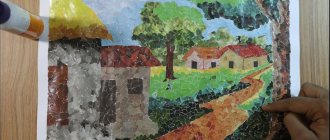
Craft for 3 years old. Break mosaic
At 3 years old, children are just learning to hold scissors correctly, but they can already assemble a mosaic from individual pieces. During this period, they like to imitate adults and do crafts according to the model.
Unfortunately, it will not be possible to use self-adhesive paper in crafts; the thick base will not allow you to tear the sheet.
The theme for creating a mosaic will be a printed image of a character from your favorite cartoon or book. It’s better to immediately indicate in the search bar that you need a coloring, this makes it easier to find a large image.
A mother can cut a large sheet of paper into strips, which the child will later tear, or can start working together by tearing a large sheet of colored paper into strips.
At the first stage of working together, it is good to prepare many small pieces of different colors and arrange them in piles or containers by color. The adult controls the dimensions of individual parts by the width of the strips that he prepares for tearing.
This craft is very suitable for a three-year-old master; he can do a lot here and decide for himself.
During this lesson, he chooses a picture, dashingly tears strips of paper, doing what adults usually do not allow, breaking prohibitions. And at 3 years old, a child strives for exactly this: independence and playing by his own rules.
Napkin paintings
Elements made from colored paper napkins give tear-off appliqués an unusual lightness.
Chick
Using a yellow napkin as a basis, you can make a cute chicken.
You need to prepare for the lesson:
- glue.
- thick paper or cardboard base,
- yellow napkin,
Operating procedure.
- Draw or copy the chicken design onto the base.
- Tear the napkin into small pieces.
- Attach it carefully. You can glue only the part of the element representing fluff.
- Draw the eye and beak.
You can make a delicate birch tree using a green napkin. Such work can be done by primary school students for a school thematic presentation.
Craft Lion. Advantages of the cut-off appliqué method
The advantage of broken appliqué is precisely the technique of preparing parts.
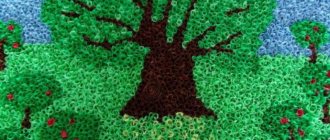
Torn paper produces a jagged, natural edge that is perfect for simulating moving water or waves, a horizon line or the shape of clouds, or animal fur. The advantage of this method of work lies in the technique of preparing the parts itself.
The “Lion” craft combines broken and regular appliqués.
Materials:
- A4 size sheet of cardboard or watercolor paper for the base of the applique;
- a large piece of sand or light brown paper, about half the size of a base sheet;
- scraps and pieces of colored paper of various shapes in all varieties of brown, yellow and orange;
- paper of dark brown, black and yellow or green colors, for the nose, eyes and eyebrows.
The cut off method is used here to create the mane. To achieve maximum effect, it is important not to use scissors. Using scissors, cut out the face, ears, nose, and eye details. But for the mane they only tear the paper.
First, a lion's face is cut out of a large piece of sand paper. The shape of the muzzle can be viewed on the Internet, again using the word “coloring book,” or better yet, “children’s coloring book.”
Having attached the muzzle blank to the center of the base, its length and width are outlined with a pencil.
The mane is collected from paper strips, it is good when they taper towards one end. All pieces are glued from the outer edge of the mane, gradually moving towards the middle of the sheet. They use strips of different colors, the colors are arranged in a chaotic order.
At the last stage, the head is glued on top of the mane. Finish the craft with small details of the muzzle.
To give the craft volume, you can glue the mane strips only with the end closest to the center. In this case, the strips should be shorter so as not to sag.
Even from this dry summary one can understand that another strong point of the cut-off method is the multi-color and texture of the resulting craft.
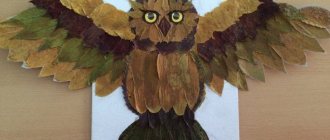
Using this method, the plumage of motley birds is imitated. Against the background of a broken appliqué, the huge yellow eyes of an owl or a riot of tropical greenery look great.
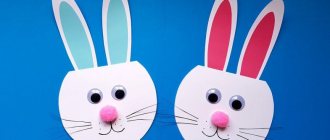
Bunny
In the junior and middle groups, students may be asked to fill in a pattern drawn on the base with paper elements.
Designing the bunny image will be an easy task. For the lesson, it is convenient to take blue cardboard and white paper for the elements.
Operating procedure:
- Select small pieces from white paper to decorate the image.
- Apply glue to the design.
- Glue the paper parts together without going beyond the boundaries of the image.
- Draw the nose and eyes with a black marker.
What does break appliqué develop?
If we speak in the words of presentations and developmental techniques, then making crafts using this technique develops fine motor skills, accuracy, the ability to repeat a picture according to a model, and the child’s color perception.
The method allows you to achieve bright external effects in simple ways; it can be used when making large independent projects by children at school.
For example, when designing a wall newspaper or a craft project about the world around you.
Break applique is a method that combines destruction and creation. In it, the slightly frightening destructive side of a child’s knowledge of the world around him is used for creativity, reconciling children’s freedom and the rules of life of the adult world.