Why is it useful to do appliqué?
Applications for children bring a lot of benefits:
- Creative work develops fine motor skills, which, in turn, affects the development of the brain;
- Using applications, you can tell your child about the world around him, learning new facts with him;
- Fine motor skills develop not only the brain, but also affect the development of speech, because all these processes are interconnected;
- Another quality that a child acquires during creative work is patience and perseverance;
- You can teach your child to be hardworking and clean by tidying up the workplace after school;
- Working with different materials, the child receives new tactile sensations;
- The child’s imagination develops, the first skills in creativity appear;
- Coordination of movements improves.
What is needed for the application
In the photo of appliques for kids you can see that a variety of materials are used for them. Any material can be used, even cotton swabs.
But there is still a list of required materials, without which not a single craft can do:
- Cardboard can be of different colors and sizes, as well as different textures. It is taken for the base, usually in A4 format, because for a smaller size the details of the craft will be too small;
- You can buy glue either purchased or make the paste yourself. Usually they take PVA, which the child applies to the appliqué details first with his finger, and only then starts with a brush or directly from the bottle;
- When a child is just learning to make crafts with his own hands, you can use plain paper for creativity. As you grow older, you can take another material or combine paper with something else;
- Scissors – a child should be taught how to use this tool from a very early age. It is better not to give them to children, preparing the parts yourself.
Application image options
As a gift to your beloved mother, you can create a beautiful craft from a couple of wonderful kangaroo silhouettes.
The kid will probably be interested in the opportunity to simply bend the part to make a frog's mouth or dog ears. Showing and teaching him this is not difficult at all.
Note!
DIY paper origami craft step by step: ready-made diagrams for creating beautiful origami at home (90 photo ideas)
Crafts from paper and glue for children: step-by-step instructions for creating interesting crafts with your own hands (90 photo ideas)
- Children's paper crafts: 110 photos of the best ideas for creating unusual crafts with your own hands. Master class + step-by-step instructions
The main part of the part is pressed tightly with one palm, and the edge is wrapped either towards itself or away from itself. It may be convenient in different ways for each case.
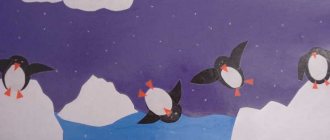
This cute tit bird is easy to make and hassle-free. The posts are sequentially glued, then the grass, then the thread on which the colorful silhouettes of birds sit.
For the picture “Fish”, the teacher cuts out aquariums, and pieces of scraps are used as bubbles. The blue background can be pasted on or simply painted on. The child just needs to stick on bubbles, seaweed and fish.
The boys will certainly be interested in the picture of a boat at sea. An ordinary cocktail tube is glued on, and sails and bottoms were made on it. Flags, clouds, sun. The sea is done with gouache and finger.
Take into account
In any creative work with children, you should remember that children often find it difficult to concentrate on one thing for a long time. Therefore, creativity always takes place in a playful form and without coercion.
The following factors should also be taken into account:
- The plot of the application should be simple and understandable to the child, otherwise he will not have any interest in the craft;
- Classes must be conducted in good faith;
- The course of work should also be designed taking into account the age of the child;
- It is better to alternate different materials when working to avoid monotony;
- If the child is not persevering, you need to prepare everything for work in advance, otherwise he may not be able to endure until the end of the lesson;
- Any work must be systematic, so you need to do creative crafts at least once a week;
- Children should not be occupied for more than 5-7 minutes; they quickly get tired and switch to something else.
- With older children, the time is increased to 15 minutes per lesson;
- To prevent the child from being distracted by foreign objects, there should be only creative materials in the workplace.
Volume of applique crafts
Creating a pattern by gluing multi-colored pieces of fabric or paper - applique. Making a three-dimensional applique craft is not an easy task. However, having the initial simple skills to create such images, you can engage in such creativity.
If you devote a little time to activities with your baby every day, then little by little, without much difficulty, he will master this technique and independently “create” to the delight of himself and those around him. For such crafts, you need to stock up on colorful paper, glue, scissors, cardboard and a stencil. Good luck.
Paper applique of shapes
A beautiful applique for the youngest children can be made from geometric shapes. With the help of such work, you can learn the names of the figures and at the same time learn how to work with paper.
For example, you can make a beautiful house out of paper; you won’t need many parts for it: a triangle for the roof, a large square for the house itself, small squares or a square for the window. You can additionally cut the pipe into a rectangle.
Progress:
- You need to glue the house onto the cardboard base;
- At the top, a roof is glued to the square of the house. Make sure that everything is neat, the glue should not extend beyond the contours of the elements;
- Now you need to glue the window in the center. If the house is large and there are several windows, you need to place them at an equal distance from each other;
- All that remains is to add a rectangular pipe to the roof. A simple craft is ready.
- If you are making such an applique with an older child, you can additionally stick grass and the sun on the craft or add them to the picture.
- With a small child, the elements that have been listed will be enough to keep his attention focused on work.
Making a hedgehog with your own hands
The second option, which you can even make with your child for an exhibition in kindergarten, is a funny paper hedgehog. The inventory list remains the same.
Regarding the instructions:
- Making needles - one of the best options is to put your child's hand on dark paper, trace and cut out the shape yourself.
- You need to make about 4-5 such products per craft.
- Next, the palms are arranged and glued together to form small needles on the hedgehog’s back.
- The hedgehog itself can be downloaded on the Internet, printed on paper and cut out in advance.
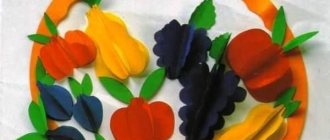
Next, all the parts are connected, eyes and additional objects are added, for example, fruits. The child can perform them in the “ragged style”.
It is enough to draw an apple and a pear on colored paper so that the child can trace the outline of the picture.
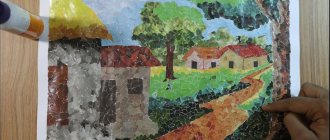
Crumpled paper applique
The plot for such a craft can be completely different. Let's try to make a Christmas tree under the snow.
To do this you will need:
- A sheet of cardboard for the base,
- Glue,
- Scissors and colored paper.
Instead of paper, you can use multi-colored napkins: they are softer and easier to use and wrinkle faster.
Progress:
- Colored paper needs to be cut into pieces or torn and crumpled each of them. If the craft is made from napkins, they can be divided along the folds into four parts;
- Draw a Christmas tree stencil on a sheet of cardboard to make it easier to glue and not go beyond the contours;
- Now, within the contour, you need to fill the Christmas tree with paper balls.
- You can smear glue on the entire surface of the cardboard at once, or you can smear a separate ball, gluing each part in stages;
- When all the green paper has filled the Christmas tree, you can stick some white balls on top, as if snow were growing on the Christmas tree. You also need to attach a tree leg made of brown paper.
Children will really like this craft, because the process is quite exciting, and all the details are made by hand.
Hippopotamus
The hippopotamus, adored by all children, is made from rough paper. That's why he's such a delight. Plus the water is almost like “real”, transparent. The body is visible through it. For the craft, white paper is painted in a light blue tint, which is produced by diluted blue gouache.
Using a thick soft brush, the sheet is quickly covered with the solution. If it bends due to such a procedure, then you need to go through it again. In five minutes you can actually prepare up to 27 leaves for all the children in the garden.
The silhouettes of the head with the nose and nostrils and the tummy are cut out. For the water element, bluish toilet paper or napkins are used. The main thing is to explain that there is no need to put glue on them, otherwise the paper will tear. Correctly apply water to the already applied glue and blot with a dry piece.
Cereal application
Paper crafts can always be diversified with another type of material, for example, cereal.
- An outline of what will be depicted on the craft is also drawn on the cardboard base.
- For example, you can take a hedgehog, which will require two types of cereal.
- After the outline and all the details of the hedgehog are drawn, all that remains is to fill each area with cereal.
- So, needles can be made from buckwheat. The muzzle can be glued together from rice or corn grits. The nose can also be glued together from buckwheat.
- In order for the products to stick better to the base, first coat it with glue, and only then pour the cereal along the contour and allow the glue to dry.
After this, gently shake the craft so that the non-adhered elements fall off.