Hedgehog made from cones and a plastic bottle
So, autumn. The children have gone to school and, in addition to other worries, the fragile shoulders of parents of primary school students also have the responsibility to help their kids with autumn-themed crafts. If you're looking for simple ideas, check out how to make a hedgehog using pine cones and a plastic bottle.
There are a lot of options for such crafts; you will find several examples in this article. But the author of this project came up with an original way, covering the bottle with tights and securing the cones with glue and thread, that is, simply sewing them on.
It turned out neatly and, most importantly, reliable, at least the hedgehog will not fall apart after the first examination by the children. So learn from your wise parents. If you are interested in more details, use the link to the website of the author of this craft under the gallery with step-by-step photos, you will learn a lot of interesting things.
Yes, if you want a cute hedgehog, choose the right bottle, like in the photo, with a narrow neck.
Below see photos of the master class
Photo source: cenorez.ru/?p=5931
Below are some more examples of how to make a hedgehog from pine cones and a plastic bottle.
For example, it’s not at all difficult to make such a surprised hedgehog from pine cones.
Prepare:
- Pine cones,
- unnecessary plate
- 2 caps from plastic bottles,
- plastic bottle,
- any glue,
- scotch,
- leaves, acorn, everything that is suitable for decoration.
It's very easy to make a hedgehog
- Glue the bottle to the plate and wrap it with tape.
- Glue the pine cones.
- Make round eyes out of paper and secure them on top of the lid itself.
- Cut whiskers out of the plastic and tighten the lid until it holds tightly.
- You can glue a red rowan on top and cut out green paper.
Here the hedgehog is ready. Try it, you might like it.
Photo source: handmadebase.com/easy-and-quick-make-hedgehog-of-cone-and-n/
The third option, a hedgehog made from a plastic bottle and pine cones, decorated with green grass.
Methods for attaching cones to a plastic bottle were described above. You can glue it, cover the bottle with plasticine, wrap it in fabric and sew it on.
In general, this is not an easy matter, so choose the option that suits you best. Maybe you can come up with some original way of your own.
Photo source: www.toysew.ru/raznoe/ezhik-shishek-podelka.html
For this craft, in addition to pine cones and a plastic bottle, you will need black wire, scissors and super glue. In this case, a large five-liter bottle was used, so you will need to cut it to the desired size and insert the parts into each other, securing with glue. Then paint the bottle black, when dry, draw a face and eyes. Make antennae out of wire and finally, the hardest part, cover the body of the bottle with cones.
How the author of this craft dealt with the final stage, you can watch the video on the website, link under the gallery. See step-by-step photos below.
Photo source: svoimirukamy.com/yozhik-iz-plastikovoj-butylki-i-shishek.html
And one last example. But this is not just a hedgehog made from pine cones and a plastic bottle; here the basis of the design is a metal bowl. A plastic one will probably do, as long as it has a solid base. This simplifies the task a little, so thanks to the author for the idea. True, attaching a cut bottle to a bowl is also not easy, but if you give more glue and tape, it should work out fine. Cover with primer and let dry. Well, then as usual. Glue the cones and draw a face. The entire composition can be covered with moss and some other decor can be added.
Below you can see a short photo tutorial
Photo source: stranamasterov.ru/node/93582
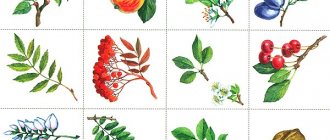
Hedgehog applique: options, description, diagram
While working, you will be able to teach your child to master a variety of techniques, apply tools in creativity and use them correctly.
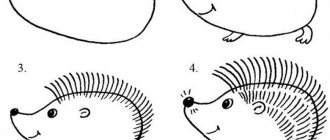
First hedgehog applique
- Draw the following pattern on white paper.
- Place the gray cardstock face down. Trace this stencil with a simple pencil, thus marking the outline of the hedgehog. Cut out the workpiece.
- Prepare a couple of black paper strips approximately 6 cm wide. Cut the strips into a thin fringe. Tuck the edges of the strips with scissors.
- Glue the resulting fringe to the back of the animal. Take pink paper and cut a circle out of it. Then glue this circle where the nose will be. Cut out the hedgehog's eyes using white and black paper. Using a pen, draw a smile on the hedgehog.
Let's start cutting
Second hedgehog applique
To perform the following application, follow these steps:
- Take the following template.
- Prepare stencils for each element.
- Cut out these parts, taking into account the ratio of shades and numbers.
- Stick the blanks onto the template one by one and place each element in its place.
Sample
Hedgehog made of cones and straw, moss
Let's start creating
- Next, wrap the straw around the frame in the belly area.
- Form a hedgehog's head from a small piece of straw and draw out its muzzle. Wrap all the straw very tightly with twine. Attach the head to the body using twine as well.
- Wrap small pieces of straw around the neck, thereby connecting the head and body. Form a headband of straw on your head and tie it with twine. Do the same with the remaining straw, forming the back of the hedgehog and the rest of the body.
- Make the belly large for balance, since you will be attaching the pine cones to the back. Because of them, the hedgehog will fall back.
- When you form a hedgehog, decorate it. Trim any thatch that sticks out in advance.
Shaping the body
Glue the cones on the head. Next, glue them from top to bottom so that the animal’s fur coat gradually forms. Glue the cones on the sides too.
Decorate with pine cones
- If the hedgehog has a very long nose, trim it a little and wrap it again with twine.
- To make the twine invisible, cut the straw, then use a glue gun to glue it to the twine. So mask all visible parts of the twine.
Let's continue
- Glue the nose and eyes.
- Decorate the animal with a bow and insert a flower into the hedgehog’s paw.
Finishing the creation of the craft
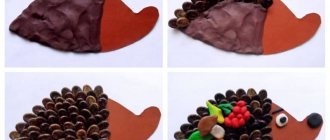
Instructions on how to make a hedgehog from a pine cone and plasticine step by step
1. First you need to prepare the plasticine. If you have a beige block, then take it ready-made. If there is no such shade, then mix white with a drop of brown until completely homogeneous. You will get the color you want. Mash a lump of plasticine in your hands.2. Pinch off 4 small pieces from the large lump to sculpt the paws, and leave the rest for the sharp face of the hedgehog. That is, the back of this animal will be made of pine cones, and the front sharp part and legs will be made of plasticine.3. Pull the torn small pieces of plasticine into thin parts, but not tubes, but rounded parts that widen towards the bottom. These will be the paws. Stretch the large ball intended for the head into a cone, sharpen the muzzle, and smooth it out with your fingers. You can bend the plasticine a little at the back so that you can attach it to the bump later.4. Use a large cone; it must be open, that is, the scales should stick out in different directions, because they should imitate the needles of a hedgehog. Typically, green fruits dry out and open during storage. Attach the head to the sharp part. There will probably be several scales on which you can attach this part. Press down, and perhaps a couple of scales will fall so that they look like ears, just like in the above case. That will be luck.5. Attach the elongated paws at the bottom where necessary, and use a toothpick to cut the toes. Now press down the entire figure so that the plasticine takes the desired shape and adheres well to the pine cone. While the plasticine is still soft, it adheres well, and then it will harden and hold quite well. It is also necessary to design the muzzle until it is only sharp and has the desired shape. You also need to add eyes using small rounds of white and dots of black plasticine. And attach a black bead to the tip itself, roll it out of plasticine.6. So we got a wonderful miniature hedgehog. He really looks like a forest animal. This autumn craft will be in demand among children. This is an option for kindergarten and for kids who are learning to work with plasticine and love to combine different materials in one product. Don't be afraid of such experiments. Even if it seems that the original bump is not similar to the copied object. You can always make additional details from paper or plasticine to decorate your masterpiece. The photo shows a ready-made version of a hedgehog craft made from a pine cone and plasticine Like the author