The Internet is the main assistant of the modern teacher
Well, there is some truth in this; we, preschool teachers, agree that it is time to change the program. But I want to defend our “conservatism” - there are decades-tested techniques and practices that really work, even applicable to today’s interactive children. And, in addition, in kindergarten we try to diversify joint activities as much as possible and add something non-standard to class notes.
And non-traditional fine art techniques are one of the ways to raise a creatively developed person.
So, regarding non-standard drawing methods, I personally definitely need to attend the webinar (and I advise you to), which is dedicated to classical and non-traditional materials in children's fine arts. Moreover, UchMag offers a tempting promotion - topping up your personal account and issuing a special webinar participant certificate.
From the literature, I would recommend the manual by G.N. Davydova “22 drawing lessons for preschoolers. Unconventional techniques,” which can be purchased at Ozone or UchMag. This is a good method by which you can compile a competent and interesting summary of unconventional drawing in the senior group, just in our topic. Parents will also find this book useful; it contains excellent materials about non-standard techniques for using paints and improvised objects.
An excellent gift for children would be the “I paint without a brush” set - it contains paints, various rollers, stamps, spatulas, and a design notebook. An inexpensive but cool set that will help your child become more daring in creativity, creative, as they say now.
What non-traditional methods of image transmission exist?
It should be noted that it is extremely important to use unusual drawing methods for children with developmental delays. They don't particularly like to draw, but they find it extremely rewarding to be creative. Therefore, you should show your child that there are many ways to depict something on paper. Remember that the child needs training; take the time to show the children how to draw using available objects.
A love of art instilled in children at an early age will help them grow into versatile individuals.
So, non-traditional drawing in the older group, and indeed for other age groups, involves the use of the following techniques:
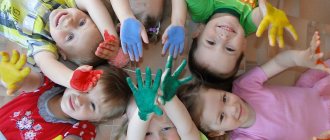
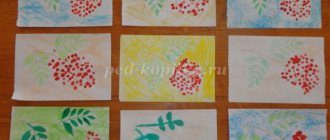
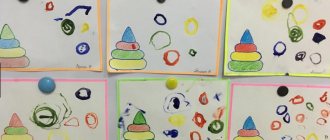
- Finger painting - if little children simply like to dip their fingers in liquid and move on paper, then older children already make complex patterns or combine finger painting with other methods. At the same time, older children dip each finger in paint of a different color and try not to stain the white sheet of paper, but to make impressions carefully. If you put a print of an entire palm, then you can draw many different characters from the resulting print.
- Drawing with pokes - for this you take either a special brush with cut bristles or cotton swabs. You can draw using water or a dry poke. In the latter case, “fluffy” lines are beautifully obtained.
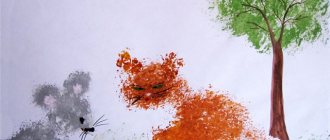
- Leaf stamps – here a real leaf from a tree, preferably dried, is used as a stamp. The paint is applied over the leaf, which is then gently pressed onto the paper. This technique can be used to create beautiful autumn landscapes.
- It is impossible to imagine a non-traditional drawing class in the senior group without blotography - a favorite type of creativity for children. It's simple: put a blot of paint, take a drinking straw and blow through it onto the blot, blowing the paint in different directions. It’s especially interesting to figure out what can be added to make the blot turn into someone or something.
You can also drop a blot, fold the sheet in half and get a mirror image of a unique shape.
They also use threads for blotography - we wet the folded threads in paints of different colors, put them on paper, fold it in half or put another sheet of paper on top and pull the threads out from under the paper.
Album “Options for non-traditional drawing techniques with children 4-5 years old
State budgetary preschool educational institution kindergarten No. 43, Kolpinsky district of St. Petersburg
Options for non-traditional drawing techniques with children 4-5 years old
Prepared by the teacher:
Gurina. A.A.
St. Petersburg, Kolpino
2020
Finger painting (fingergraphy)
Tactile sensations are, along with visual impressions, the leading way of understanding objects and phenomena around us. Therefore, special attention is paid to fingergraphy in kindergarten. But if in the younger groups children made dotted strokes, for example, painted peas on an umbrella, then in the middle group the children learn to draw lines, spots of different sizes, strokes, and also paint over certain elements of the drawing.
At the beginning of the year, children in the middle group repeat making dots with their fingers and train the skill of making round elements
In the middle group, the practice of finger drawing according to a pattern is introduced. The teacher tells, shows and hangs up an algorithm of actions on the board, how to draw an animal or a person using prints and dots-squiggles made with a pencil.
Schemes of step-by-step finger painting are presented in the book by I. Molnar “Imprint, dot, stroke. We paint with our fingers."
For fingerprinting, gouache is usually used, since it does not require dilution with water, is thick and produces bright shades. However, you can also use special hypoallergenic paints for finger painting, as well as watercolors. When working with the latter, before dipping your finger into the paint, you need to moisten it with water or drop some water into a container with watercolors.
Finger painting technique
The sequence of work in the fingergraphy technique is as follows:
- Dip your finger into the paint can.
- Using each finger we pick up paints of different shades. Remove excess with a damp cloth.
- Using your fingertips, apply the design to the sheet.
- After finishing work, wash your hands with soap.
In addition to berries and leaves, kids can also use their fingers to draw lines to depict branches.
Palm painting
As with finger painting, palm painting involves creating an imprint and adding to it using brushes. In the middle group, the imprint becomes the basis for creating various objects: birds, foliage, fish, etc. In addition, with your palms you can create elements such as leaves on trees, flowers in a vase, hedgehog needles, etc.
Palm drawing technique
For palm painting, the drawing algorithm will be as follows:
1. Place your palm in the saucer with paint. In the second semester, children learn to create multi-colored prints with one hand, so the paint will be applied with a brush held in their free hand. The skill of such multi-colored prints is developed in lessons on the topic “Bullfinch”, “Butterfly”, etc.
2. Press your palm firmly against the sheet, if necessary, slightly turn it in a circle, horizontally or vertically.
3.After finishing work, wash your hands with soap.
Drawing birds with their palms, the children add details made with a brush - beak, legs
Poking drawing
This technique is indispensable when creating “fluffy” or “spiky” images. Needles on a hedgehog, fur on a kitten, Christmas trees, dandelions - all these images acquire a special flavor thanks to the poking technique.
Poking technique
To create a poke:
- Place a dry brush with stiff bristles into a jar of gouache.
- Holding the brush vertically, we make a sharp blow to the paper.
- Rinse the brush and blot with a napkin.
The poke can only be done with a dry or semi-dry brush.
Toothbrush painting technique
To obtain voluminous, multi-layered designs, a toothbrush is used. Having collected the paint, we brush it across the sheet, focusing on the design.
In the middle group, drawing with a toothbrush is usually combined with the use of the poking method, appliqué or drawing with cotton swabs.
Toothbrush drawings in the middle group are usually made on a colored background
Monotype
This unconventional technique involves creating a picture by imprinting part of the design on the blank half of a folded sheet. At the age of 4–5, through monotype, children begin to master landscapes, which they will work with in older groups, train the ability to find the middle of an object, and develop the skill of seeing symmetry.
At the same time, not only symmetrical, but also paired objects are created in this way. To do this, a whole image is drawn on one half of the sheet, which is also completely printed on the second side.
Monotype technique
To create a monotype image:
- We bend the sheet in the middle - vertically or horizontally, depending on the location of the depicted object.
- Unbend and draw a picture on one half.
- We bend the sheet again and iron it with our hands.
- We expand and supplement the resulting image with the necessary elements. For example, let’s make a blue background for a river in which a forest is displayed.
In the drawing of a forest reflected in a lake, after unfolding the sheet, children draw a green strip of grass.
Spray
The essence of the technique is that kids pick up paint with a brush or comb, and, pointing it at the sheet, run a pencil along the bristles, thus painting the space of the drawing.
To create a one-color image from several elements, stencils are applied simultaneously
In the middle group, children become familiar with the concepts of foreground and background. For this, the multilayer spray method, which involves the use of stencils, will be an indispensable assistant.
Methodology for working with multi-layer spraying
To make a multi-layer spray:
- We attach the stencil to the sheet using paper clips.
- Take the paint with a brush.
- Let's spray.
- Apply another stencil.
- Spray a different color.
- We remove the stencils - the image turned out to be voluminous and multifaceted.
For multi-layer spraying, you can use stencils of the same image, but of different sizes, then you will get a flickering effect
Scratch
The technique involves scratching image lines on a paper substrate coated with paint according to a pattern previously applied with wax crayons.
Grattage technique
The procedure for creating a grattage drawing will be as follows:
- Color the drawing with wax crayons.
- Fill the surface of the sheet with black paint or ink.
- Leave to dry.
- Using a stick with a sharp end (for example, a wooden kebab skewer), we scratch the lines to reveal the design.
Drawing through gauze
Drawing through wet gauze does not require the use of unusual tools; the picture is created with a brush and paints.
Technique for drawing through gauze
To create a drawing using the original technique:
- We moisten the sheet with pieces of wet cotton wool or cotton pads.
- Place gauze on the paper and straighten it well.
- We create the drawing as usual.
- Let it dry, remove the gauze - the image becomes textured.
When painting through gauze, you need to apply the paint generously, as some of the “color” will disappear after removing the fabric.
Drawing with glue and semolina
We mark the indicated contours of the drawing with glue, pour in semolina and press it on top with a clean sheet. Remove the top sheet and shake off the remaining cereal. The elements are filled in one by one.
In the middle group, with this type of drawing, kids practice the ability to outline a stencil and apply glue exactly within the boundaries of the image.
The substrate for drawing semolina should be colored, since the grain will be invisible against a white background.
Wax painting
In the middle group, kids draw lines, spots and simple geometric shapes with a candle.
Wax painting technique
To create a candle design:
- We draw the outlines of the design on a white sheet with a candle.
- Paint the sheet with any colors.
- The wax lines remain unpainted and appear on the substrate.
Drawing with a wax candle is usually used in winter-themed lessons.
A variation of this technique is drawing with wax crayons. The process technology will be the same, but the wax pencils are multi-colored, so the drawings after filling with paint will be brighter.
For painting with wax, it is better to take watercolor paper, since children may not calculate the degree of moisture in the brush, and the sheet may break through.
Blotography
The essence of the technique is to obtain pictures based on spots and blots. Spots can either be used to decorate a design as intended, or can be used as a basis for an image in a traditional style.
Blotography technique
To create blots:
- Dip the wet brush into the paint.
- Make a stain or place a drop.
- Blow from a cocktail straw onto the paint, blowing it in the desired direction.
In the middle group, kids learn to inflate thin elements from a spot, for example, tree branches
Drawing with foam rubber
To highlight the texture of the depicted object - clusters of flowers, curly clouds - the method of applying paint with foam rubber (or a piece of sponge) is used. To prevent the sponge from getting your hands dirty, it is clamped with a clothespin that acts as a handle.
Stamping technique using natural materials
A whole vegetable (onion, corn, potato, cucumber, etc.) or fruit, berry (apple, lemon, feijoa, etc.), cut in half, flowers (daisies), shells, is painted and an imprint is created on paper. This technique is convenient for drawing cross-sections of fruits and vegetables. For example, to create the composition “Grandma’s Compote,” kids draw the outlines of a pan with a pencil, and depict fruits with stamps.
Additional non-standard techniques
- Prints – there are many options here. Imprints can be made using almost any object: corks, potatoes, crumpled paper, foam rubber and anything that has an interesting texture.
- Stencils – there are ready-made stencils, you can make them yourself. But in any case, the technique is very interesting, but requires skill.
- Wet painting - we draw either on a pre-moistened sheet of paper or the finished drawing is lowered into a basin of water for a couple of seconds. It turns out very beautiful!
- Painting with a toothbrush - spraying. Paint is applied to the brush and sprayed onto a sheet of paper with a stick. You can also draw pictures with a toothbrush, depicting grass, animal fur, etc.
- Monotopy is a cool technique, everyone knows it. Take a sheet of paper and fold it in half. Then on one half we draw a picture or element with paints, bend the sheet, and get a mirror image. This is how you can paint water landscapes. You can also do it another way: we apply the design to the oilcloth, and then press the oilcloth to the paper. It turns out great!
- A scratchplate is something similar to an engraving. We draw chaotic strokes on white or colored paper. After drying, rub the surface with wax. Next we paint it completely with black gouache. Then we scratch the design with a skewer.
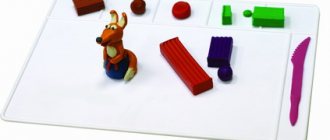
- Plasticineography - drawing with melted plasticine.
- Stained glass - a sketch is drawn on paper, maybe graphic. Then we apply a layer of PVA along the contour and let it dry. Next, the space inside the outline is painted as in a stained glass window.
- Drawing with sand, salt, scraps of paper. First, we draw on a sheet of paper with PVA glue, then we sprinkle some loose material on top, shaking off the excess. You can also paint on top of the drawing, it will turn out very unusual.
- The non-traditional drawing technique in the older group also includes templateography. We take various objects and trace them along the contour, selecting the shape so that in the end we get the intended object.
- Drawing with different objects: drinking straws, disposable forks, flat comb, toothbrush, wooden sticks, etc. Thick paints can be applied to paper with spatulas, rollers, or simply with your fingers, as I have already mentioned.
I wonder how you draw with children? Perhaps you have a personal patented drawing technique? Share with us?
It is clear that I have not listed all the methods, but I am talking about what I know myself. I advise parents to definitely try the listed image application techniques and report the results. Believe me, it is very exciting and useful for kids. You will thereby give children the opportunity to go beyond limits, to explore the endless possibilities of materials and imagination.
If you found the article informative, show it to your friends on social networks. I will be glad to see new subscribers to the news!
Sincerely, Tatyana Sukhikh! Till tomorrow!
The benefits of learning different drawing techniques
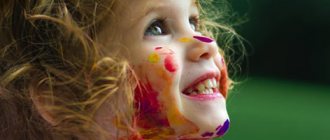
Drawing for children is the first creative activity. Artistic activities contribute to the formation of a versatile, harmonious personality. They train fine motor skills and prepare hands for writing, teach attention to detail and concentration.
There are many drawing techniques, but non-traditional ones are considered especially useful for children. Creating drawings with palms, soap bubbles, stamps, threads and other original methods in childhood is much easier and more fun than with a pencil or brush. Having mastered various techniques, the child begins to think more broadly and can more accurately depict the intended image on paper.