What are the benefits of using non-traditional techniques?
This is interesting. From an early age, children try to reflect their impressions of the world around them in visual activities through the visualization of sensations. Hence the desire to draw with fingers on foggy glass, with a stick on the sand and with chalk on the asphalt.
So, existing non-traditional drawing techniques have the main advantage - they allow you to quickly see the results of your work. And, really, putting a blot on paper with your own finger and seeing a funny design in it is fast and fun. In addition, unusual techniques allow
- develop creative abilities;
- form a non-trivial view of the world around you;
- help develop imagination and creativity;
- develop fine motor skills;
- cultivate independence.
Unconventional drawing in the second junior group
An unconventional way of drawing is, first of all, artistic effectiveness and unpredictability of the result. The technique includes unusual techniques for performing work that do not require special skills. This option can be reminiscent of an exciting activity that will allow kids to unleash their creative potential in a minimum amount of time. This method offers budding artists creative freedom.
An unconventional drawing method for younger children
For example, if a child smears his finger in paint and draws with it, or leaves his palm print on the drawing, the teacher will not punish him. The process is completed only by adding elements to obtain the desired result. Drawing turns into real fun.
What does the use of non-traditional techniques give to students?
Even at an early age, children want to reflect their impressions and explore the world around them through visual activities. Visualization of sensations helps them with this. Therefore, the child strives to make a drawing with one finger on the foggy glass.
Note! Some kids need a stick to draw pictures in the sand or chalk for the asphalt.
Existing non-traditional drawing techniques in kindergarten in the 2nd or 3rd junior group according to the Federal State Educational Standards method, which allow you to quickly see the results of your activities. This technique greatly simplifies the process when solving some teacher problems in methodological terms. Presentation of the drawing contributes to:
- development of creative abilities;
- formation of a non-trivial view of the world around us;
- nurturing independence.
The importance of classes
Even at 3 years old, children find it difficult to hold a brush in their hands. Not everyone is equally interested in visual arts. Therefore, in order to present your child with artistic creativity in all its glory, it is necessary to choose an appropriate theme. The drawing process must be turned into exciting entertainment. Teachers recommend conducting various experiments, for example, using unusual materials (leaves, sand, salt).
The use of alternative non-traditional drawing techniques for children aged 3-4 years has the following meaning:
- Full mental development of the child, increasing self-esteem, overcoming all fears.
- Development of abstract thinking.
- Formation of a holistic perception of the subject.
- Creating all kinds of conditions so that the baby can reveal his creative potential and freely express his individuality.
- Introducing children to the properties of various materials.
- Development of tactile sensations.
Scheme for drawing up lesson notes
This work must begin with the formulation of goals and objectives through visual activity. As for the goals, to those that were identified in the context of non-traditional drawing techniques in general, we can add some specific ones:
- practice the ability to recognize and name colors;
- introduce children to different types of drawing materials (gouache, watercolor, etc.);
- cultivate accuracy and goodwill in group and individual work.
During drawing classes using non-traditional techniques, the following educational tasks are solved:
- children learn to work with signets, soap bubbles, cotton swabs, and also learn to draw with their fingers or palms;
- an idea of paint concentration and basic skills in creating shades are formed;
- expressive images are created, while maintaining the liveliness and spontaneity of the child’s worldview;
- the joy of receiving a product of one’s own creativity is fostered.
The success of the lesson also depends on how carefully the teacher distributes time between all stages of work. As you know, a lesson in kindergarten lasts 30 minutes, during which you need to go through 3 stages of work:
- introduction (about 5 minutes) – implementation of motivational techniques (conversation on a topic, playing with visuals, role-playing, reading poems, listening to songs, etc.);
- the main part (about 20 minutes) is to complete the drawing;
- conclusion (about 5 minutes) - summing up, praise of the teacher, reflection of the kids (in the form of answers to questions - “Did you like drawing in such an unusual way?”, “Do you think you succeeded?”, “Whose work do you think is the most beautiful ? etc.).
Whatever technique you choose, children must be helped to realize their intended image.
Please note that some techniques (such as signet painting) do not require much time to complete. In this case, you can increase the timing of the introductory part using dramatization, role-playing, that is, techniques that require a lot of time.
Summary of GCD for drawing in the younger group using non-traditional drawing techniques
Direct educational activities in the younger group (3-4 years old).
Abstract. Author: Marina Viktorovna Kozachenko, teacher Place of work: MKDOU “Kindergarten No. 4”, Korenevo village, Kursk region
Summary of a drawing lesson in the second junior group using non-traditional drawing techniques.
Description of work: a summary of educational activities on visual arts (drawing) using non-traditional drawing techniques - finger and palm drawing, will be of interest to educators and parents of children 3 - 4 years old. Finger painting is very popular with kids and has a beneficial effect on the development of the child. Theme: Multi-colored carpet.
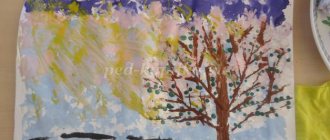
Goal: Continue teaching children to draw grass with their entire palm using the dipping technique. Reinforce knowledge of the 4 primary colors (green, red, yellow, blue). Improve the ability to draw any lines from a blot with your fingers (blotography). To develop creative qualities in preschoolers. Arouse interest in drawing and a sense of satisfaction from the work. Integration of educational areas: “cognitive development”, “speech development”, “physical development”, “artistic and aesthetic development”, “social and communicative development”. Materials and equipment: finger paints of 4 colors, plates with green paint, a strip of paper (0.5/3 m), a basin with warm water, wet wipes, a toy cockerel, a house for a cockerel, a damaged rug, gram. recording "Waltz of the Flowers". Progress of the lesson: Educator: Come on in, guys, don’t be shy, make yourself comfortable. Make friends with your legs, put your hands down. Get your ears ready, get your eyes ready, I’ll tell you a fairy tale now... (to the accompaniment of Russian folk music, the teacher tells a fairy tale) Educator: At the edge of the forest, in a small hut, there lived a cockerel and his chickens. One day, mice snuck into the hut where the cockerel and chickens lived. Even during the day they walked around the house and gnawed everything they came across. And then a disaster happened: the mice gnawed through the rug on which the chickens always played. The rug was very beautiful, like a spring lawn. It depicted grass and beautiful flowers. The chickens loved this rug! (showing a damaged rug) Educator: Guys, do you want the cockerel from this fairy tale to come to us? (children's answers) Let's remember the Russian folk nursery rhyme about a cockerel. Reading a nursery rhyme There is a cockerel, a red comb, a tail with patterns, boots with spurs, a double beard, a quick gait, he gets up early in the morning, he sings red songs. (The teacher takes the cockerel out of the house) Teacher: Guys, look, the cockerel brought paints and asks you to help - draw a new beautiful rug for his chickens. Shall we help our guest? (children's answers) Educator : Oh, kids, the cockerel forgot to bring his brushes! But it's okay, we can handle this task because we have handles. Psycho-gymnastics Show me your hands, stretch them forward, close your eyes and I will make your hands magical. (the teacher strokes the hands of each child) Open your eyes, your hands have turned into magic and now we don’t need brushes - we will paint with our palms and fingers. Let's show with me how our fingers draw in the air. (Kids repeat after the teacher movements that imitate drawing a variety of lines: up, down, right, left). The tables are arranged in three rows. A strip of paper (0.5/3 m) is fixed on the middle row. 1 and 3 each have 5 plates with green paint. Separately prepared: wet wipes, basins with warm water and towels. The teacher brings the children to the middle row and places them on both sides (opposite each other). Educator: Children, first we will draw grass. What color will we paint the grass? (children's answers) Educator: You need to go to the plate with paint, dip one palm into the paint, then the other. We return to our seats and press our palms to the paper. (Show the teacher on a separate sheet).
Sounds like gram. recording "Waltz of the Flowers". Doing work by children. Children sit at the tables and get to work. After drawing the grass, the children wash their hands. Finger gymnastics (preparing children for finger painting) Into the forest by the berries One, two, three, four, five (the fingers of both hands “hello” - touch each other: first connect the thumbs, then the index fingers, etc.), B We’re going for a walk in the forest (the index and middle fingers of both hands “walk” along the table). For blueberries, for raspberries (with the index finger of your right hand, bend the fingers on your left, starting with the thumb), for lingonberries and for viburnum. We will find strawberries and take them to our brother. (the index and middle fingers of both hands “walk” along the table) Children return to their places at the tables. Educator: Now we will draw flowers on the rug. The flowers will be colorful and very beautiful. And we will draw them using a drawing technique - blotography, the word means a drawing from a blot. We are already familiar with this drawing technique. Let me remind you. (Three pipettes contain paint: yellow, red, blue) The teacher shows on a separate sheet the technique of drawing from a blot, drawing straight lines from the blot with his finger.
Doing work by children. Each child has 3 blots of different colors, children draw flowers. Educator: What colors of paints do you use to paint flowers? At the end of their work, children wipe their hands with wet wipes and return to the tables.
Educator: Do you like the rug you drew? And the cockerel really likes it, but he wants to know what colors of paint you used? (children's answers) Children fix the primary colors. Educator: The cockerel thanks you, now his chickens will play on a beautiful rug again. And the chickens gave you “Colored Peas” candies in gratitude. What color is the candy? (children's answers) Educator: Well done! You did a great job! When our mat is dry, we will roll it up and give it to the cockerel, and he will give the mat to his chickens.
We recommend watching:
Drawing with palms and fingers in kindergarten for children of the middle - senior group. Notes on drawing in the second junior group. Notes on drawing in the junior group. Notes on drawing with elements of application in the younger group on the topic: Space.
Similar articles:
Master class for preschool teachers. Unconventional drawing techniques
"Wet" drawing technique
Parents about non-traditional drawing techniques
Application with drawing elements
Non-traditional drawing techniques in kindergarten for children 5-6-7 years old
What techniques are used
Modern methodology contributes to the implementation of the educational task when performing work.
Note! A similar technique is considered for children from 3 to 4 years old. In addition, you can organize additional interesting activities with minimal financial costs.
What technique is used in practice?
Drawing with cotton swabs
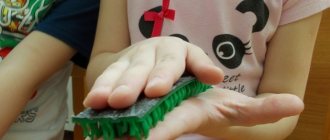
An unusual drawing technique develops a sense of rhythm and color. Cotton swab (stick) - a popular drawing technique is called the “poking method”. When creating a drawing, it is impossible to do without a cotton swab, container, and wet wipes. When creating a new material, little artists place a stick in a container of paint, and then apply imprints to the drawing.
Technology of activity teaching method
Important! Young artists can depict a river, rainbow, grass, rain, snow, sun, tree, sky or something else.
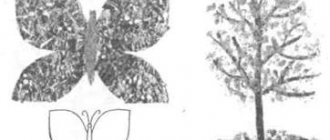
When creating a drawing using a cotton swab on the theme “Trees when autumn comes,” the teacher must show the children how to properly hold this object in their hands.
Instructions: Children receive blanks of tree trunks with branches, cotton swabs, and paints.
Important! To make it easier for the children, you can mark the area of the drawing, indicating the exact location of the foliage.
Finger painting
To implement this method, you can do without certain material. For example, a teacher prepares paint in advance with wet wipes.
Note! Implementing teamwork based on this technique is a great idea for both educators and preschoolers.
The teacher takes into account the mental and physical characteristics of the children and prepares a topic for drawing in advance, for example, “Foliage of autumn trees.” The teacher provides the little artists with a template - a large tree.
Other themes are also covered, such as “Winter” or “Summer is Coming.” In kindergartens, the finger painting “Snowflake” is most often created. To perform it, paints and pencils are used.
Instructions: The teacher distributes A4 sheets. The guys must draw a snowflake. To complete the work you will need a blue and white pencil.
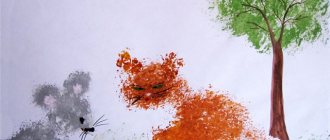
Drawing with palms
This method is not the most accurate, since children must draw with their palms. Before creating a drawing, the teacher must prepare a shallow container of paint. Pour some water inside and drip some gouache.
Note! Using this method, you can easily create collective drawings, for example, “Fish in the Aquarium”, “Our Aquarium”, “Merry Matryoshka”, “Firebird”, “Winter has come”.
Instructions: The teacher shows the children the finished substrate. The drawing is created on a sheet with a blue background. The guys must completely dip their palm into the container of paint. Then the teacher calls on the kids to go to the table where the aquarium is located, stand in a circle and leave their imprint there with their thumb up or to the side.
There is no need to put a mark on the one that the first comrade has already put. The teacher also warns that the fish must be located at a certain distance from each other. Then make an eye for your fish using white paint. Dip your index finger into black paint, make a pupil and carefully draw a line near the mouth.
Drawing with soap bubbles
This technique is the most difficult. Here children will have to show their imagination (open mind). Before starting to draw with soap bubbles using the preschool method, the teacher prepares material in the form of liquid soap, baby shampoo, water, watercolors (food coloring), cocktail tubes, and spoons.
Drawing lesson on the theme “Girl dancing” for the middle group
Initially, the teacher prepares the mixture, and then pours the mixture equally into small glasses. You can prepare the paint by diluting soap with water (the ratio should be 10:1). After obtaining the mass, the addition of dye and a little gelatin or glycerin is required. Thanks to these components, the bubbles retain their shape for a long time. The finished mixture will have to be placed in a cool place (away from the sun) and kept for 2 days.
Important! It is recommended to strain the mass through cheesecloth. The finished mixture should be placed in the refrigerator for 10 hours. Having received the material, you can make a outlined and regular print.
Instructions: The teacher invites the children to take a sheet of paper, a container with soap solution, straws and disposable teaspoons. Children must blow into the tubes to create foam. Next, a mass of one color is collected and laid out on a sheet. The balls should be placed far from each other. Once the shape of each print is dry, children can add a string to each ball.
Drawing with stamps
Drawing with stamps can reveal the possibilities of using familiar objects as art material. This method promotes the mental development of the child.
Note! When drawing with a stamp, a child develops an interest in inventive art, which leads to increased self-esteem and the development of coordination of movements.
Foam rubber impression
The main goal of this method is to introduce students to an unconventional method of drawing using the “foam rubber imprint” technique, and to develop the ability to arrange the elements of a drawing on a sheet of paper.
Educational qualities: fosters a love of fine arts and nature.
Developmental qualities: to develop aesthetic perception, a creative attitude to work, attention, memory, spatial thinking, fine motor skills of the hands, a sense of composition, color, color perception, to form in children a stable interest in visual arts, creative imagination.