What is the essence of non-traditional drawing for children 4–5 years old?
Non-traditional drawing is a method of visual activity that is not based on the traditions of this type of creativity in terms of the choice of materials for applying paint, but uses cotton swabs, fingers, foam rubber, crumpled paper, etc.
In kindergarten, non-traditional drawing is notable for the fact that all (!) kids get different pictures. For children in the middle group, these techniques of visual creativity, first of all, stimulate the development of research abilities, as they open up wide scope for experiments: applying dyes to materials of natural origin, drawing through gauze, etc. In addition, non-traditional drawing:
- trains sensorimotor coordination and fine motor skills, which is a key factor in speech development;
- develops memory, attention;
- promotes the development of imaginative thinking;
- forms the prerequisites for harmonious social and communicative development - children in the process of work turn to each other and to adults, ask questions;
- develops aesthetic taste and ideas about harmony.
Non-traditional drawing in individual classes, as well as as a type of work in lessons of various educational areas in preschool educational institutions, helps solve the following problems:
- expand children's understanding of ways to depict objects;
- develop interest in teamwork;
- practice working with different materials - to realize a creative idea, children draw using cotton wool, palms, stamps, etc.;
- activate children's creative abilities and imagination;
- create an emotionally positive climate in the team (the children’s work looks like a game - to make the lawn more beautiful, they draw dandelions with a poke of a cotton swab, and using their fingers to depict raindrops, they say: “Rain, rain, drip-drip-drip”);
- develop self-confidence.
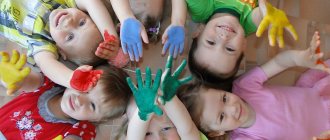
Non-traditional drawing classes create an atmosphere of goodwill in the team
Visual materials in the fine arts area
Visual materials play an important role in the corner. That is, these can be reproductions of famous artists, portraits of the authors themselves. It is also recommended to post materials on applied arts. For example, these will be albums on the themes “Khokhloma” or “Gzhel”. It is good to replenish the area of fine art materials that were studied in classes with children.
It is recommended to add several toys from folk crafts to the design of the fine art corners. For example, it will be a matryoshka doll and a carved horse. Undoubtedly, postcards, perhaps dedicated to passing holidays, will be a good decoration for the Fine Art corner. Such as March 8, Victory Day, New Year, etc.
Techniques and methods of non-traditional drawing for middle preschool age
Children 4–5 years old use non-classical drawing techniques to practice skills acquired in regular lessons:
- sketch the boundaries of the image with a pencil or paints;
- think over decorations - confetti, plasticine, beads, etc.;
- complete the missing elements, for example, multi-colored blots need to be combined into one form using lines made with pencils or paints;
- paint over the background (if, for example, a drawing of forest trees was created using the monotype technique, the background and sky need to be drawn separately).
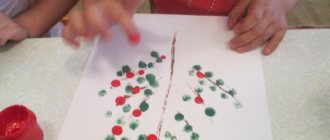
Finger painting (fingergraphy)
Tactile sensations are, along with visual impressions, the leading way of understanding objects and phenomena around us. Therefore, special attention is paid to fingergraphy in kindergarten. But if in the younger groups children made dotted strokes, for example, painted peas on an umbrella, then in the middle group the children learn to draw lines, spots of different sizes, strokes, and also paint over certain elements of the drawing.
At the beginning of the year, children in the middle group repeat making dots with their fingers and train the skill of making round elements
In the middle group, the practice of finger drawing according to a pattern is introduced. The teacher tells, shows and hangs up an algorithm of actions on the board, how to draw an animal or a person using prints and dots-squiggles made with a pencil.
Schemes of step-by-step finger painting are presented in the book by I. Molnar “Imprint, dot, stroke. We paint with our fingers."
For fingerprinting, gouache is usually used, since it does not require dilution with water, is thick and produces bright shades. However, you can also use special hypoallergenic paints for finger painting, as well as watercolors. When working with the latter, before dipping your finger into the paint, you need to moisten it with water or drop some water into a container with watercolors.
Finger painting technique
The sequence of work in the fingergraphy technique is as follows:
- Dip your finger into the paint can.
- Using each finger we pick up paints of different shades. Remove excess with a damp cloth.
- Using your fingertips, apply the design to the sheet.
- After finishing work, wash your hands with soap.
In addition to berries and leaves, kids can also use their fingers to draw lines to depict branches.
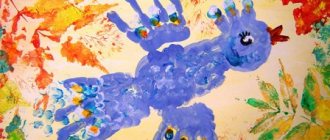
Palm painting
As with finger painting, palm painting involves creating an imprint and adding to it using brushes. In the middle group, the imprint becomes the basis for creating various objects: birds, foliage, fish, etc. In addition, with your palms you can create elements such as leaves on trees, flowers in a vase, hedgehog needles, etc.
Palm drawing technique
For palm painting, the drawing algorithm will be as follows:
- Place your palm in a saucer of paint. In the second semester, children learn to create multi-colored prints with one hand, so the paint will be applied with a brush held in their free hand. The skill of such multi-colored prints is developed in lessons on the topic “Bullfinch”, “Butterfly”, etc.
- Press your palm firmly against the sheet, and if necessary, slightly rotate it in a circle, horizontally or vertically.
- After finishing work, wash your hands with soap.
Drawing birds with their palms, the children add details made with a brush - beak, legs
Combined technique: fingergraphy and palm painting
For some topics, a combination of drawing with palms and fingers will be relevant. For example, for the drawings “Funny Octopuses”, “Fish”, etc., the main detail, that is, the body, is done with the palm of the hand, and the eyes and scales are drawn with the fingers.
The combined technique allows you to develop the ability to find the center of the image, mix colors and shades to obtain the required tone, which helps to more accurately convey the idea.
To depict a hedgehog, first draw the body using your palms, and then use your fingers to fill in the grass, nose and eye.
Poking drawing
This technique is indispensable when creating “fluffy” or “spiky” images. Needles on a hedgehog, fur on a kitten, Christmas trees, dandelions - all these images acquire a special flavor thanks to the poking technique.
Poking technique
To create a poke:
- Place a dry brush with stiff bristles into a jar of gouache.
- Holding the brush vertically, we make a sharp blow to the paper.
- Rinse the brush and blot with a napkin.
The poke can only be done with a dry or semi-dry brush.
In the drawing with a poke, very natural shade transitions are obtained.
Monotype
This unconventional technique involves creating a picture by imprinting part of the design on the blank half of a folded sheet. At the age of 4–5, through monotype, children begin to master landscapes, which they will work with in older groups, train the ability to find the middle of an object, and develop the skill of seeing symmetry.
At the same time, not only symmetrical, but also paired objects are created in this way. To do this, a whole image is drawn on one half of the sheet, which is also completely printed on the second side.
Monotype technique
To create a monotype image:
- We bend the sheet in the middle - vertically or horizontally, depending on the location of the depicted object.
- Unbend and draw a picture on one half.
- We bend the sheet again and iron it with our hands.
- We expand and supplement the resulting image with the necessary elements. For example, let’s make a blue background for a river in which a forest is displayed.
In the drawing of a forest reflected in a lake, after unfolding the sheet, children draw a green strip of grass
Toothbrush painting technique
To obtain voluminous, multi-layered designs, a toothbrush is used. Having collected the paint, we brush it across the sheet, focusing on the design.
In the middle group, drawing with a toothbrush is usually combined with the use of the poking method, appliqué or drawing with cotton swabs.
Toothbrush drawings in the middle group are usually made on a colored background
Spray
The essence of the technique is that kids pick up paint with a brush or comb, and, pointing it at the sheet, run a pencil along the bristles, thus painting the space of the drawing.
To create a one-color image from several elements, stencils are applied simultaneously
In the middle group, children become familiar with the concepts of foreground and background. For this, the multilayer spray method, which involves the use of stencils, will be an indispensable assistant.
Methodology for working with multi-layer spraying
To make a multi-layer spray:
- We attach the stencil to the sheet using paper clips.
- Take the paint with a brush.
- Let's spray.
- Apply another stencil.
- Spray a different color.
- We remove the stencils - the image turned out to be voluminous and multifaceted.
For multi-layer spraying, you can use stencils of the same image, but of different sizes, then you will get a flickering effect
Video: master class on painting with spray paint
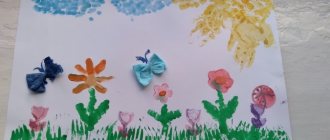
Drawing with foam rubber
To highlight the texture of the depicted object - clusters of flowers, curly clouds - the method of applying paint with foam rubber (or a piece of sponge) is used. To prevent the sponge from getting your hands dirty, it is clamped with a clothespin that acts as a handle.
At the beginning of mastering the technique of drawing with foam rubber, children use stencils
Stamping technique using natural materials
A whole vegetable (onion, corn, potato, cucumber, etc.) or fruit, berry (apple, lemon, feijoa, etc.), cut in half, flowers (daisies), shells, is painted and an imprint is created on paper. This technique is convenient for drawing cross-sections of fruits and vegetables. For example, to create the composition “Grandma’s Compote,” kids draw the outlines of a pan with a pencil, and depict fruits with stamps.
Photo gallery: drawings with different stamps in the middle group
To depict balloons, it is convenient to use stamps with small balls
To depict a picture of falling leaves, children use stamps from autumn leaves collected on a walk
To prevent the vegetable salad from stamps from being “blurred”, you need to dry the imprint of each “vegetable”
Video: master class on drawing with stamps from natural materials
Drawing with a fork and crumpled paper
Another type of stamp is creating pictures with a fork or crumpled paper. Using a metal or plastic fork, scoop up paint from a bowl and make an imprint on paper.
To make the image brighter, you need to apply a thick layer of paint
Carefully lower a crumpled piece of paper into the paint and use it to leave a mark on the sheet.
To make the elements more naturalistic, the pieces of paper should be of different sizes
In the middle group, both methods are complicated by the addition of other isotechniques: appliqué or plasticineography, as well as the classical method of drawing.
Video: master class on drawing snowflakes with crumpled paper using masking tape
Drawings with cotton swabs or cotton pads
If at 1.5–4 years old children decorated images with dots of paint made with cotton swabs, then in the middle group the task becomes more complicated. The children learn to draw lines, geometric shapes, etc. on a blank sheet of paper with cotton swabs, relying only on their ideas.
Cotton pads for use in painting are folded in half or several times, dipped in paint and applied to the sheet.
Photo gallery: examples of drawings with cotton swabs in the middle group
Initially, children use cotton swabs to color the picture.
On the “fish”, kids practice the technique of making lines and dots of different sizes and thicknesses
« » « » « » » « “Vegetable salad” children try to draw with cotton swabs without drawing pencil outlines
Blotography
The essence of the technique is to obtain pictures based on spots and blots. Spots can either be used to decorate a design as intended, or can be used as a basis for an image in a traditional style.
Blotography technique
To create blots:
- Dip the wet brush into the paint.
- Make a stain or place a drop.
- Blow from a cocktail straw onto the paint, blowing it in the desired direction.
In the middle group, kids learn to inflate thin elements from a spot, for example, tree branches
Video: master class on drawing using blotography
Nitcography
To depict a sheep, a fluffy dog or a cloud, you can use a thread drawing: apply paint to a woolen thread, place it on a sheet, if necessary, perform circular movements.
In the middle group, the nitcography technique is used mainly for children to explore the possibilities of color combinations
Drawing with glue and semolina
We mark the indicated contours of the drawing with glue, pour in semolina and press it on top with a clean sheet. Remove the top sheet and shake off the remaining cereal. The elements are filled in one by one.
In the middle group, with this type of drawing, kids practice the ability to outline a stencil and apply glue exactly within the boundaries of the image.
The substrate for drawing semolina should be colored, since the grain will be invisible against a white background.
Drawing with semolina is the most accessible way to get a three-dimensional image
Wax painting
In the middle group, kids draw lines, spots and simple geometric shapes with a candle.
Wax painting technique
To create a candle design:
- We draw the outlines of the design on a white sheet with a candle.
- Paint the sheet with any colors.
- The wax lines remain unpainted and appear on the substrate.
Drawing with a wax candle is usually used in winter-themed lessons.
A variation of this technique is drawing with wax crayons. The process technology will be the same, but the wax pencils are multi-colored, so the drawings after filling with paint will be brighter.
For painting with wax, it is better to take watercolor paper, since children may not calculate the degree of moisture in the brush, and the sheet may break through.
Scratch
The technique involves scratching image lines on a paper substrate coated with paint according to a pattern previously applied with wax crayons.
Grattage technique
The procedure for creating a grattage drawing will be as follows:
- Color the drawing with wax crayons.
- Fill the surface of the sheet with black paint or ink.
- Leave to dry.
- Using a stick with a sharp end (for example, a wooden kebab skewer), we scratch the lines to reveal the design.
Children like the scratch paper because it contains a surprise element.
Drawing through gauze
Drawing through wet gauze does not require the use of unusual tools; the picture is created with a brush and paints.
Technique for drawing through gauze
To create a drawing using the original technique:
- We moisten the sheet with pieces of wet cotton wool or cotton pads.
- Place gauze on the paper and straighten it well.
- We create the drawing as usual.
- Let it dry, remove the gauze - the image becomes textured.
When painting through gauze, you need to apply the paint generously, as some of the “color” will disappear after removing the fabric.
Video: master class on drawing through gauze
Many functions in unison
Considering that the group is a small room, you need to make the most of every meter. And the playing area can be changed depending on the initial circumstances. The tools and materials in this case should be easily modified for a new game presentation. You can also sometimes combine zones with similar themes. Let’s say that an “artist’s workshop” and a puppet theater coexist well.
Also, the main argument of the corner is its safety. Furniture, toys, materials must be of high quality and harmless. More dangerous items (sharp, cutting) should be stored in closed containers. Carrying out creative activities using tools should be carried out under the supervision of a teacher.
And another important point, of course, is to take into account the interests of girls and boys. Let there be different objects in the corner that are attractive separately for boys and girls. For example, these will be coloring pages with dolls, butterflies and coloring pages with robots and cars.
Methodology for preparing a lesson in drawing in non-traditional techniques
As a separate artistic and aesthetic direction, one lesson per week is devoted to drawing in the middle group according to the Federal State Standard (FSES). Its duration is 20 minutes. The teacher chooses the drawing technique - traditional or non-traditional - based on the topic of the lesson and the level of preparation of the children. The structure of the lesson will be the same as in other areas of education.
Conducting non-traditional drawing classes requires careful planning
Table: timing and essence of the stages of a non-traditional drawing lesson
| Stage | Time | Content |
| Introductory | up to 3 minutes | The teacher introduces the kids to the topic of the lesson, updates their knowledge with the help of riddles, poems, fairy tales (cartoons). |
| Basic | explanation - up to 4 minutes | The teacher shows a sample drawing and demonstrates the procedure for completing a creative task. Before starting drawing, finger gymnastics, finger gymnastics and/or physical education are performed. |
| practical activity - up to 10 minutes | Children draw, the teacher provides individual assistance if necessary. | |
| Final | up to 3 minutes | The teacher organizes an exhibition of children's drawings and praises the children for their work. Children try to evaluate their pictures according to the criteria “it worked/didn’t work”, “like the picture/don’t like it and why.” The teacher points out the shortcomings in general; the shortcomings of each are discussed individually. |
Table: Karpova I.N. Summary of a lesson on unconventional drawing on the theme “Sun” in the middle group
| Stage | The essence |
| Introductory | - Today we will find ourselves in the world of a fairy tale. So sit back and get ready to listen. Today is a holiday in the magical kingdom of colors. In winter, the Sun rarely appeared in the sky. And now spring has come. The sun spent a long time preparing for this celebration, trying on her outfits. His wardrobe included outfits in yellow and orange shades. These colors are called warm. And the harmful crocodile decided to ruin the holiday - he swallowed our sun. Everyone loved the sun and rejoiced when it appeared in the sky, but no one loved the crocodile. And he decided to swallow the Sun. Everything around has faded, turned gray and dull. Without the sun it became somehow quite sad. But this is a fairy tale. And who saves the sun in it? Bear, but in winter and early spring the bear is still sleeping, and asked you and me to help the sun. By the way, the crocodile also took your tassels. What are we going to draw with? Hands, palms. |
| Basic | - But first you need to stretch your fingers. (Gymnastics for fingers) Here are my fingers, like the rays of the sun. One, two, three, four, five - Let's count the rays. (We bend the fingers on 2 hands at the same time) A clear morning will come. The red sun will rise. (Raise your arms above your head) Wake up kids, it’s time to save the Sun! |
| Independent work of children. Children sit in front of whatman paper (it’s convenient to work while standing), make an impression with their palm, using warm colors to the accompaniment of quiet, calm music. Children try to make the impression one by one, without jostling. (For convenience, the teacher can rotate the Whatman paper). - Guys, look, the crocodile has freed the sun! Look how we turned out. Bright, unusual, and warm. | |
| Final | “Everyone did well today, they tried to work together and no one bothered anyone.” You did everything together, that’s why it turned out so beautifully. |
| Source | https://nsportal.ru/detskiy-sad/risovanie/2014/02/26/konspekt-zanyatiya-po-netraditsionnomu-risovaniyu-rybki |
Video: finger painting lesson on the theme “Winter Forest” in the middle group
Video: sponge painting lesson on the theme “Autumn” in the middle group
Long-term planning for unconventional drawing
In order to distribute in advance the order of mastering non-traditional drawing techniques according to the topics of the educational process, the teacher draws up a long-term plan for this artistic and aesthetic direction. As a rule, two lessons per month are allocated to non-traditional techniques and two to traditional ones. Regardless of the technique, after the lesson there is an exhibition of children's work.
You can see an example of drawing up a long-term plan for non-traditional drawing as part of the educational process here. In addition, non-traditional drawing can be studied as part of a circle or organized as a project assignment.
Creative activities teach kids to be proud of the results of their work
Children are tireless seekers of new experiences and knowledge. The task of adults is to find the most suitable ways to make children believe in their strength and uniqueness. Fine arts, in particular unconventional drawing, provide invaluable assistance in this regard. After all, without the usual brushes and pencils, the child feels freer and can fully express his imagination.
Aesthetics, beauty and creative change
We introduce beauty from an early age. The Fine Art corner should be not only practical, but also beautiful. It needs to be designed so that preschoolers can admire its appearance. That is, they learn to appreciate beauty and acquire the ability to enjoy it. The inclusion of children in the design of toys and children's works also plays a big role. This is how we begin to develop “childish” design in children.
Of course, if the objects in the corner do not change for a long time, the children will begin to lose interest. From time to time, as you study a new topic, you need to change and add materials. Also, conditions for children’s creativity must be created in the corner. Children should have the opportunity to sit next to a corner, color a picture or look at an album with creative works.