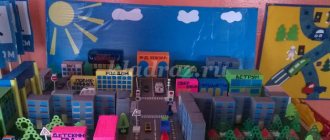
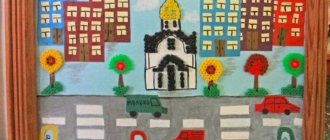
Layout "Streets of our city"
Authors:
Leonova Lyudmila Andreevna,
Nechkina Svetlana Valentinovna
teachers of MBOU NSH No. 37
city of Surgut
Educational and methodological manual on social and communicative development “Streets of our city”
The layout is intended both for direct educational activities and for independent activities of children.
Target:
Formation of the foundations for safe behavior of children on the road; prevention of children's road traffic injuries.
Tasks:
-Introduce children to the rules of the road, the purpose and signals of traffic lights, road signs, expand knowledge about the rules of safe behavior for children on the street;
-To consolidate children’s knowledge about the shape, size and color of objects, to consolidate the ability to compare (find similarities and differences).
— Strengthen the ability to distinguish and name construction parts, knowledge of the sequence of building houses. Teach children to analyze their construction.
- Develop children's memory, thinking, imagination.
Forms of working with the layout
1. Cognitive development. Formation of elementary mathematical concepts.
-D/i “Find a house by description”
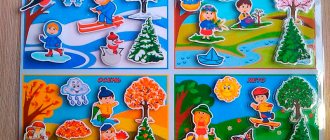
- D/i “What has changed?” - changes in the location of objects (front, back, right, left, middle, side).
— Invite the children to find the tallest, widest or lowest house
— Invite the children to name what geometric shapes the objects on the model resemble.
- “What floor does the family live on?”
2. Social and communicative development. Formation of security fundamentals.
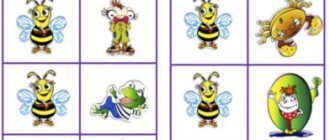
-Did. exercise “Help the funny people cross the street”
-Conversation “What does every sign on the road “tell” us?”
-Conversation “Urban transport traffic rules”
-Invite children to name and show the types and features of urban transport (“Ambulance”, “Fire”, “Police”, bus, etc.)
-Plot-role-playing games
3. Artistic and aesthetic development. Constructive modeling activity.
— Construction of one-story and multi-story buildings.
— Invite the children to build a house: according to the model, according to the plan, according to the drawing.
— Collective construction of an entire microdistrict.
- Did. exercise “Build the same house, but tall”
Dear teachers and parents - participants of the exhibition!
On June 2, 2015, a solemn ceremony of awarding the winners of the regional methodological exhibition “Modern educational environment of kindergarten and family” took place at the information and exhibition complex of the Tyumen Regional Duma. Details >>>
From June 8 to June 10, 2015, teachers from Tyumen received certificates of exhibition participants and multimedia albums with the full version of the exhibition at the Grant Center for the Development of Creativity for Children and Youth at the address: Profsoyuznaya St., 52. tel. for inquiries: 685-321,
June 9, 2015 Diplomas, certificates and gifts were sent to the winners and participants of the Exhibition of the south of the Tyumen region, Yamal-Nenets Autonomous Okrug and Khanty-Mansi Autonomous Okrug-Yugra by registered parcel post to the address of the preschool educational institution. Details >>>
Share
DOMOSTROYPlumbing and construction
This is the game layout that appeared in our group at the beginning of the school year. I wanted to share with you how we created it - maybe it will be useful to someone.
To make the base of the game model “City Street” we will need: 2 pieces of MDF panel (I have them 53 cm), a piano hinge, screws and nuts for fastening
Using a drill, we drill holes in the MDF panels in selected places, attach the piano hinge to the MDF panels
To ensure that the model stands at an angle of 90 degrees and does not fall back, we screw a corner stop on one side (for me it is part of the fastening from an old curtain), and paint the lower part of our model with black paint.
choosing clipart of houses for the street. for my layout I put it together like this
We print the pictures in duplicate and laminate them; if you don’t have a laminator, you can simply cover them with tape. The picture becomes brighter and it is easier to care for the layout - wipe off dust, for example. We paste one copy of our laminated pictures, joining them on the layout, this is what we should get.
Now we will give our picture volume. To do this, we cut out buildings from second copies at our discretion, and glue them onto pre-prepared ceiling tile blanks - single background and double foreground, in my work I used “Master” ceiling tile adhesive
Cutting out buildings with a utility knife
We paste it (I still use the same “Master”) on our layout, our street now has “depth”
Let's move on to the design of the roadway. We take construction tape, highlight the pedestrian crossing, the dividing strip, that is, what we will paint over with white, and cover everything else.
In my work I usually use ordinary aerosol paints in a spray can, sold at any hardware store, dry quickly, and are easy to use. We highlighted all the lines with white - remove the tape. The roadway and crossing are ready.
We laminate the printed templates (1 sheet of laminated film - 2 sheets of templates with cars), fold the sheets with the white sides inward. We laminate them so that the cars are tougher, brighter and can be wiped clean. When a sheet is laminated, we cut it along the contour and we get 2 sheets laminated on the colored side, the second side remains unlaminated (paper) - the paper sticks together better, and laminated machines shine. This is what a laminated sheet with templates, cut on 3 sides, looks like.
Cut out car templates and glue them together
Now let's move on to making road signs. Materials: I used 2 sheets of regular white office paper, ceiling tiles (better washable), a stationery knife, toothpicks, master glue, mosaic in 3 colors (red, yellow, green), laminated sheet with blank signs, I used this one. Honestly, I don’t know how to indicate the authors; everything was cut out from so many places (((
We cut it out, glue 1 copy onto the tile, cut it out, and stick 2 copies on the other side. We make a stand for our signs. Take a sheet of white paper and cut strips of 4-5 mm along the long side of the sheet. For one sign, you need 5 strips. We take one strip and wind it onto a toothpick, forming a tight “roll” - this is the upper part of the stand. Glue 4 strips into a long strip and roll them into a “roll”. Place a small one on top of a large “roll” and glue it together. We dip the edge of the toothpick with glue, pierce our “rolls”, and with the other edge of the toothpick we pierce the blank with a road sign. All our sign is ready
Do-it-yourself game layout according to traffic rules for kindergarten
Master class on making a game model “City Street”
Author: Oksana Sergeevna Norkina Teacher, MADOU kindergarten No. 21 “Rosinka” of the combined type of the urban district of the city of Kumertau, Republic of Bashkortostan The master class is designed for educators, but can also be useful for parents. Purpose: teaching game modeling, developing safe behavior on the roadway. Goal: making a model for game modeling in working with children of senior preschool age. Objectives: - introduce children to the rules of the road, the purpose and signals of traffic lights, road signs, expand knowledge about the rules of safe behavior for children on the street; — to encourage children to engage in independent activities in the traffic rules corner. The game layout can be used to develop fine motor skills, visual perception, social and everyday orientation, and spatial orientation.
Description: Stage I - the basis for the layout To make the basis for the game layout “City Street” we will need: 2 pieces from an MDF panel (I have them 53 cm each), a piano hinge, screws and nuts for fastening.
Using a drill, we drill holes in the MDF panels in selected places, and secure the piano hinge with screws and nuts.
So that our model stands at an angle of 90 degrees and does not fall back, we screw a corner stop on one side (for me it is part of the fastening from an old curtain), and paint the lower part of our model with black paint.
Now we will design the upper vertical part of the layout. To design it, we take 2 pictures depicting houses (I put together these for myself).
We print the pictures in duplicate and laminate them; if you don’t have a laminator, you can simply cover them with tape. The picture becomes brighter and it is easier to care for the layout - for example, wipe off dust. We paste one copy of our laminated pictures, joining them onto the layout, this is what we should get.
Now we will add volume to the card. To do this, we cut out buildings from second copies at our discretion, and glue them onto pre-prepared ceiling tile blanks - single background and double foreground, in my work I used “Master” ceiling tile adhesive
Cutting out buildings with a utility knife
We paste it (I still use the same “Master”) on the layout, our street now has “depth”.
Let's move on to the design of the roadway. We take construction tape, highlight the pedestrian crossing, the dividing strip, that is, what we will paint over with white, and cover everything else.
In my work I use ordinary aerosol paints in a spray can, sold at any hardware store, dry quickly, and are easy to use. We highlighted all the lines with white - remove the tape. The roadway and crossing are ready.
Stage II - Paper machines. Now he prints out paper machine templates; there are a huge number of them on the Internet; let’s take these as an example.
The image has been reduced. Click to see original.
The image has been reduced. Click to see original.
We laminate the printed templates (1 sheet of laminated film - 2 sheets of templates with cars), fold the sheets with the white sides inward. We laminate them so that the cars become tougher, brighter and can be wiped clean. When the sheet is laminated, we cut it along the contour and we get 2 sheets laminated on the colored side, the second side remains unlaminated (paper) - the paper sticks together better, and laminated machines shine. This is what a laminated sheet with templates, cut on 3 sides, looks like.
We cut out the car templates and glue them together.
Stage III - road signs. Now let's move on to making road signs. Materials: I used 2 sheets of regular white office paper, ceiling tiles (better washable), a stationery knife, toothpicks, master glue, mosaic in 3 colors (red, yellow, green), laminated sheet with blank signs, I used this one.
The image has been reduced. Click to see original.
We cut out and paste 1 copy onto the tile, cut it along the contour with a stationery knife, and on the other side we glue 2 copies (if you wish, you can not paste the second part of the sign. We make a stand for our signs. Take a sheet of white paper and cut strips of 4-5 mm along the long side sheet. For one sign, you need 5 strips.. Take one strip and twist it onto a toothpick, forming a tight “roll” - this is the upper part of the stand. Glue 4 strips into a long strip, twist it into a “roll”. On a large roll, put a small one on top, glue it together. Dip the edge of a toothpick in glue, pierce our “rolls”, pierce the blank with a road sign with the other edge of the toothpick. Our sign is ready.
To make the traffic light more voluminous, add a small mosaic of the appropriate colors to the lights, pierce the holes with an awl, and insert the mosaic.
Our fleet
Our signs
Thanks everyone for your attention!
We recommend watching:
Summary of the travel game “Lessons of Caution” for older preschoolers Didactic game on traffic rules for kindergarten “My Native Village” Educational and entertaining game on traffic rules for older preschoolers Competitive game program on traffic rules in the senior group “My Bicycle Friend”
Similar articles:
Scenario for children's traffic rules competition in the preparatory group
Long-term plan for the development and management of role-playing games
Scenario for a parent meeting on traffic rules in a preschool educational institution
Project on traffic rules in the senior group
Summary of a lesson on life safety in the preparatory group