Ordinary bird
Let's try to depict a simple bird.
Master class for beginners:
- Let's start the drawing with the beak, which looks like two triangles, identical in length, only the bottom one is slightly smaller.
- The next step is the oval-shaped lower part of the body.
- We continue the egg-shaped top, and the lines below do not connect.
- It's time for the ponytail. It starts from the first line, going beyond the second, performed in a zigzag manner.
- Now we designate the wing that overlaps the body, and erase the unnecessary strokes.
- All that remains is to apply the paws with sharp claws and the eye-circle, in which the pupil is shifted to the left.
Our picture is ready, now you know how to draw a bird with a pencil. If desired, you can color it.
How to draw a bird with a pencil
It is not so easy to draw a bird using only a pencil and an eraser in your arsenal.
Draw a line at an angle: you will later have to rely on it when depicting the silhouette of a bird. The line needs to be divided into 2 segments: the smaller one is for the head (here we draw a circle), the larger one is given to the body (here we draw an oval with a narrowed end).
From the lower part of the future abdomen, 2 lines are drawn - the “foundation” for the tail. There, in the lower abdomen, a sketch is drawn for future legs. One foot will require 2 lines connected into a triangle.
For a crest you will need a triangle, from which a segment is drawn connecting the body and head. On the left, draw a beak in the form of a triangle, draw an oval from it towards the crest. From the beak, in turn, it is necessary to draw a line. On the right, connect the stomach and head. Then draw the eye.
The next stage is the wings. They should be in the form of a semicircle. They need to be drawn from the center of the body, while the wing should be pointed downwards.
Let's move on to the paws. They are drawn in the form of oval fingers. To give it a more natural look, it is recommended to draw a branch on which the bird will sit.
Draw the contours of the beak and make a cut in its center.
A few strokes in the center of the wing are useful for obtaining plumage, and at the lower end of the body - for the tail. You will need 5 of these feathers.
Actually, the coloring of the bird. The lower part of the crest, closer to the head, should be darker in color.
When coloring the eye, leave a few white dots for highlights. Paint the muzzle with a dark color (beak area), and the breast with a lighter color.
Depending on the plumage, the wings can be given different shades of gray.
Then color the paws and tail. The latter should be painted in one shade of gray.
Magnificent peacock
The colorful specimen does not hold back your imagination when decorating it, and it is not at all difficult to reproduce it on paper.
Step-by-step instructions for children:
- A peacock's head is a circle with a beak.
- Add a torso configuration with a neck.
- The rest of the space on the album sheet is given to a chic, flowing tail, onto which patterns similar to the leaves of a tree are applied.
- The tail background will be green. We paint the body, eyes and fragments of decoration with bright colors. Don't forget about the characteristic crest.
You can choose colors at your discretion, experimenting and achieving expressiveness.
How to draw a rooster
The Cockerel is a character in many Russian folk tales. In addition, since ancient times it was considered the guardian of the hearth and symbolized the morning dawn. Surely you are interested in learning how to draw a rooster? To do this you will need checkered paper and a set of pencils.
Start with the head and torso. Draw a circle without finishing its lines. Bring the body out from below through arcs and connect them into a corner for the future tail.
Move to the beak, which can be represented by two triangles, then to the scallop and to the eye.
Next, the wing is drawn onto the body, rounded figures are drawn from below, and the legs are drawn from them.
Of course, a cockerel needs a beautiful, large and colorful tail. There are 2 arcs for 1 feather. You will need 4 of these feathers.
All that remains is to trace the cockerel with a pen and color it. Bright colors are required for the tail and legs, paint the comb red and the beak yellow. All.
Wise Owl
This peculiar representative of the fauna is a frequent hero of children's paintings.
- Her head is represented by a flattened ball, and her pointed body is connected to it by a smooth transition with the absence of a cervical bridge.
- The legs begin with small oval panties and end with claws.
- We finish drawing the pointed ears, a crochet nose and a wing.
- We highlight the feathers on the tail. The eyes are round and yellow.
- The head area is decorated with down strokes. The breast is lighter in color.
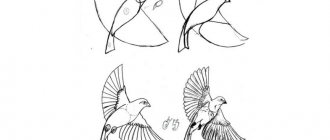
flying dove
How to draw a bird easily step by step with a pencil in flight?
A similar task is within the capabilities of young artists:
- We draw the outline of the head, which goes into the bottom of the body.
- The head line is continued by a raised wing, on the edges of which there are zigzags imitating a feather.
- We repeat the silhouette of the second element, located slightly behind.
- Add a ponytail and an eye dot.
- You can put a twig in the dove's mouth, making it a symbol of peace.
The soaring seagull looks interesting, which is characterized by long curved wings, a massive beak and webbed feet.
- Her figure will be made of a circle and an oval, from which elongated triangular wings extend.
- Fan-shaped tail below.
- They have plumage with black edges and a yellow nose.
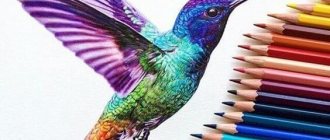
How to draw a bright bird
To begin with, you will need: 1 black felt-tip pen, an A4 sketchbook, an eraser and several multi-colored pencils.
We draw with a simple pencil first the body with wings, then the legs. To do this, you need to place the album vertically. Then a semicircle is drawn, from each end of which a strip is drawn, rounded towards the end to form wings. Below you need to add several small and long ovals.
Next, draw a second semicircle from one wing to the other to complete the body. You need to add paws to it. To do this, draw a pair of triangles, then another pair on the other side.
To give the bird something to sit on, you need to draw a branch by drawing 2 stripes under its paws (not necessarily even).
A bird without a tail is not a bird. It can be depicted as 2 long triangles with blunt ends.
We recommend reading:
- How to draw a star: 10 best options for drawing five-pointed and other stars with your own hands. Pictures of finished works with descriptions
- How to draw a dragon with a pencil - the best step-by-step instructions for beginners. TOP pictures for quick visual learning
- How to draw a pony: TOP 10 best lessons for beginners. Detailed instructions for drawing My Little Pony step by step with a pencil
The next stage is the muzzle. First, the beak is drawn, represented by a triangle. Round or oval eyes are drawn above.
The next step is to adjust the drawing and outline with a felt-tip pen.
Next comes coloring the drawing. To give expressiveness, the sides of the beak should be brighter than the center. The same goes for the paws. Color the eyes black.
If you want to make the bird bright, you need to paint it in the appropriate colors. For example, the wings and tail are painted green. The head is painted orange, the chest is painted yellow, and the lower abdomen is painted green again.
A brown or black pencil is suitable for coloring the twig.
We recommend reading:
How to draw lips with a pencil - simple instructions with descriptions and pictures. Step-by-step master class for beginnersHow to draw a family: a master class on creating a drawing “My Family” for kindergarten or school. The best lessons for children on drawing with pencil and paints
How to draw a bear with a pencil? Review of simple and step-by-step instructions for children and beginners (120 pictures of a bear)
Swan
The majestic specimen captivates with its grace.
Look how easy it is to draw this handsome guy:
- We outline a circle-head and an oval body; these parts are connected by an elongated swan neck, which is thickened.
- We emphasize with strokes the outlines of the wing and small tail.
- The eye is blue, and the wide beak is reddish with the obligatory nostrils.
- Using chiaroscuro we add volume to the figure.
- We accentuate the blue of the water.
You can display a pair of birds located opposite.
Another long-necked figure is the stork. It is characterized by long, ankle-shaped legs with a middle thickening of orange color and large paws.
Bullfinch
- The circle and oval are combined with rulers, the back of which will go into the wing.
- Draw the head elements and the triangular tail.
- We select the feathers and plant the bird on a branch.
We outline the outline in relief and color the winter singer, making the abdomen red, which is its distinctive feature.
Eagle
- The proud master of heaven is extremely attractive.
- Having sketched out the bird's body, draw an open beak and a circle-eye on the head.
- Let's detail the picture.
- We frame the open wings with zigzag feathers.
- The tail section is lowered down.
A formidable predator sits on a rock or stump, clinging to it with powerful claws. On his paws are characteristic downy pants. It's not the most affordable offer, but it's worth a try.
How to draw an owl
Since ancient times, the owl was considered the wisest bird in the world. Its plumage attracted the attention of both professional artists and amateurs. You can draw an owl in a few steps. You will need a pencil, a sketchbook and some markers.
The sheet should be in a vertical position. Start with two large circles, because... The owl's eyes are big. There should also be smaller circles inside them.
Then draw a triangular beak and draw a line from both sides of it.
Now move to the crown. From the lines drawn from the beak, draw the ears and connect them in the center with an arc.
The next item is the wings. It is necessary to draw a line from the bottom of the eyes, rounding it at the bottom. Repeat the same on the other side.
From the wings you need to draw a line for the future body. It needs to be narrowed downwards. Draw arcs in the center of the abdomen, round them at the bottom and connect them to the outer lines. The line below is necessary to connect the torso.
All that remains is to draw the paws. There are 3 small ovals per paw. Everything is ready, all that remains is to outline with a felt-tip pen and color the drawing.
Parrot
The colorful Macaw is in demand, so let’s boldly get to work and try to draw this bird step by step:
- We depict a large and small oval; they are smoothly united by a back line ending in a flowing tail.
- The volumetric fragment becomes the basis of the wing, wavy at the bottom.
- Add a convex nose-hook and an eye.
- Marked semicircles will help show how the colors on the head change.
When coloring, use a red and yellow pencil, additionally using a dark blue tone on the tail section and the edges of the wings. Violet and black colors provide relief to the feathers.
And the youngest creators will love the image of a tiny chicken. They will undoubtedly cope with this task.
- The body consists of two circles, painted yellow.
- We draw on the thin paws and beak; the orange fluff along the contours will give the baby some authenticity.
The proposed sketch options provide an answer to the question of how to beautifully draw different birds that are similar to the prototype.
Fine arts lessons not only develop artistic thinking in children, but also enrich them with knowledge about the environment, which is important.
Wild birds. Storytelling and step-by-step drawing
Thanks to one of the previous articles, your children learned new things and learned to portray domestic birds. Today the focus will be on wild birds. Storytelling and step-by-step drawing are again performed according to simple and understandable patterns.
Introduce your child to birds that live in the city and in the forest. How to talk about birds?
I offer a version of the story based on the title. During the process, it is advisable to mention signs that help you recognize the bird. As a sample, I provide a text that, with a few changes, can easily be used to describe another bird.
Tit
You might think that the tit got its name from its blue color. But there is little of it in her plumage. Only the cap on the head is bluish-black. The chest is yellow, the tail is black, the back is greenish. Why is it called that?
In spring and summer, tits hide in the foliage of trees. They are difficult to see. But you can hear the song: “Si-si-si.” It was the song that gave the bird its name.
Tits live here all year round, although many people think that they appear only in winter. In summer there is a lot of food in the forest, and small birds live away from human habitation. In winter, tits fly to cities and villages - closer to people. Then they feed on seeds, grains, bread crumbs, pieces of meat and lard.
Tits are our friends; they bring great benefits in the garden and forest by destroying pests.
Let's draw our smart titmouse. In this case, the result was a blue tit. If you choose different colors for painting and remove the stripe near the eyes, you will get a different look.
What do birds eat?
The appetites of birds vary greatly. In a day, a tit or wren eats as much as their own weight. Thanks to such gluttons, nature regulates the number of insects. A blue tit can eat 1-2 thousand small bugs and larvae per day. During the period when the chicks appear, the parent birds destroy even more insects to feed the offspring. Kinglets, for example, fly up to the nest up to 400 times a day, usually the number of chicks is from 8 to 12. When the babies already begin to fly out of the nest, the whole family can catch up to 4 thousand caterpillars in a day.
In addition to insects, birds can eat plant seeds. Siskins, greenfinches and finches prefer weed seeds: horse sorrel, wormwood, quinoa. In addition to caterpillars, blackbirds also eat berries. But this food is not completely digested, and the seeds fall to the ground - new berry bushes sprout. Crossbills and tap dancers do not eat very carefully; the seeds of coniferous plants scatter around, and many then germinate. We can say that birds protect forests, gardens and vegetable gardens from insects, destroy weeds and participate in planting trees.
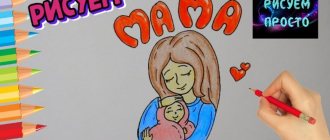
Helper for adults
A picture-cheat sheet that will help you out when you tell your child about birds. It is easy to communicate important points about each representative of birds and expand the stock of verbs and adjectives. If you offer a small competition to compare birds (search for similarities and differences), your child’s thinking will develop. The game is based on the phrases of an adult. For example, you say: “I will tell you about the swallow, and you?” - “I like the sparrow, I’ll tell you about him!” - “My bird has black and white feathers, what about yours? My bird flies to warm countries in winter, it is migratory, but what about yours? A swallow has 2 wings, a body, a small head, legs and a tail that looks like a fork, but what does your bird look like? My swallow eats insects, it catches them in the air on the fly, but what does your bird eat? My swallow is written about in the fairy tale “Thumbelina,” but in which book was your bird written? Let’s find this book and read it together.”
Practical exercise
Go for a walk in a public garden or park, bringing bird food with you. These can be cereals, seeds, nuts, crackers, bread, cookies (even dried or candied fruits). Place the treat in a pouch or bag where your child can easily remove the contents. Look at the birds, help your child remember the name or learn a new one. Describe the flyer’s appearance and his habits. At home you can arrange a little improvisation. Ask your child to show how a dove walks, a sparrow jumps, sing, imitate a voice (caw, tweet, squeak). Looking for birds in a picture that a child saw on a walk and naming them is also a very useful task.
Forest birds
As winter approaches, it's time to remember about migratory birds. The handsome red-breasted bullfinch is drawn almost the same as a tit.
Another bright representative of the bird kingdom is the owl. Now a very popular image among children and teenagers. You can draw with one oval, but this option is more detailed. Several techniques for drawing this night huntress were learned by the author as a child. When coloring the eyes, you can make several circles of different diameters and colors.
There is an old pine tree at the edge of the forest. A large head is visible from the hollow - a sleepy owl widens its round eyes: the bird's trilling voices woke it up too early. The bullfinches have flown in and are calling to the tits, scattering rowan trees are falling down. The result is a picture of a winter forest.
The heron and stork are easily recognized by their thin slender legs and long beak. Both birds are drawn according to a common template. If you slightly change the shape of the beak and the color of the plumage, you will get a flamingo. Let me remind you once again that this is a symbolic drawing. School-age children can be given more accurate images.
City birds
The usual winged inhabitants of streets, squares and parks are pigeons. They are fed and chased by children, and launched into the clouds by newlyweds. Using step-by-step pictures, your child will learn to draw this bird.
A small, nimble sparrow can be much more agile than the important, slow pigeons. It’s especially funny to watch how a gang of impudent winged robbers leaves their larger brothers in bewilderment, stealing a huge piece of pink salmon or other delicacy. Remember a few steps from the series of drawing a tit, add elements, color it - the sparrow is ready!
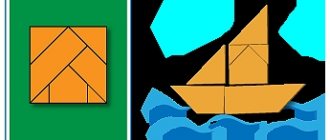
This is a variant of the image of birds in the city. Let your child come up with his own story or draw what he saw on a walk. There is a bird in the picture, the drawing of which is not discussed in the article. Can you and your child guess what techniques and forms are used to depict her? The ability to “break” an object into parts and visually identify simple geometric shapes is an excellent training in perception, attention and thinking. In addition, thanks to this skill, the child will learn to “decipher” complex images and draw them independently.
Stories with pictures instead of words about birds
Two short stories for beginning readers. After reading, ask your child to retell the story using the pictures.
Try to periodically repeat the names of birds to your child, watch them together, sculpt, make appliqués and other creative works. For example, using a simple template, you can make an adorable card with birds.
Birds are cut out according to a template from colored or white paper, cuts are made on the wings and folds are made along the dotted lines. Apply glue along the contour of the image, except for the wings. After painting or decorating with colored fragments, bend the wings of a large bird so that it hugs the chick. The volumetric applique is ready.
On the eve of winter, make a bird feeder, place it so that the child can replenish food supplies himself and can calmly watch the birds eat. From an early age, instill in your child a caring attitude towards the surrounding nature, and set a worthy example yourself. Thanks to the materials in the article, your child will learn about what wild birds look like, where they live, and how they are useful. Storytelling and step-by-step drawing will allow you to consolidate the acquired knowledge in practice.
PS Has your child seen birds of prey?
Does the baby know about the benefits and harms that birds bring?
Child psychologist
Anna Zubareva
For advertising purposes:
Do you want to know how to properly teach your child at home? Subscribe to site updates and you will always know when a new article has appeared:
Share on social media networks
RќСЂР°РІРёС‚СЃСЏ
Related posts:
- Talking about birds and drawing step by step We continue to get acquainted with new simple drawing techniques for children. AND…
- Drawing step by step. Forest Today's material is selected for children of different ages. Thanks to the picture instructions you...
- Crafts with children. Master class on textile dolls Today’s material is dedicated to the joint creative process. This is an opportunity to have a productive…
- Learning to read. Pictures instead of words The new school year has begun. Some of the kids are mastering difficult school...
- Spring fun. Vegetable garden Seasonal games and entertainment are very useful for children. Several tasks...
Photos of bird drawings
0