Why learn to draw mushrooms
A simple technique for drawing mushrooms is useful not only for those who are learning to draw professionally. This type of training helps the child train his hand. And for parents, this is an opportunity to spend quality time with their son or daughter.
In addition, the ability to draw a mushroom gradually expands a child’s horizons. They remember what its structure is, where it grows, and how cleverly it camouflages itself among the grass and fallen leaves.
In addition, through drawing, the child remembers different types of mushrooms, and also learns to distinguish edible from inedible. And these skills are remembered much better than after looking at pictures in a book.
Pencil drawing master class
Regardless of the chosen type, the diagram of how to draw a mushroom with a pencil requires the following steps:
- Creating outlines. This is an oval cap with a stem attached to the bottom.
- Contour detailing.
- Erase auxiliary lines.
The completion is painting. To do this, you can use colored pencils, felt-tip pens or paints.
Porcini
When learning how to simply draw a mushroom, many people start with white ones. They are not only widespread in forests, but also have a regular shape that is not difficult for a beginner to master.
The work proceeds according to the following scheme:
- The contours of the cap and legs are drawn. Since porcini mushrooms rarely grow alone, a sketch of one or two smaller ones is usually made nearby.
- The detailing of the outline consists of an arc separating the apex, a line showing the beginning of the stalk, as well as light folds around the stalk.
- Use an eraser to erase the line indicating the part of the cap that will not be visible behind the stem.
- All that remains is to paint over the mushrooms. The top of the cap is brown, with one zone being a lighter shade to show the highlight. The bottom of the cap is painted yellow, and the stem is gray.
To make the composition more logical, grass is added from below, which covers part of the leg. It is painted green.
Basket with mushrooms
A master class on drawing a basket with mushrooms will be of interest to caring parents and children.
Creative work fuels interest in non-classical drawing techniques, develops motor skills and imagination, fosters a love for the surrounding nature, and evokes positive emotions.
While drawing, you can have a casual conversation with children on nature topics, discussing the questions “Why do they go to the forest”, “What gifts does the forest give”, “Which mushrooms are edible and which are inedible”, “How to behave correctly in the forest so as not to get lost "
An original version of how to draw a basket with mushrooms is offered in an interesting master class:
- Make mushroom stamps from raw potatoes. To do this, cut the potatoes into two halves, remove excess raw materials from each of them with a knife, leaving a convex outline of the mushroom.
- Draw a circle on a landscape sheet and divide it into parts with a horizontal line. The lower part is large, this is the basket, add another one to the upper arc, this is the handle of the basket.
- Take an empty matchbox, dip the wide side into brown gouache and make several successive prints along the bottom contour of the basket, filling the entire volume of the basket with parallel prints.
- Paint the potato stamp - the mushroom cap with red paint, the stem - with white paint.
- Place several mushroom stamps above the basket.
To complete the picture and give it a forest spirit, you can put several leaf stamps. To do this, a dried leaf of wood is painted and stamped on paper.
Chanterelle
In search of how to beautifully draw mushrooms in the autumn forest, many choose chanterelles. They attract attention with their bright color and unusual shape of the cap, which usually grows together with the stem.
You can draw a fox using the following algorithm:
- Two auxiliary lines are drawn (vertical with a slight slope and horizontal), which allow you to achieve more beautiful forms of the mushroom.
- Oblique lines are added to the vertical leg, forming the base of the leg. And the gradual expansion that forms the bowl will become the transition to the cap.
- After erasing the additional lines, draw an uneven elongated oval protruding above the leg on both sides.
- Vertical stripes are drawn under the cap.
- All that remains is to finish drawing a little grass from below.
You can color the fox with brown and orange pencils. The first color is needed for outlining and shading the leg. Moreover, the edges should be brighter than the middle. The hat is done in orange, the grass is done in green.
Tips for Drawing Mushrooms
When you decide to draw a mushroom, you need to understand that this is a creation of nature, and not the result of engineering calculations. A ruler and compass, combined with perfectionism, will not help to depict the natural and clumsy beauty of mushrooms.
Whatever type of mushroom you want to draw, it is worth remembering that it always consists of two parts - a stem and a cap, the cap is always wider than the stem.
You can paint mushrooms with paints (gouache, acrylic) without resorting to rough sketches. The paints dry quickly, and the drawing looks rich and bright.
Russula
Elegant red, pink, orange or green russula are often found in the forests of the middle zone. Although their shape is similar to a porcini mushroom, the technique of their execution has its own nuances.
Step-by-step instructions for children to draw this mushroom include the following steps:
- First, a vertical line is made, divided into 3 parts. This allows you to choose the correct proportions of the mushroom.
- Then the top is drawn. Moreover, it is important to make sure that the leg will be in its place by drawing its contours.
- Russula will look especially expressive with a leaf on its cap. After drawing the main details, additional lines are erased.
- The leaf under which the russula is hidden is done in yellow and red. The color of the mushroom can be yellow, pink or green. Moreover, coloring is done taking into account shadows and highlights.
If such a composition is part of an autumn landscape, you should not paint too dense vegetation around the mushroom. A short bunch of grass will be enough.
Summary of directly organized educational activities on drawing “Mushrooms”
Olga Rybalko
Summary of directly organized educational activities on drawing “Mushrooms”
summary with the integration of educational areas on the topic : “ Mushrooms ”
Leading educational field : “Artistic and aesthetic development”
—
visual activity .
Goal: To teach children to create an image of mushrooms in drawing ; place the image over the entire sheet of paper, draw large , on the entire sheet. Arouse children's interest in drawing - mushrooms ; Learn to look at their parts, color; consolidate children's knowledge that there are edible and inedible mushrooms
Objectives: Activate children’s vocabulary on the lexical topic “ Mushrooms ”
.
To develop children's interest in drawing ; fine and gross motor skills of the hands, coordination of speech with movement.
Foster independence, activity, encourage friendliness and willingness to help.
Types of activities : gaming, motor, visual .
Forms of organization : individual, group.
Forms of implementation of children's activities : making a product of children's creativity ( drawing a mushroom )
Equipment: landscape sheets of paper (A4 format)
, illustration with
the image of mushrooms , oilcloth on the table for each child, gouache (brown, cups, brush, wet napkins, hedgehog toy.
Participants: children of the middle group
Preliminary work: Reading poems and guessing riddles about mushrooms , watching the cartoon “Under the Mushroom ”
.
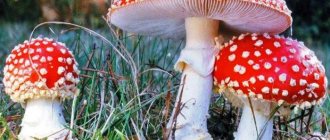
fly agaric
This is the most famous of the poisonous mushrooms, attracting attention with its unusual appearance.
Here's how to draw a fly agaric step by step with a pencil:
- First you should draw the outlines for the three legs, taking into account that the tallest mushroom will be in the center.
- To make the composition look interesting, fly agaric mushrooms can be made with different caps. The smallest of them will have a russula-like top. The second one will have a hat that looks like a circle with a completed arc. The tallest mushroom will have a circle-like top with wavy edges.
- Now folds with wavy lines are drawn on the legs, characteristic only of fly agarics. And on the caps the plates are drawn where their lower part is visible.
- All that remains is to add white dots on the top side of the caps, making circles of different sizes.
- If you used a black gel pen to draw the main outlines, you will need to wait until the ink dries.
- Now you can start coloring. The leg is made gray, the shadows are created brown. Bright hats are made with three pencils. The middle is painted orange, the center - red, the edges - burgundy.
- Next to fly agaric mushrooms you can draw moss, which is colored green.
Having looked at how to draw a mushroom easily, let’s summarize: this skill is useful for children even in areas of life not related to drawing. This way you can have a pleasant and useful time with your child, developing his skills and expanding his horizons.
To draw mushrooms common in the forest, you can use pencils and step-by-step diagrams. Therefore, it makes sense to prepare a sheet of paper, pencils, an eraser and try it.
Drawing edible mushrooms
There are a huge number of different edible species in nature. Mushroom “meat” is very rich in proteins and carbohydrates. The most valuable in terms of taste are the following mushrooms: chanterelles, boletus, honey mushrooms, boletus mushrooms and, of course, porcini mushroom. Most often, both experienced artists and small children love to draw them.
Draw an oil can with a pencil
How to draw an oil can mushroom? At first glance, it may seem that this is very easy, but in fact, in order for the drawing to be original and beautiful, you need to work a little.
Butterflies are small tubular mushrooms with a thin stem and a fleshy cap. They can be found in pine forests and mixed plantings. Butterflies are valued by mushroom lovers for their soft, juicy cap.
The drawing scheme is almost the same as for other mushrooms, but you should know some of the features of butter mushrooms. The hat in adults is brown with a purple tint and looks like half a ball. There is a ring at the base of the mushroom. Above the ring is a white leg, and below it is brown-violet.
Knowing the features of the oiler, you can begin to depict it step by step on paper.
- To begin with, sketch out the outline of the mushroom using auxiliary lines.
- Then outlines are made for the future leg and top.
- Draw the leg, making it not too thick, but more refined. On the leg, closer to the top, a surrounding ring is drawn. The hat is depicted as half a ball.
- Finish painting the grass or fallen leaves.
- Make clear contours and erase extra pencil lines.
- Then they start coloring. If you draw several mushrooms together, it is important to remember that young butterflies have a yellow-brown top, while adults have brownish-purple tops. Finally, the background is painted and the work can be considered completed.
Chanterelle mushroom
To know how to draw a chanterelle mushroom correctly, you need to know its special details.
The second name for chanterelles is “Cockerel” due to their external resemblance to the comb of a rooster. Chanterelles are colored light yellow or orange-yellow, like the fur of a fox, which is why they got their name. Chanterelles can be seen in mixed and coniferous forests in moss or among fallen leaves.
When depicting a mushroom on paper, it is necessary to take into account that the base and the cap of the chanterelles are a single whole. The stem has wavy folds, and the cap is irregularly shaped with wavy edges.
Knowing the characteristic features of a mushroom and following the main steps, you can easily draw a chanterelle in a picture.
boletus mushroom
Not everyone knows how to beautifully draw a boletus mushroom. In order for the drawing to seem real, it is necessary to find out what a boletus mushroom looks like.
An adult boletus mushroom most often has a thickened curved stalk, on which black specks are randomly located. In its appearance, the leg resembles a birch trunk, which is why this name was chosen for the boletus. The mushroom cap is wide, however, not massive.
When depicting a boletus with a pencil, you can use the following steps:
- First draw a circle.
- An oval is drawn just above the center of the circle. This will be the mushroom hat.
- Next, draw a tall, wide leg.
- Draw the details.
- Erase auxiliary lines.
- Add scales to the leg.
- Color the drawing.
Photos of mushroom drawings
0