Miroshina Elena
Notes on drawing in the preparatory group “Portrait of a Friend”
Municipal budgetary preschool educational institution
kindergarten No. 27 “Fairy Tale”
Summary of GCD for drawing in the preparatory group
«Portrait of a friend»
for RMO for artistic and aesthetic development
Prepared by : teacher Miroshina E. S.
1 sq. category.
Urban district city of Vyksa.
2017
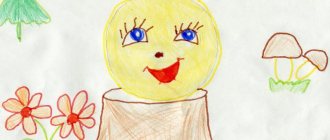
Goal: Formation of interest in portraiture ,
as one of the genres of fine art.
Tasks:
1. Strengthen the ability to draw a portrait of a friend , conveying the features of appearance.
2. Develop figurative perception, visual memory.
3. Cultivate friendly relationships in the group .
Methodical techniques: motivational moment - game “Compliments”
portrait modeling portrait execution scheme (for those who find it difficult, artistic expression, reflection.
Integration of educational areas: artistic and aesthetic development, speech development, social and communicative development, cognitive development.
Preliminary work:
Examination of portraits of famous artists: V. A. Serov “Girl with Peaches”
, V. M. Vasnetsov
“Alyonushka”
, conversations on the painting,
drawing “Daddy’s
Portrait ” , excursion to the museum.
Material:
Benefit "Face"
(consists of an oval and a circle (face, several types of hairstyles (male and female), 4 pairs of eyes (brown, blue, green, gray, pairs of ears, nose (2 types), lips
(3 types)
. Parts of the face are cut out of colored cardboard, displayed on a flannelgraph, sheets of white paper (A4 formats, simple pencils, erasers, water jars, watercolor paints, brushes No. 2, No. 4, napkins, musical accompaniment: audio recording of A. Vivaldi “The
Seasons”
.
"Portrait". Summary of a drawing lesson in the middle group
Anastasia Pyatachenko
“Portrait”. Summary of a drawing lesson in the middle group
Summary of a drawing lesson in the middle group " Portrait "
Pyatachenko Anastasia Sergeevna
Goal: To arouse interest in the genre of painting - portrait .
Objectives: learn to draw your portrait , conveying your emotions and feelings. Cultivate perseverance, patience, accuracy. Learn to distinguish emotions.
On the topic: methodological developments, presentations and notes
Plan outline of an open lesson: Portrait of a friend. (2 ml. Cockerel teacher Babenko E.V.) Program content: Analysis of the depicted train with completed and unfinished carriages, mastered.
Formation of skills to determine emotional states using pictograms. Fostering humanism, “responsiveness”, a caring attitude towards people of different nationalities, a desire to please them with good deeds.
The main goals of this quiz are: - to consolidate children’s knowledge about fire safety rules, rules of conduct in case of fire; - to foster a sense of responsibility; - to develop confidence.
Summary of a lesson on emotional development for children of senior preschool age.
Lesson from the series “Emotional development of preschool children.”
Summary of the sports festival “Towards each other” for children of primary preschool age with their parents. .
- teach children to see each other’s mood; - teach children to look for a way to please a friend; - “Doing something nice for each other” is accepted as a rule, which everyone in the group adheres to.
Source
Summary of extracurricular activity "Portrait of a friend"
Drawing lesson notes
Topic: “Portrait of a Friend”
Give an idea of the portrait genre; develop in children the ability to peer into human faces; learn to draw a portrait of a friend, correctly depict his facial features; develop a sense of composition.
Conversation about friendship and friends; looking at photos with friends.
Invite children to take photos for the album. “By chance” it turns out that there is no film in the camera. What should I do? How to design the album? (Children’s answers: they offer to draw portraits.)
Show children reproductions of portraits, asking who is depicted in them. Read the poem “Portrait”:
If you see what's in the picture
Does anyone look at us?
Or a prince in an old cloak,
Or a steeplejack in a robe,
Or Kolka, your neighbor,
- Each of us has friends. And they will probably be very pleased if we draw their portraits.
Pay attention to the basic arrangement of parts of the face: eyes, nose, mouth, ears, etc. Show the sequence of drawing and coloring techniques. Note characteristic features (hairstyle, eye and hair color, freckles, clothes, earrings, etc.). In the middle of the lesson there is a physical training session:
Turn them any way you want
We painted today
Our fingers are tired
Let's shake our fingers
Let's start drawing again.
During the lesson, songs are played: “Without friends, I’m a little less,” “It’s fun to walk together.” At the end of the lesson there is a guessing game.
Material number: DB-265950
Didn't find what you were looking for?
You might be interested in these courses:
The Internet can help us!
I am sure that anyone can be taught to draw well. There are tutorials for this, even video tutorials. True, literally every line is explained where to draw, everything is very accessible, if you wish. There is a certain technique, having mastered which, you can comprehend the wisdom of depicting any objects or living beings with paints or pencils.
So, an online store sells a wonderful guide: “Drawing Lessons for Beginners. Fun and effective” – here are step-by-step instructions that will allow you to learn how to draw whatever your heart desires with a pencil. The book was written by professional artists, so it’s worth taking a closer look at it if you want to learn how to draw beautifully. The benefit is suitable for people of any age. It's never too late to master graphics skills!
“UchMag” offers materials for creativity, for example, I can recommend an excellent set for young artists. It includes 28 items: paints, markers, pencils, crayons, pastels and a brush. As the manufacturer points out, pencils and crayons sharpen well, which is important. Sometimes you come across pencils that are impossible to sharpen! A great option as a gift for a child for any occasion.
Convenient set of pencils in a tube - “SpongeBob” with a sharpener included. Perfect for use at home, in kindergarten, at school. The colors are popular and bright. Plus – it’s inexpensive, although the tube itself is metal, but the price is quite affordable.
I bought a cool thing for my son at OZON.RU - a combination board. It is rough on one side and smooth on the other. You can draw with chalk and special markers. Chalk and marker included. It is convenient for us to do our homework on this board, especially to work through the rules of the Russian language and examples in mathematics. Wrote - erased, no need to fill up notebooks.
I also found a serious textbook on Ozone from the eminent teacher Giovanni Civardi, “Drawing. Complete Guide." This book is intended for those who seriously study drawing, as well as for artists. The author offers methods for mastering the technique of drawing with charcoal, pencil, and ink. Step-by-step training gives everyone who loves to draw the opportunity to master the technique of depicting people, objects, animals, as well as landscapes and still lifes.
Leave your comment
Responsibility for resolving any controversial issues regarding the materials themselves and their contents is taken by the users who posted the material on the site. However, the site administration is ready to provide all possible support in resolving any issues related to the work and content of the site. If you notice that materials are being used illegally on this site, please notify the site administration using the feedback form.
All materials posted on the site were created by the authors of the site or posted by users of the site and are presented on the site for informational purposes only. Copyrights for materials belong to their legal authors. Partial or complete copying of site materials without written permission from the site administration is prohibited! The opinion of the administration may not coincide with the point of view of the authors.
Source
Rules for constructing a portrait
You can draw a profile or full face using any available means. You can use pencil, ink, charcoal, felt-tip pen, watercolor, pen, etc. Each technique gives its own effect depending on the characteristic abilities and the technique used.
Note! To complete the drawing, you need to prepare white or colored, smooth or rough paper. Alternatively, you can use cardboard.
When drawing a person’s face, you should draw the center lines correctly. Using two guides, you can easily highlight the correct proportions, identical eyes, and symmetrical parts. By visually representing these lines, you can work on a person’s facial expressions and emotions. When creating a portrait, you need to show sadness or joy. In the first option, the young artist will have to lower his eyebrows, as well as the corners of his mouth, then close his eyes.
Rules for constructing a drawing
Summary of GCD Topic: “Portrait of a Friend”
Topic: “Portrait of a Friend”
Give an idea of the portrait genre; develop in children the ability to peer into human faces; learn to draw a portrait of a friend, correctly depict his facial features; develop a sense of composition.
Conversation about friendship and friends; looking at photos with friends.
Invite children to take photos for the album. “By chance” it turns out that there is no film in the camera. What should I do? How to design the album? (Children’s answers: they offer to draw portraits.)
Show children reproductions of portraits, asking who is depicted in them. Read the poem “Portrait”:
If you see what's in the picture
Does anyone look at us?
Or a prince in an old cloak,
Or a steeplejack in a robe,
How to teach a child to draw a portrait
This artistic activity is not only a reproduction of the features of a certain person, but an understanding of his inner world. By drawing a portrait of a person, a child conveys his character, appearance, and facial expression. No other genre reveals the genre of painting as much as portraiture.
How to teach your child to draw a portrait correctly
Drawing a portrait step by step for children uses simple pencils. Initially, the child creates his own creation with the simplest lines, blots. Over time, he gradually masters artistic skills. Children under 3-4 years old cannot complete complex tasks because they do not understand proportions well. They have a penchant for creating landscapes and illustrations. But over time, no one forbids drawing portraits of fathers, mothers, grandmothers, grandfathers or other relatives in kindergarten.
Leave your comment
Responsibility for resolving any controversial issues regarding the materials themselves and their contents is taken by the users who posted the material on the site. However, the site administration is ready to provide all possible support in resolving any issues related to the work and content of the site. If you notice that materials are being used illegally on this site, please notify the site administration using the feedback form.
All materials posted on the site were created by the authors of the site or posted by users of the site and are presented on the site for informational purposes only. Copyrights for materials belong to their legal authors. Partial or complete copying of site materials without written permission from the site administration is prohibited! The opinion of the administration may not coincide with the point of view of the authors.
Source
Step-by-step drawing of a portrait of a person with a pencil for children
Very often, little artists draw the human skeleton and muscles. Ignorance of human anatomy can lead to mistakes. That is, movements and facial expressions will look unnatural. Therefore, you need to carefully study the basic principles in order to get a quality drawing. The following stages of drawing a high-quality portrait for children are discussed here.
Important! To facilitate the process, it is necessary to draw a vertical line exactly in the center, which will divide the portrait into two parts, and horizontal lines, dividing it into three parts (forehead, eyebrows, eyes, mouth, nose, chin).
On the top line you should draw arched eyebrows. The eyes should be located below. To give the shape of the eyes, it is necessary to draw arched lines. The middle is for the pupil and iris. After this you need to draw eyelashes. The nose is drawn in the middle (a smooth arched line starts at the eyebrows). You should round off the top of the nose, and then you will have to draw the wings of the nose and nostrils.
Another step by step is drawing the mouth. A line of the mouth and two arcuate lines are drawn (on top of the upper lip). Then the lower lip is drawn with a large arched line. After this, you need to draw the ears and finish drawing the shoulders and hair.
Step by step drawing of a person
In older groups of kindergarten
Many parents wonder how to teach their child to draw a portrait of a person step by step. Initially, the child must be sent to a preparatory preschool center, where professional artists teach all the rules. If it is not possible to send your child to preparatory school, then you need to take him to kindergarten. In all senior groups, children take a drawing lesson.
Note! The teacher teaches how to draw a pencil portrait. Thus, the child will be able to convey the appearance, character and mood of a particular person. Consequently, there is an interest in the search for visual means.
The artist conveys the oval shape, hairstyle, hair color and other facial features. To create a high-quality drawing, a professional artist will be able to depict a person’s character on paper. Next, the teacher asks whether the children want to become real artists? Will they be able to create a unique drawing, for example, to depict their beloved mother?
Scheme for drawing a portrait for older children
The children learn to position the parts of the face correctly. During the course of the work, drawing techniques are consolidated using various materials. The main task of the teacher is to cultivate a feeling of love and respect for the mother. In addition, children are introduced to the public holiday “Women’s Day”.
The drawing should show the mother's facial features (eyes, nose, lips, hair). When creating a picture, children develop an attentive and respectful attitude towards their mother. The child strives to please and help his beloved mother.
Methods of drawing a portrait in the senior group
Before starting this process, the teacher invites the children to familiarize themselves with the material that will be useful for creating the picture. Step-by-step drawing of a mother for older preschoolers involves the use of paper, pencil, wax chalk, watercolor, palette, thick and thin brushes, water glasses, and napkins.
Important! Initially, children look at portraits of famous artists and poets. Next, the guys read literature on the topic “My Mother.”
Notes on drawing in the preparatory group “Portrait of a Friend”
Miroshina Elena
Notes on drawing in the preparatory group “Portrait of a Friend”
Municipal budgetary preschool educational institution
kindergarten No. 27 “Fairy Tale”
Summary of GCD for drawing in the preparatory group
«Portrait of a friend»
for RMO for artistic and aesthetic development
Prepared by : teacher Miroshina E. S.
Urban district city of Vyksa.
Goal: Formation of interest in portraiture ,
as one of the genres of fine art.
1. Strengthen the ability to draw a portrait of a friend , conveying the features of appearance.
2. Develop figurative perception, visual memory.
3. Cultivate friendly relationships in the group .
Integration of educational areas: artistic and aesthetic development, speech development, social and communicative development, cognitive development.
Examination of portraits of famous artists: V. A. Serov “Girl with Peaches”
, V. M. Vasnetsov
“Alyonushka”
, conversations on the painting,
drawing “Daddy’s
Portrait ” , excursion to the museum.
Benefit "Face"
(consists of an oval and a circle (face, several types of hairstyles (male and female), 4 pairs of eyes (brown, blue, green, gray, pairs of ears, nose (2 types), lips
(3 types)
. Parts of the face are cut out of colored cardboard, displayed on a flannelgraph, sheets of white paper (A4 formats, simple pencils, erasers, water jars, watercolor paints, brushes No. 2, No. 4, napkins, musical accompaniment: audio recording of A. Vivaldi “The
Seasons”
.
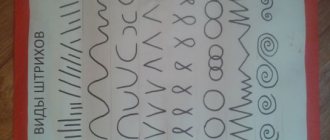
Drawing lips
Simple technique for drawing lips:
- A short sinusoid is marked - a section of the mouth.
- A curve shaped like a flying seagull is applied on top - the upper lip.
- An oblong arc is drawn from below with the tips adjacent to the upper curve - the lower lip.
- The folds of the lips are depicted as rays extending up and down from the incision.
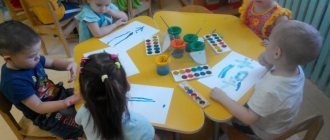
Progress of the lesson:
Children and teacher stand in a circle. The game “Compliments”
/Following the teacher, clockwise, the children compliment their neighbor: “Anya! You have a new hairstyle! Sonya! You have a fashionable sundress today! Anton! You have beautiful hair! Elena Stepanovna! You look good!"/
Teacher: You were just giving each other compliments . What else can you give to a friend ?
Teacher: Look at your friend . What color are his eyes? What shape is the nose, lips, ears? What hairstyle?
I suggest you model a portrait of your friend ( friend )
.
Model multiple portraits using the Face
Teacher: And now I suggest you go to your seats and get to work.
Children go to the tables.
Teacher: How can you make the portrait look like the person you are drawing?
Teacher: Of course, you need to depict the same eyes, nose, mouth, hair... And it’s also important to convey the mood of your friend .
Drawing the eyes
The simplest way to draw eyes beautifully:
- With a slight movement of the hand, using a simple pencil, an arc is drawn, of irregular shape, slightly raised from the side close to the middle of the divided oval of the face, and the ends of the arc are also different in length, the one closer to the center should be slightly longer.
- Another arc is drawn below, but slightly smaller in size with the opposite bend and regular shape.
- The arcs are connected to each other.
- The upper eyelid is drawn - another arch below the first, duplicates it in shape, but the ends are reduced to the junction of the upper and lower bends. The lower eyelid is drawn in a similar way.
- A circle is drawn - the cornea. The pupil with outgoing “rays” is located in the center.
- Eyelashes are added.
- The left eye is drawn in the same way.
- Arcs are drawn above the eyes - eyebrows.