Abstract of GCD for drawing in the senior group on the topic “My favorite city”
Olga Abramova
Notes on drawing in the senior group on the topic “My favorite city”
PRESCHOOL EDUCATIONAL INSTITUTION
CHILD DEVELOPMENT CENTER – KINDERGARTEN No. 58 “SQUIRREL”
Summary of GCD for drawing in the senior group
on the topic : “My favorite city ”
.
Summary of GCD for drawing in the senior group
on the topic : “My favorite city ”
.
Goal: To clarify and consolidate children’s knowledge about their hometown , Mytishchi, and its attractions.
Materials: Photographs depicting the central streets of Mytishchi and
main attractions, postcards, illustrations with views of Mytishchi, gouache, a sheet of A4 paper, a jar of water.
Lesson summary “My Street” (middle group)
Elena Chaus
Lesson summary “My Street” (middle group)
Goal: to cultivate in children a love and a sense of pride for their street , their hometown.
• consolidate children's knowledge of the concept of “ street ”
, knowledge of one’s address and the address of the kindergarten, the ability to talk about
the street on which the child lives (NGO “Social and Communicative Development”
, NGO
“Cognitive Development”
, NGO
“Speech Development”
);
• continue to introduce your hometown and its attractions (NGO “Social and Communicative Development”
, NGO
“Cognitive Development”
, NGO
“Speech Development”
, NGO
“Artistic and Aesthetic Development”
);
• activate vocabulary, cognitive interest (NGO “Speech Development”
, NGO
“Cognitive Development”
);
• attract children’s attention to this topic with the help of modern computer technologies (NGO “Cognitive Development”
);
• develop speech, observation, attention, memory, thinking, perception (NGO “Speech Development”
, NGO
“Social and Communicative Development”
, NGO
“Cognitive Development”
);
• develop gross motor skills (NGO “Physical Development”
);
• cultivate love for one’s hometown, street , home, the desire to see them beautiful and clean (NGO “Social and Communicative Development”
, NGO
"Artistic and Aesthetic Development"
).
Preliminary work: conversations about home address, visiting a store, mail, the difference between school and kindergarten; educational games “Find two identical houses”
,
“Where is your home”
, “What is extra
(school supplies)
”,
“Who lives where”
;
role-playing games “Drivers”
,
“Shop”
,
“Kindergarten”
,
“Mail”
;
reading poems by S. Drozhzhin “
Walking the Street ” , S. Marshak
“Mail”
;
guessing riddles about transport; drawing your street (together with parents)
.
Preview:
GCD Drawing “My Street”
Author: Puchkovskaya Olesya Vladimirovna, teacher, secondary school No. 18 (preschool level), Achinsk
Main educational area: “Artistic and aesthetic development”
Preliminary work: field trip through the city streets, conversations about the city, reading fiction, drawing rectangular and square objects.
Equipment: Luntik toy, portrait of S. M. Kirov, photographs of city streets
Children are located at work places.
The teacher brings in Luntik's toy.
Luntik: Hello. Where did I end up? And who are you? (children's answers)
Luntik: I am Luntik. I fell from the moon. Where did I end up?
Educator: Hello Luntik. We'll tell you everything.
Guys, what is the name of our city? What about our school?
What street is it on? Yes, that's right, on Kirov Street.
Luntik: What an interesting name, and why is the street called that?
Educator: Our street is named after the famous person Sergei Mironovich Kirov (showing a portrait). He was a very smart and strong-willed man, and he became famous for doing a lot of good and useful things for our country, Russia.
Luntik: Oh, how interesting. Is your street beautiful? Tell us about her? (children's stories)
Educator: Well done children. Look Luntik, the children brought photographs with them, let's look and find familiar places. (I post the photo on the board).
Let's go Luntik with the guys for a walk along our street.
Relaxation exercise “Walk”
-Walking along a narrow path
-Walking on toes
-Walking on heels
- Swinging on a swing
Luntik: It was a good walk. You have a big, beautiful street, and how many houses... Why does a person need a house? (children's answers).
Educator: Smart girls. Guys, we all have houses where you live with your beloved family. Who remembers their home address? (children's answers)
Luntik: Why do people need an address? (children's answers)
Luntik: I would like to visit the children.
Educator: I think, Luntik, the guys will be very glad to see you as a guest. In the meantime, play with us.
Finger game “Building a house”
I knock with a hammer, I knock
I'll hammer a hundred nails,
We will build a house, a house,
We will live together in it.
Luntik: Guys, they told us on the moon that you have a lot of animals and birds on your planet. Which animal has which house?
Half of the children are given cards with pictures of animals and birds, and the other half are given houses. Everyone needs to find a mate.
Educator: Well done guys, played well.
Listen to B. Serikbaev’s poem “Home”
I will draw a multi-storey house. Of course, it will be a little papery. Of course, it will not be very brick, but it will be white-walled, but it will be nice. Surely no one will ever drive a puppy away from this house.
On the topic: methodological developments, presentations and notes
Organizing the safety of children 2-4 years old on the street and at home.
Dear friends! Today our meeting is dedicated to a very important issue - teaching our children the skills to behave safely on the city streets. The question may arise: why explain de.
We expand children's understanding of the rules of behavior in the yard and on the street, we teach them to see everything that poses a danger to their life and health.
Program content:· Summarize children's knowledge about traffic rules, traffic signals, and types of transport.·.
· Summarize children's knowledge about traffic rules, traffic signals, types of transport. · Expand knowledge about.
Source
Preview:
MBDOU "Kindergarten No. 45
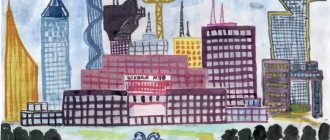
Topic: “Streets of our city”
senior group Filicheva Lyubov
Goal: to encourage children to develop a sense of composition when creating a simple urban landscape.
- to help consolidate children’s ideas about architecture and the profession of an architect;
- practice creating a simple composition on the theme of a modern city street, harmoniously placing the drawing on the plane of the sheet.
- ensure the formation of the ability to establish a relationship between the appearance and purpose of a structure, to find the distinctive features of different buildings: number of storeys, color, material, shape;
-encourage you to think through the design of the drawing before starting before execution.
-practice in obtaining intense, bright color when painting small details and light tone when painting houses and the sky.
-ensure the development of creative imagination and activity.
-promote the development of love for one’s hometown.
Materials: album sheets, pictures depicting various buildings, photo illustrations, city landscapes, simple, colored pencils.
-Series of observations “Streets of our city”:
Observation 1. Examination of buildings, their purpose.
Observation 2. What are buildings made of?
Observation 3. Architectural elements of buildings (windows, balconies, loggias, columns).
-Conversation about the architect, architecture.
-Looking at illustrations, photographs, postcards depicting buildings of different architecture.
-Drawing of various houses.
-Reading fiction: S. Baruzdin “Who built this house”, V. Mayakovsky “Who should I be?”, A. Pushkin “The Tale of the Fisherman and the Fish”, Russian folk tale “The Winter of Animals”.
Preparation for OD: carry out wet cleaning in the group, ventilate the room, prepare the material by those on duty, conduct a sedentary game before the lesson. Photos of the city of Trans-Volga region are hung on the board.
Our city is across the river,
And our city is called Zavolzhye.
There is one on the Volga
Where we can live together in harmony.
-Guys, how beautiful our city of Trans-Volga region is! There are many streets in our city. What streets do you know?
Children: Pushkin, Pirogov, Herzen, Lermontov, etc.
Educator: And also Mira Avenue, the spacious V.I. Lenin.
What buildings have you seen on the streets of our city?
Children: Residential buildings, schools, kindergarten, cinema.
Educator: That's right, guys! The builders built many buildings for the Volga residents, but first they had to be designed, the streets had to be thought out.
— What is the name of the science of designing (inventing) buildings?
Q: And the person who designs buildings?
Educator: Guys, let's organize an exhibition of drawings of our city. How can we organize it?
Children: Let's draw pictures about our city.
-I suggest you draw one of the city streets, but which one you decide for yourself.
Educator: Builders try to make houses strong, beautiful, and to serve people for a long time.
— All buildings are different: in some they live, in others they study, in others they trade, in others they relax. Each building corresponds to its purpose.
Therefore, all houses differ in appearance from each other.
— How do residential buildings differ from each other?
Children: Height. There are one-story and multi-story houses.
Educator: What can houses be built from?
D: from logs, bricks, panels.
Guys, please note that residential buildings have windows. How are they located?
Children: In rows, one under the other.
Educator: Are they different in size or the same?
Residential buildings also have comfortable balconies.
Educator: Guys, on the streets of our city, in addition to houses, there are other buildings. Which?
Children: Kindergarten, schools, shop.
Educator: How is the school building different from others?
Children: Wide entrance to the school, large windows, no balconies.
Educator: Guys, we looked at different buildings. I suggest you do a very interesting job today - make an album of drawings on the theme: “Streets of our city.”
I have already prepared the cover.
How are the houses located relative to the street?
Children: The houses are located along the street.
Educator: There is not one building on the street, but several. They are different in size and shape. One building may partially obscure another.
Draw the building, stepping back from the bottom edge of the sheet.
What can you depict between the buildings?
Children: Trees, bushes, benches, lanterns, flower beds.
Educator: What color pencils will we use when painting buildings?
Children: Light, bright.
Educator: And when drawing details?
Educator: And now, guys, you, like the architects, first think about what buildings will be on your street, how and where you will place them on a piece of paper.
Educator: Who wants to talk about their drawing?
Child: I will draw Pushkin Street.
Educator: What street will you draw, Alena? What buildings will be on your street?
Alena: Residential, multi-storey buildings, school, store.
Educator: Guys, first make a light sketch with a simple pencil, and then paint over it.
If you understand, then you can start drawing.
Progress of the lesson
— Guys, do you know that our world consists of many colors? Everything around is bright. Our mood can also be different, it is painted in different colors. Here I have a beautiful box - it’s magical. our good colorful mood will appear in it
Think about what color you are in the mood for today. For example, I’m in a green mood (several children respond and blow on the box)
.
That's how much color, kindness, good mood appeared in the magic box.
— Guys, what do you think, do colors live in our kindergarten?
Yes, that's right, a lot of colors live in the kindergarten. Do colors live in our city ? Yes, because our city is colorful.
— Tell me, what is the name of the city in which you and I live?
Children's answers (Moscow)
.
Right. Guys, is Moscow big or small? Tell me, what is in our city ?
You said everything correctly, guys, our city is big, beautiful, with big houses , with shops, with hospitals, with schools, with kindergartens, with theaters.
There are different types of houses : high and low,
Green and red, distant and close.
Panel, brick, seemingly ordinary.
Useful, beautiful - there are different types of houses .
Educator: And so that the work turns out beautiful, we will rest a little and start completing the task
One two three four five. (Children do jumping in place)
Let's build and play.
We are building a big, tall house. (Stand on tiptoes and stretch arms up)
What a beautiful house! (They extend their arms forward with an index gesture)
An old gnome will live in it. (Squat)
— Guys, I suggest you draw the streets of our city . Our magic box turns you all into artists. Take your seats at the tables. Let's, guys, look at the houses on the street - what shape they are
Children's answers: (rectangular)
.
That's right, they can be tall and narrow, or they can be low and wide. (The teacher shows on a sheet of paper drawing a rectangular house , street ). First we draw a street houses on it . We paint over the houses carefully so as not to go beyond the edges of the picture.
You can begin. Sit correctly: straighten your back, legs together, take a pencil with three fingers. First let's try to draw a big house in the air.
Independent creative activity of children. (Teacher's help to children who have difficulty)
As they are completed, the drawings are placed on the board.
Lesson summary
— Guys, I suggest you look at your drawings. They are all very good. What do you think was a successful drawing (statements from 2-3 children with the help of a teacher)
— Children, did you like your drawings? And I really liked it. You all worked really hard today. What did you enjoy doing most today? (children's answers)
Summary of GCD for the application in the preparatory group “New houses on my street” Summary of GCD for the application in the preparatory group “New houses on my street” Educator: Nikonova Alexandra Vladimirovna. Goals: continue.
Lesson notes for the senior group “At Home on the Street” (technical program “Technomir”) Additional general developmental program of technical orientation “Technomir”. Lesson notes for the senior group “At home on the street” (based on the model). Application in the preparatory group “New houses on our street” Dear colleagues! Today I want to show you the work of our children from the preparatory group on the application on the theme “New houses on our street.”
Summary of educational activities for artistic and aesthetic development “New houses on my street” in the preparatory group Goals: continue to teach children to use scissors; form a generalized idea of buildings; learn to build according to a drawing (pattern,...
Summary of educational activities on application in the senior group “Houses on our street” Purpose: To teach children to convey the image of a city street in application. Objectives: To strengthen children's ability to depict buildings using cutting techniques.
Lesson summary “Safety at home and on the street” Purpose: to deepen and systematize students’ knowledge about the rules of safe behavior and ways to get out of dangerous situations. Objectives: Contribute.
Summary of a drawing lesson in the preparatory group “Such different houses” Nadezhda Fedorovna Sidelnikova, teacher of MDOBU, combined type kindergarten No. 125, Sochi Equipment for children: tinted paper,.
Summary of the drawing lesson “Houses on our street” for the senior group Tasks: to form an idea of your hometown, your home street; houses located on it. Clarify ideas about the size of houses (tall,...
Summary of the drawing lesson “Spring on the Street” in the preparatory group Goal: to develop the ability to conceive the content of your drawing and bring the idea to completion. Program objectives: Educational: Teach children.
Source
Drawing with children of the senior group on the theme “My Native Street”
Teacher Filina S.D.
Drawing with children
of the senior group
on the theme “My Native Street”
Learn to depict in a drawing various houses and buildings located on one side of the street.
Strengthen technical skills and abilities.
Exercise your ability to independently choose means of expression, using traditional and non-traditional methods of painting.
Learn beautifully, select (combine) a color palette when painting.
Learn to place the image over the entire surface of the sheet, determining the location of individual objects
Develop creative abilities.
Cultivate love for your native land.
A4 sheets of drawing paper.
Wax crayons or markers
Text of the book “Drawing with children 5-6 years old. Class notes"
Theme of the week: “My City”
Lesson 43. On my street (Drawing with charcoal pencil) Program content.
Introduce children to the history of their hometown. Show children the features of drawing with charcoal pencils. Learn to draw the contours of multi-story and one-story buildings with a charcoal pencil. Consolidate knowledge about the main parts of a building (wall, roof, window, door, balcony). Learn to create a cityscape.
Demonstration material.
Paintings depicting wooden and white-stone Moscow, photographs of the modern Kremlin and Moscow streets (for Moscow residents).
Handout.
Watercolor paper, charcoal pencils, cotton swabs.
Progress of the lesson
Tell the children about the founding of the city of Moscow (or the city in which the children live):
“The founding of Moscow is associated with the Russian prince Yuri Dolgoruky. Previously, this was an ordinary village of Kuchkovo, because the boyar Stepan Kuchka lived in it. There, on a high hill, Prince Yuri Dolgoruky met with another prince to conclude an alliance. Yuri Dolgoruky liked the place on the banks of the Moscow River so much that he decided to annex these lands to his own and build a small wooden fortress. By order of the prince, the village of Kuchkovo began to be called Moscow (after the name of the river).
Many, many years passed, and a white-stone Kremlin was erected on the site of the wooden fortress (show pictures of the white-stone Kremlin). And after some time, the Kremlin was built from red brick (show the photo).
Since then, Moscow has changed a lot: there are high-rise buildings, cars, buses, trams drive along the streets (show photos of modern Moscow streets). But once there was a small wooden fortress here, and two dozen houses stood on the river bank.”
Ask the children if they have seen the Moscow Kremlin.
– Today we will draw a modern street: with high and low houses. And we will draw with charcoal.
Introduce children to the features of charcoal pencils: they are very fragile, so you should draw with them without strong pressure, easily. To prevent the drawing from being smeared, it is advisable to place a napkin under the fist of your right hand.
Suggest starting with the road - a straight horizontal line at the bottom of the sheet. Arrange houses on it in the form of wide and narrow, high and low rectangles. There is no need to paint the house; you can slightly darken the windows.
At the end of the lesson, spray the children's work with hairspray.
Look at the streets they depict with your children and highlight the most successful moments.
Ask how the children enjoyed drawing with charcoal pencils.
Lesson 44. Construction in our city (Free choice of material)
Program content.
Learn to come up with a plot yourself, draw an unfinished house, a crane, builders. Develop a sense of composition. Strengthen the ability to use different materials to create an expressive drawing.
Handout.
Landscape sheets, simple pencils, gouache and watercolor paints, wax and pastel crayons, colored pencils, brushes, palettes, jars of water, rags.
Progress of the lesson
Read A. Deruzhinsky’s poem “Crane” to the children:
The crane rose to the skies - a real giant. Excellent worker, busy all three shifts. Only the workers will ask, and then he brings a brick. I admire: Every day Higher, Higher New house!..
Ask the children:
– This poem is called “Crane”, but what else could it be called? (Construction site, new house, etc.)
Offer to think and depict the construction of a new house, first with a simple pencil, and then draw up the work in color. It is advisable that children draw not only an unfinished house, but also a crane and builders.
Theme of the week: “Native Army”
Lesson 45. Portrait of Dad (Drawing in gouache)
Program content.
Give children an idea of the portrait genre. Develop artistic perception of a person’s image. Learn to draw a portrait of your father (head and shoulders) from memory. Practice mixing paints to create a complexion.
Handout.
Landscape sheets, simple pencils, gouache, brushes, jars of water, palettes, rags.
Progress of the lesson
Ask several children to talk about their dad and describe his appearance. Say that there were no cameras before. And people used the services of artists who painted their face or full-length portrait from life.
Invite the children to become portrait artists today and draw their dads from memory. First you need to outline the oval head, neck, shoulders, then the eyes, nose, mouth and hairstyle. After this, you can safely paint over the background and paint the portrait with paints. To get a complexion, you need to mix white and red gouache on a palette and gradually add yellow until you get the color of a person's skin.
The child can give such a portrait to his dad.
Lesson 46. Flying airplanes (Drawing with wax crayons and watercolors)
Program content.
Learn to draw airplane silhouettes with a simple pencil, conveying the shape. Strengthen the ability to paint over an object with wax crayons and tint a sheet with watercolors so that one color smoothly transitions into another. Develop creativity and imagination.
Handout.
Watercolor paper, wax crayons, watercolor paints, brushes, palettes, jars of water, rags.
Progress of the lesson
Read the poem by Yu. Vladimirov to the children:
Three-engine plane It hums with its engines, It swings on its wings, It shines with its propeller...
Ask the children:
– What is this poem about? (About the plane.)
– Where can planes fly? (Over forests, over fields, over cities.)
At the top of the sheet, suggest using wax crayons to depict several flying airplanes made of ovals: an oval body and triangular wings. Draw round portholes.
At the bottom of the sheet you can outline a forest and a field or a city. Then ask them to tint a piece of paper with watercolors, depicting the sky in different shades (from blue to purple), mixing different colors.
Theme of the week: “Transport”
Lesson 47. Steamboat (Drawing with wax crayons and watercolors)
Program content.
Learn to draw objects with a simple pencil, conveying the shape of the main parts, their location and size. Continue to strengthen the ability to fit an image into a sheet. Continue learning how to paint over a silhouette with wax crayons and tint a wet sheet of paper with watercolors.
Demonstration material.
Painted steamship.
Handout.
Watercolor paper, wax crayons, watercolor paints, wide brushes, palettes, jars of water, rags.
Progress of the lesson
Introduce children in advance to S. Marshak’s poem “Mail.”
Together with the children, remember what kind of transport the letter traveled in this poem (in a train carriage, on a bus, on a ship).
Read an excerpt from this poem:
The steamer will depart in two minutes. People filled all the cabins with suitcases. But they don’t carry suitcases into one of the cabins. This is what will go there: Postman and mail.
Offer to depict a steamship on which mail is transported. Using a simple pencil, you need to draw the hull of the steamship - an inverted trapezoid. At the top of the trapezoid is a rectangular cabin with round portholes and a chimney. You can also draw portholes on the ship's hull. Then paint over the steamer with wax crayons.
After this, you need to draw a horizon line, moisten the sheet with a wide brush and depict the sea with wide wavy lines, using different colors and shades (light green, green, blue, indigo, violet).
The sky also needs to be painted in different shades. Lesson 48. Truck (Free choice of material)
Program content.
Learn to depict objects consisting of different geometric shapes (rectangular, round, square with a cut corner), and correctly position the parts of the object. Develop a sense of composition. Teach children to use different materials to create expressive drawings. Strengthen the ability to understand and analyze the content of a poem.
Demonstration material.
Subject pictures of cargo transport (dump truck, truck, van, etc.).
Handout.
Half album sheets, simple pencils, gouache and watercolor paints, wax and pastel crayons, colored pencils, brushes, jars of water, palettes, rags.
Progress of the lesson
Read to the children the beginning of the poem by E. Fireflower “Who Starts the Day?”:
The driver doesn’t like to sleep for a long time. The driver gets up as soon as it’s light. He hurries to his car to start the engine. Everywhere the driver's business awaits - He is ready to carry bricks to all ends of the earth, So that cities grow.
Ask the children:
– Who is this poem about? (About the driver.)
– What kind of trucks can a driver drive? (Truck, dump truck, van.)
Look at object pictures of freight transport with your children. Determine that all cars have a cab with an engine, a body, and wheels. Invite the children to choose one of these cars to draw. Advise the children to place the sheet horizontally. It is more convenient to start drawing with the body and cabin, but they should not be too close to the bottom edge, otherwise there will be no room to draw the wheels. Below you can mark the road.
Theme of the week: “My family”
Lesson 49. Matryoshka dolls from Sergiev Posad (Drawing with gouache)
Program content.
Introduce children to the history of the creation of the Russian wooden nesting doll. Show the characteristic features of the Sergiev Posad matryoshka doll. Develop the ability to paint the silhouette of a nesting doll with patterns and flowers. To form the aesthetic taste of children.
Demonstration material.
Sergiev Posad nesting dolls (thick-sided, in multi-colored aprons, in red, blue, green scarves).
Handout.
Matryoshka doll templates of different sizes cut from album sheets, gouache, brushes, jars of water, palettes, rags.
Progress of the lesson
Tell the children about the history of the creation of the first nesting doll:
“Now there are dolls made of plastic, rubber, porcelain, etc. But before, toys were made only from straw, clay and wood. More than a hundred years ago in Sergiev Posad, the master V. Zvezdochkin made a disassembled doll - a matryoshka doll, and the artist S. Malyutin painted it. Matryoshka dolls are made from linden or birch wood. The wood is dried and sawn into bars. Figures are turned from the bars on a machine, starting with the smallest. A large nesting doll can contain one smaller nesting doll, and sometimes all sixty. The finished matryoshka is painted with bright colors. The most difficult thing is to give the desired facial expression to the nesting doll, draw eyes, crimson lips, rosy cheeks. When the nesting doll is painted, it is varnished several times.”
Take a look at the Sergiev Posad matryoshka doll with your children - it is stable, thick-sided, in a shirt and sundress, on top of which is a multi-colored apron. Matryoshka clothes are decorated with wavy and straight lines, dots, circles and flowers. On the head is a red, blue or green scarf.
Invite the children to paint the nesting doll templates. Highlight the face, outline and decorate the clothes.
At the end of the lesson you can read the beginning of S. Marshak’s poem:
Eight wooden dolls, round-faced and ruddy, in multi-colored sundresses live on our table, they are all called matryoshka dolls.
Then ask them to arrange the nesting dolls according to height and stick them on a long sheet of paper (or on a roll of wallpaper).
Lesson 50. Family of Semyonov nesting dolls (Drawing with colored pencils)
Program content.
Introduce children to the Semyonovskaya matryoshka doll. Learn to draw a silhouette of a matryoshka doll from life with a simple pencil. Practice conveying the characteristic features of Semenov’s nesting dolls using appropriate colors and patterns. Develop the ability to imitate movements as the poem progresses.
Demonstration material.
Semenov nesting dolls with a large red flower in the center of the sundress and a yellow scarf on the head.
Handout.
Landscape sheets of different sizes, pencils, colored pencils, erasers.
Progress of the lesson
Ask the children to repeat the movements after you:
We are cheerful nesting dolls, (Hands folded into a shelf in front of the chest, the index finger of the right hand rests on the right cheek.)
Okay, okay.
We have boots on our feet, (Put each foot alternately on the toe, then on the heel and click with the heels.)
Okay, okay.
In our colorful sundresses, (Hold onto the imaginary ends of the scarf and squat slightly.)
Okay, okay.
(Clap their hands.)
We look alike, like sisters, Ladushka, okay.
(Clap their hands.)
Show the children wooden nesting dolls and play with them: take one out of the other, arrange it according to height. Ask who is the mother and who is the daughter. Count how many daughters there are, how many nesting dolls there are. Please note that all the nesting dolls have a large red flower painted in the center of the sundress, green leaves around it, and yellow scarves on their heads.
Invite the children to draw one of the nesting dolls with a simple pencil. Someone will draw the mother, someone will draw the biggest daughter, someone will draw the smallest or medium-sized one. First you need to draw a circle (head) and an oval (torso). Then connect the head and body of the nesting doll with a smooth line and remove the extra internal lines with an eraser. After the outline of the nesting doll is drawn, you need to decorate the nesting doll: draw a face, a scarf, a flower, leaves and color the nesting doll.
Then the nesting dolls can be cut out, arranged according to height and pasted on a long sheet of paper (or on a roll of wallpaper).
Theme of the week is “Women’s Day”
Lesson 51. Portrait of mother (Drawing with pastel crayons)
Program content.
Develop artistic perception of a person’s image. Continue to learn how to convey facial features in a drawing. Learn to draw a portrait of your mother (head and shoulders) from memory. Cultivate love for your loved ones.
Demonstration material.
Photos of mothers of children.
Handout.
Landscape sheets, pencils, pastel crayons, cotton swabs.
Progress of the lesson
Ask the children to bring photos of their mothers in advance. During class, look at the available photographs with the children. Ask several children to describe their mother's appearance.
Read to the children V. Berestov’s poem “Feast of Mothers”:
The eighth of March, the holiday of mothers, - Knock-knock! - knocking on our doors. He only comes to that house where they help their mother. We'll sweep the floor for mom, and set the table ourselves. We will cook dinner for her, we will sing and dance with her. We will paint her portrait as a gift. - They are unrecognizable! Wow! “Mom will tell people here.” And we always, And we always, We will always be like this!
Put away the photographs and invite the children to draw pictures of their mothers from memory. Remind you that you should first draw an oval head, neck, visible shoulders, eyes, nose, mouth. Then the details are drawn - eyebrows, ears, hairstyle. All that remains is to design the work in color. Remind children that pastel crayons are fragile and must be used to draw carefully. Pastels can be mixed by layering one color on top of another. Shade the pastel with a cotton swab to create a solid, uniform color.
The child can give the resulting portrait to his mother.
Lesson 52. Filimonovsky deer (Gouache painting)
Program content.
Continue to cultivate interest in the works of Filimonov masters. Introduce the elements of Filimonov painting (lines, stars, flowers, Christmas trees) and its colors. Continue learning how to decorate a voluminous silhouette with a pattern, alternating horizontal lines of two colors. Learn to draw a traditional element of Filimonov painting - a flower. Strengthen the ability to draw straight thin lines with a continuous movement of the tip of the pile.
Demonstration material.
Filimonovsky clay toys: cockerels, chickens, deer (deer), horses, cows, lambs, soldiers, ladies; samples of elements of Filimonov painting.
Handout.
A donkey made by children, covered with yellow gouache mixed with PVA glue; gouache, thin brushes, rags, jars of water.
Progress of the lesson
Tell the children about the Filimonovskaya toy: “The Filimonovskaya toy originated in the village of Filimonovo. Near the village there were deposits of white clay, and they began to make toys from it. (Show the children the clay products.) Filimonov toys can be immediately recognized by the short and thick legs, long necks and small heads of the animals. Filimonov toys are decorated with narrow straight or inclined and intersecting lines in green, red and yellow.
Show the children samples of Filimonov painting: alternating green and red stripes, oblique stripes between two parallel lines, Christmas trees, flowers in the form of circles. Offer to decorate the deer sculpted during the sculpting class with these elements.
The finished craft can be given to your mother or grandmother on March 8th.
Theme of the week: “My friends”
Lesson 53. Me and my friends (Stroke with colored pencils)
Program content.
Continue to teach how to give a familiar object a new image using additional details using colored pencils. Develop observation and imagination. Exercise children in matching words and movements of hands and fingers.
Handout.
Landscape sheets, scissors with blunt ends, simple and colored pencils.
Progress of the lesson
Start your lesson with finger gymnastics “Friendship”:
Girls and boys are friends in our group. (Cover your left hand with your right palm and sway it to the rhythm of the poem.)
You and I will make friends Little fingers.
(Cover your right hand with your left palm and sway it to the rhythm of the poem.)
One, two, three, four, five.
(Join the fingers of both hands, starting with the thumb.)
Five, four, three, two, one.
(Join the fingers of both hands, starting with the little finger.)
Talk to children about their friends:
– Who are your friends?
– Why are you friends with them?
– Do you give each other toys?
Offer to depict yourself and your friends in an unusual way - in the form of scissors. Look at scissors with your children and think about how they can be turned into a person. Draw the head on top, arms on the sides, and legs on the bottom. Scissor rings can be styled into pants or skirts.
Children need to place the scissors, handles down, on a piece of paper and hold them with their left hand.
Holding a pencil in your right hand, use it to trace the outline of the scissors along the outer edge. Then remove the scissors and turn the resulting silhouette into one of your friends, dressed in bloomers. To do this, you need to draw a round head on top of the scissors, handles on the sides, legs on the bottom, and paint over the missing details with colored pencils. In the same way, you can portray yourself and a few more of your friends. Lesson 54. Funny and sad blots (Blotography. Watercolor)
Program content.
Introduce children to a new method of depiction - blotography, and show its expressive capabilities. Learn to give the resulting blots a mood. Develop observation, fantasy, imagination, interest in creativity.
Handout.
Halves of album sheets, watercolor paints (or gouache, ink), juice straws, pencils or markers, wide brushes, rags, jars of water.
Progress of the lesson
Read a poem about blots to the children:
This blot is a steamboat, This blot is a hippopotamus. This blot is like a daisy on a forest edge. This blot will be a cat - On the top of the ears.
Tell them that today the children will “blow out” the blots and make them happy or sad.
Each child needs to put more water and paint on the brush and place a large spot on the album sheet. Apply a straw to the center of the stain and blow strongly; you can “blow” the paint in different directions. Then you need to place and “inflate” blots of other colors. To make the paint dry faster, you can blot it with a cloth.
Each blot has its own mood. Show the children how to use felt-tip pens to give the blots different “face” expressions: happy, sad, angry, surprised, calm, joyful, etc.
Topic of the week: “Me and my body”
Lesson 55. Man (Drawing with simple pencils)
Program content.
Learn to draw schematic figures of people, observing proportions. Exercise in conveying the position and movement of people. Form figurative perception.
Demonstration material.
Cards with schematically drawn people in different poses (one has his arms raised up, legs together; another has his arms to the sides, legs shoulder-width apart; the third has bent over; the fourth has crouched, etc.).
Handout.
Landscape sheets, simple pencils.
Show the children an image of a schematically drawn person, the children must repeat the pose themselves.
Then show the children how to draw a person schematically (a round head, a straight line going down from it - the body, stick-like arms extending in different directions, and stick-like legs at the bottom).
Place sample cards in front of the children and offer to also sketch two or three people in different poses.
Lesson 56. Children doing exercises (Drawing with colored pencils)
Program content.
Learn to draw people, observing the ratio of head and body in size. Learn to convey in a drawing the position of the arms and legs when children perform exercises. Develop creativity.
Handout.
Landscape sheets, simple pencils, colored pencils.
Progress of the lesson
Start the lesson with exercises:
We got up early today (You walk in place.)
And they began to do exercises. Hands up! Hands down! Lean left and right!
Offer to pretend the children are doing exercises. First you need to draw the head and body. Then think about the position of your arms and legs. Color the drawing with colored pencils. Draw a few more people.
GCD move
Parent:
Today we will go traveling. Tell me, what can you go on a trip with? From the proposed cards, choose any one that represents the type of transport.
Show it and name it.
Child (shows cards depicting transport by plane, train, car, bicycle, boat, etc.)
Parent:
That's right, well, we'll go on a trip in a hot air balloon. Close your eyes and imagine the blue sky and our hot air balloon. What is he like? Name the words that describe our balloon.
Child:
Large, beautiful, round in shape, has a basket for passengers, multi-colored, bright, light, etc.
Parent:
What's inside the balloon?
Child:
Well done! Let's fill the dome of our balloon with air. (The child performs breathing exercises). And getting into the basket is not so easy. You need to give your address. (The child says his address and goes into an imaginary balloon basket).
Parent
: Well, everything is ready for the trip. Let’s do a warm-up exercise before the long journey. The parent invites the child to listen to the poem:
The village is small, (clench your fists) My reliable village, (close your fingers in a “lock”) The village is dear, (fold your palms like a “house”) May you not be known to Rus', (clicks each of your fingers in turn) Although a little small, (hug yourself hands) But in my soul it is appropriate (spread your arms wide to the sides) Your beautiful face. (close palms one across the other)
Parent:
Well, now we’re going on a journey through the streets of our village, which is called what?
Parent: Our village is small but beautiful; there are many streets, interesting places and buildings. Each of us lives on our own street. Tell us about it: what is it called, what is it like, what is on your street? (child's story). Sample story:
The child answers (kindergarten, at home, etc.)
Parent
: What do all buildings have in common?
Child:
Every building has windows, doors, walls, and a roof.
Parent:
Tell me, how are these buildings different from each other?
Child:
The buildings differ from each other in height, wall color, decorations, etc.
Parent:
How else can buildings differ from each other?
Listen to all the child's options.
Parent:
Buildings may also differ from each other in the material from which they are built.
What is this house made of?
Child:
This house is built of brick.
Parent
: So what is he like?
Parent:
What is this house made of?
Child:
This house is built of stone. It's made of stone.
Parent:
What is a house built of wood?
Child:
A house made of wood is made of wood.
Parent:
Today you and I will draw the street of our village.
Parent:
Tell me, what is usually found on every street? (Buildings, houses).
Parent:
That's right, there are different houses on it. Tell me, how can you draw a house?
Listen to your child's options.
Parent:
Pay attention to the image of the central street of the village. What parts is the road divided into? (On the roadway and sidewalk).