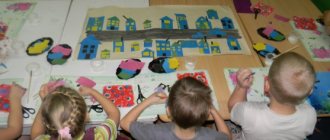
Summary of a lesson on appliqué in the senior group “Autumn Flowers”
Tasks:
Educational:
— Introduce children to the method of symmetrical cutting from paper folded several times (taking into account the characteristics of the inflorescences);
— Teach how to compose a composition on the plane of a sheet (a sign of beauty can be found in the combination of a dark background and a light bouquet and a light background and a dark bouquet);
— Activate the dictionary;
- To form a generalized idea of autumn flowers - asters, dahlias, calendulas, chrysanthemums.
Educational:
— Develop a sense of color, a sense of composition;
— Develop attention, memory, logical thinking, imagination of children;
— Develop interest in completing tasks and creative activity.
Educational:
— Cultivate accuracy in working with scissors and paper;
— To cultivate a caring and aesthetic attitude towards nature, a sensitive attitude to the beauty of autumn flowers.
Methods and techniques: verbal, practical.
Materials and equipment: Reproductions from paintings by famous artists, postcards with images of autumn bouquets, bouquets of fresh flowers, background paper - dark, light, square paper blanks for flowers (also light and dark), scissors, glue, napkins.
Preliminary work: Examining autumn flowers in flower beds; search for contrasting combinations (plants, objects) in the surrounding world; reading fiction about flowers; viewing reproductions, pictures, postcards depicting still lifes with flowers.
Progress:
1. - The Sorceress Autumn gave us many gifts - these are mushrooms, fruits, vegetables, and berries; she decorated the trees with rich clothes and grew beautiful flowers.
— What autumn flowers do you know?
— Look at the bouquets in vases. What does an aster flower look like? Dahlia? Please note that these flowers have many petals and are lush.
- And if we place all the light asters and calendulas on the table against the background of a light wall, and dark dahlias, gladioli, chrysanthemums against the background of a dark curtain, what will happen? (not bright, the background blends in with the colors)
- Let's swap our bouquets - what happened? Why?
- Now we will also try to create our own unique bouquets, we will be magicians, magicians. Let's make light flowers on a dark background, and dark ones on a light background.
Phys. just a minute
2. There are materials for work on the table; children independently select the ones they need.
— To get a beautiful aster or chrysanthemum, you need to fold the leaf diagonally in half 3 times, holding it by the blind corner of the fold, make several cuts on the open side, cutting out the pointed petals of the flower, and unfold it. (Show.)
— For dahlia and calendula petals, you need to follow the same steps, only cut out the rounded petals. (show)
— In order for the flower to be lush, several cut blanks are needed. The tips of the petals can be bent using a pencil or scissors. Next, cut out the stems and leaves.
- After finishing working with scissors, we try to create a composition on the background sheet - make the bouquets the way you like.
- Apply glue only to the middle of the workpiece, assemble it - you get three-dimensional flower heads. (Show.)
Children's work. Individual assistance.
3. Lay out the work on the table.
— Dear wizards, do you think we succeeded in turning paper into luxurious autumn flowers?
— Did you get the right combination of background and bouquet?
— Which bouquets do you like best? Why?
- Let's collect all the compositions and arrange an exhibition for parents, so that they can also admire your magical bouquets of autumn flowers.
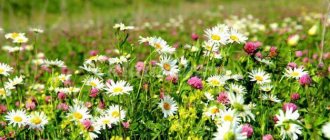
Flower meadow
The fabric applique attracts with its brightness. It can become a wonderful decoration for clothing, interior items, or an original souvenir.
The master class presented in the article will tell beginning needlewomen how to easily make an applique “flowers from fabric” with their own hands.
You need to prepare for work:
- sketch paper;
- needles, scissors, threads;
- glue;
- fabric (it is advisable to use different types of fabric).
Stages of work:
- Draw the petals (you can print ready-made templates or use flower-themed coloring books).
- Carefully cut out the blanks.
- Place the prepared samples on a cloth and secure with needles. Then draw the contours of the petals and cut them out, not forgetting to make room for hemming the edges of the parts.
- The edges need to be folded and ironed carefully. Make up a composition at your own discretion, first secure each element with needles, and then baste (for ease of work at the next stage).
- All parts are carefully sewn to the product using an invisible seam.
These appliqués can be used to decorate sofa cushions, summer hats, and dresses. The panel will look beautiful. To do this, take thick cardboard, stick green velvet paper on top and “scatter” bright flowers throughout the space and glue them.
The picture can be inserted into a frame under glass. An amazing gift, the price of which is the love of creativity.
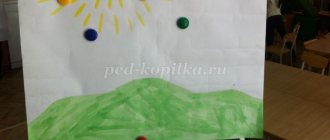
Autumn forest applique made from cotton pads
This technology is perfect for children aged three years and older. Since the disks are quite large, this method is more suitable for single trees. Prepare red, orange and yellow paints. For this craft, it is better to use gouache, as watercolor will give lighter colors.
Paint 10-15 discs and dry. You can paint with a brush or dilute the paints and drip from a pipette. If you use several colors on one disk, the colors will mix with each other and give new shades, which will allow you to more fully convey the color scheme of autumn.
Glue the barrel onto a sheet of paper and painted cotton pads on top.
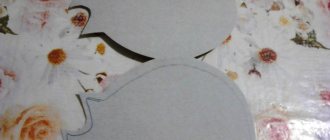
"Daisies"
Preschool children will enjoy making this application because it is not difficult to complete. The result will be a colorful craft.
You need to prepare:
- drawing “bouquet of daisies”;
- pencil, PVA glue, scissors, brushes, paints (preferably acrylic);
- colored woolen threads, matching the color of the flower in tone;
- frame.
Master Class:
- First, prepare a frame for the future picture. On thick rectangular cardboard, draw a frame of the desired thickness and cut out the middle. Paint the resulting product (light-colored paint is best). Leave until completely dry.
- Make small flat buttons from threads (the diameter should match the width of the frame) from woolen threads (color at your discretion) and paste them over the entire area of the frame.
- It is enough to finely chop the woolen threads. Place the thread mass into separate containers: white for the petals, yellow for the center of the chamomile, two shades of green for the leaves and stems.
- Place a stencil of the design on the base and carefully trace it with a pencil.
- Carefully grease the centers of the drawn daisies with glue and thickly glue pieces of yellow thread.
- Make the petals in the same way using white threads.
- Create stems in a similar way using dark green threads.
- For the leaves, use threads of a lighter green tone.
- Insert the picture into the frame. This is both a good gift and an interesting home decor.
Applique is a type of creativity accessible to all ages. A huge range of available materials, such as paper, fabric, plastic, cereals, glass, allows you to create beautiful products.
Appliqué practice is very beneficial for a child’s development. Since this is most often a collective work, the child learns to create together, while helping and accepting help.
Children's imagination, thinking, and imagination also develop, and the quality of attention, perseverance, and perseverance gradually increases.
The application in its own way is a guarantee of friendly creative relations between parents and children.
Application “Autumn tree” made from pumpkin seeds
In order to create this work, you will need:
- sheet of cardboard
- paints
- glue
- pumpkin seeds
- tree stencil
The first step is to create the autumn leaves. This application involves the use of pumpkin seeds, which are previously painted in different colors. It is advisable to use yellow, orange and red colors.
Coloring can be done with both paints and felt-tip pens. On a sheet of paper you need to draw a barrel with paint or use a stencil. Then the work will be more accurate. Now all that remains is to glue the leaves to the tree.
The work is ready.
Where to start?
So, regardless of which group you are conducting the lesson with, it is initially necessary to introduce children to the varieties of trees and shrubs.
After all, only a few of them will be able to name you more than 2 types of trees, not to mention shrubs. How can you do something you don’t know? Therefore, the teacher’s task is not only to tell, but also to show what this or that tree looks like. Perhaps you have teaching material on this topic: hand-drawn or printed from the Internet. But I recommend that you purchase demonstration pictures “Trees and Shrubs”, which can later be used in other classes. They cost just a penny, and the thick cardboard and large size of the cards will make you very happy.
The thematic picture dictionary “Flowers, Trees” will also serve well in classes where you need to get acquainted with the diversity of the plant world, depict it in the form of an applique or draw it. These two manuals will provide invaluable assistance to the teacher both in the initial stages of preparation for creative work, and in the case of a more in-depth study of the topic.
And of course, you will need templates to work. For the little ones, you will need to cut them out yourself, leaving only small elements for cutting - you need to practice using scissors from an early age. Students will only have to glue the necessary elements. For older children, “patterns” will be useful for tracing them on colored paper and then cutting them out yourself.
Cotton wool applications
One of the most popular and simplest ways to imitate snow for crafts is cotton wool. The work done in this way turns out to be voluminous and truly winter-like.
Snow covered trees
What you will need:
- blue or light blue cardboard;
- pencil;
- glue;
- cotton wool
Let's get started:
- Take cardboard and draw a tree trunk on it.
- We coat the branches with glue and put cotton wool on them.
- In the background we draw snowdrifts and a few more trees, make clouds and bushes.
- We glue the cotton wool to the snowy hills and along the contours of the plants. The picture is ready.
We use cotton balls
For the next craft we will prepare: cardboard, colored paper and several cotton balls.
- We cut out snowdrifts from a strip of white paper and glue them at the bottom.
- We make several trunks for future trees from brown paper and place them on cardboard. We put a snow cap made of cotton wool on each of the branches.
- We cut out patterned snowflakes or make small circles using a hole punch and paste them over the trees.
Forest of cotton pads
As an alternative to regular cotton wool, you can use cotton pads. Additionally you will need: colored cardboard, glue and scissors.
Let's start designing the application:
- To imitate snow-covered hills, take a cotton pad, cut it in half and glue it onto cardboard.
- Then we cut out several strips - these will be tree trunks. Glue them onto the snowdrifts.
- We make the crown of the tree from a whole disk.
- To add liveliness to our picture, we draw snowflakes. They can be cut out of paper, drawn with cotton swabs, or small circles of cotton pads made with a hole punch can be glued on.
Another craft option:
- We draw Christmas trees on several cotton pads: we got four, then we cut them out.
- From another disk we make a month and snowflakes.
- We take cardboard and glue a cotton swab in the middle at the bottom - this is the trunk of one of the trees.
- Cut several cotton pads in half. In our case - three. We glue them at the bottom with different sides - we get snowdrifts and snowy hills.
- Place a cotton pad on top of a cotton swab - this is the crown of the tree.
- We place the cut out Christmas trees on the snowdrifts. Glue the month and snowflakes.
House in the forest made of cotton swabs
Don't forget about cotton swabs. With their help, you get cute snow-covered trees and houses.
Let's take: cardboard, colored paper, scissors.
- Whole sticks are suitable for tree trunks, but to create branches you will need to cut them.
- To make it at home, place cotton swabs next to each other horizontally or vertically. Cut out a triangular roof from white paper and glue it on top. We make windows and doors from colored paper. You can do the opposite: cut out houses from paper, and lay out the roof from sticks.
- We also cut out clouds, snowflakes and snowdrifts from white paper.
Volumetric fabric flowers
An applique of such flowers diversifies interior items. A minimum of components and tools are required. Many housewives have collected multi-colored pieces of various fabrics. For this craft it is better to use cotton. There will also be buttons.
Need to prepare
- tissue components;
- flat buttons of various colors in two sizes;
- handicraft tools;
- thin cardboard.
You can get started:
- Make a template out of cardboard - a circle. It is advisable to prepare blanks of different diameters.
- Transfer the stencils to the fabric. Trace the silhouettes (not forgetting the seam allowances), cut them out, turn the edges in, sew with a regular seam, and iron.
- Tighten the thread to form a bag.
- First sew a button of a larger diameter into the middle of the product, and sew a smaller button on top.
- Attach the resulting three-dimensional flower to the intended base in different ways (sew or glue).
- Similarly, make the required number of multi-colored flowers.
Hand-made appliqué of pressed dried flowers is used in room decoration along with purchased designer items and accessories.
Today on the decor market you can often find paintings in the oshiban style from various manufacturers. It's worth trying to create them yourself.
Family tree making technology
If you want to try something new in your work, then I suggest you do some applique work in the form of a family tree. In this case, it is advisable to make the crown of the tree whole; voluminous leaves are not suitable here. In this photo they look very sloppy.
What will happen on the crown depends on your imagination. You can stick apples on which children will write members of their family (suitable for a preparatory group) or flowers. You can also ask parents in advance to bring photographs of family members in the form of small circles. Such a craft can even take pride of place in the living room and become a family heirloom. There are a lot of options, choose depending on the age of your students.
Amazing paintings
Flat applique is the simplest version of creating an original panel of dried flowers. All parts of a dry plant can be used: shoots of various curves, leaves, inflorescences, seeds.
The base for the applique is often covered with fabric or painted with watercolors.
Thick cardboard quite often acts as a similar base for small crafts, since it has excellent adhesion to any glue and is well processed with various paints.
Often, burlap is used at the base of the picture, which is used to cover the canvas. Many craftsmen use this material based on its environmental friendliness. Such applications are suitable for beginners who love floral art.