Theoretical aspects of training
Paper construction (paper-plastic) is a type of activity for preschoolers that involves:
- drawing up an action plan;
- selection of materials for crafts;
- performing manipulations using the chosen technique.
In kindergarten, children construct crafts in classes organized by the teacher in a playful way.
Lesson objectives
Before planning a lesson, the teacher must set a goal that he wants to achieve. It is implemented through several tasks.
Educational objectives:
- introduce the properties of different types of paper (classic, velvet, holographic, crepe);
- develop the ability to cut out the necessary parts for a craft and name them (square, circle, etc.);
- clarify ideas about colors and their names;
- learn to make three-dimensional shapes from paper blanks by bending, crumpling, twisting or tearing them;
- encourage the creation of products according to plan (independently choose the theme and material for the craft);
- learn to combine elements into a composition (for example, roads and houses are a street).
Correction and development tasks:
- develop fine motor skills, thinking, attention and memory;
- improve visual and tactile perception;
- develop the ability to analyze created crafts and, based on this, plan your further actions;
- develop imagination.
Educational tasks:
- develop the ability to maintain order in the workplace and put tools in their place after finishing work;
- cultivate kindness, love of nature, etc. (depending on the craft).
Types of paper designs
Paper plastic is divided into 2 types:
- origami - folding figures by bending paper;
- volumetric paper and cardboard modeling, involving the use of scissors and glue.
Design forms
There are 7 forms of organizing constructive activities:
- Pattern design developed by F. Fröble. The teacher’s actions serve as an example. Children repeat what is shown, learning new techniques for working with various materials.
- Model design proposed by A. N. Mirenov. Instead of a sample, a model is used in classes - a ready-made craft. The method for creating the product is not shown. Students must recreate the model themselves. This form of organizing activities is used when working with children 5-6 years old and older. It helps to activate the thinking of preschoolers, because... they need to mentally disassemble the product into its components and reproduce the procedure unknown to them.
- Design according to conditions, developed by N. N. Poddyakov. He suggested not giving children ready-made samples and ways to solve a problem. The underlying conditions must be problematic in nature. For example, students are asked to make an object out of paper that can be given to their mother on March 8th. This method allows you to develop thinking and imagination. It is used if children have already made given objects or analyzed products that are similar in structure.
- Design based on drawings and visual diagrams. The authors of the method are S. Leon Lorenzo and V. V. Kholmovskaya. When working with preschoolers, templates are used. Children learn to use drawings as a way of understanding an object and how to create it.
- Design by design. For kindergarten students, this activity is difficult. In order for them to think creatively, the teacher must form in children an idea of the objects being created, the ability to repeat the teacher’s actions and look for new ways to create crafts. Only after preschoolers have mastered the existing methods of paper modeling will they be able to creatively use the knowledge they have acquired.
- Design on the topic. This form is close to making crafts by design. The difference is that the teacher limits the idea to the topic. For example, a teacher invites children to create any craft on the theme “Autumn.”
- Frame design proposed by N. N. Poddyakov. This method is rarely used when working with preschoolers. The teacher shows a frame made of any material, and then does something that changes the structure. With such training, children learn not only the structure of the frame, but also how to change it.
Motivation for children
To make it interesting for preschoolers, you can turn the activity into a game: bring a toy (hero) and invite the children to make a house or a gift for him.
It is important that children understand the practical significance of their activities. They will be more motivated if they know that their product can be given to an adult (mom, dad, grandmother, etc.).
Consultation on design for preschool students
PAPER CONSTRUCTION IN KINDERGARTEN: TYPES OF CRAFTS AND METHODS OF CONDUCTING CLASSES IN DIFFERENT GROUPS
Paper is the most popular material for creative activities with preschoolers. It can be folded, wrinkled, torn, twisted. These seemingly simple actions are quite complex for a child. By making paper crafts, children in kindergarten not only develop their artistic abilities and creative imagination, but also broaden their horizons, acquire additional knowledge, and learn modeling and design. Content
1 Goals of teaching paper design in preschool educational institutions, tasks and techniques relevant for each age group
1.1 Varieties of design projects: on a plane, three-dimensional, origami, design from strips, etc.
1.2 The most appropriate material for creating crafts (origami, three-dimensional, etc.), their optimal size
1.3 Methods for manufacturing initial parts, the degree of children’s participation in this process
1.4 Additional techniques used in creating crafts (elements of drawing, coloring, appliqué, etc.). The relevance of an individual approach when designing from paper in a preschool educational institution
2 Options for a motivating start to a paper design lesson: a surprise moment, looking at pictures, conversation, coming up with a fairy tale plot, etc.
3 Card index of paper design topics for each age group of preschool educational institutions
4 Lesson notes
5 Photo gallery of finished crafts for kindergarten students with comments on the completion of the work, step-by-step construction
5.1 Photo gallery “Works of pupils of the second junior group”
5.2 Photo gallery “Works of secondary group students”
5.3 Photo: “Works of senior preschoolers”
5.4 Photo gallery “Works of preparatory group students”
5.5 Photo gallery “Step-by-step construction from paper”
6 Origami club program for the middle group. Topics for classes - card index
7 Analysis of design classes in preschool educational institutions and its impact
The goals of teaching paper design in preschool educational institutions, relevant for everyone
age group tasks and techniques
Paper construction as a type of productive activity for preschoolers is aimed at obtaining a specific result - crafts. This educational activity is closely related to play, and therefore is very interesting for the child. Construction develops children's thinking, namely the operations of analysis and synthesis. Visual perception improves, preschoolers come to understand that in the world around them there are homogeneous objects that belong to the same concept and have common characteristics. For example, all houses, even those that are different from each other, have walls, a roof, windows and doors. Making paper crafts, although a fascinating activity, is, however, a rather difficult activity for preschoolers. It requires the development of spatial concepts, attentiveness and precision of actions. The paper design technique usually provides a visual and detailed explanation of the process of making each craft. In this case, the sample made by the teacher (even in older preschool age) is of greater importance. Introduction to paper construction begins in the second junior group and is aimed at introducing children to this type of activity and arousing interest in it. First, the teacher tells the children about the properties of paper: they learn that it can be soft and hard, smooth and rough, and can have any color. It is important to let children touch the material with their hands. In further classes, preschoolers are taught the simplest techniques for working with paper - they are asked to crumple it, fold it, twist it, and tear off pieces from it. Undoubtedly, children will be interested in such actions, while the teacher pays attention to the sounds accompanying them.
During design classes, children develop the ability to follow the teacher’s verbal instructions, which accompany each action. When creating simple crafts for children, aesthetic taste is formed, accuracy and perseverance are cultivated.
Construction begins with the simplest crafts from ready-made parts, which are offered to the children by the teacher. They already have all the necessary folds and cuts. The children's task is to fold them and glue them together. The teacher helps to place the parts correctly, and he also complements the products with details. For example, when creating a bunny, preschoolers glue the ends of one strip together to make a head. Then the finished ears are glued to it. The head is attached to a bridge made of a wide strip with cuts - paws. After this, the teacher approaches each child and glues three-dimensional eyes to the bunny’s face and draws a nose. Pupils of the second junior group can make such a simple craft. In general, children really love making animals. In the younger group, you can use a universal blank for this purpose: a circle and a large ring are cut out on a sheet of cardboard folded in half - the head and body of the animal. Next, the head is glued to the body, the parts are painted with spots, stripes, etc. (depending on the type of animal), a muzzle is drawn on the circle.
With the help of a simple blank, you can make a wide variety of animals. In early preschool age, it is very important to praise kids in the process of work. After all, children have not yet developed the necessary skills, and the process of designing from paper is more difficult than for older preschoolers. In the middle group, children improve their acquired initial skills in working with paper. In addition, at this age they already begin to work with scissors, learn to round corners, obtaining rounded shapes, and make cuts along the edge of paper. The teacher teaches children to bend a rectangular and square sheet of paper in half, aligning the corners. At this age, paper crafts begin to actively include applicative elements and finishing details. In the older group, preschoolers already have sufficiently developed fine motor skills and hand coordination. At this age, children learn to bend a sheet of paper in four and cut parts along the fold. The children successfully combine various forms of material into crafts. Pupils of the senior group already have well-developed spatial thinking, they understand various techniques. In the process of construction, reproductive activity is improved (work according to a model), but at the same time, the teacher stimulates the creative imagination of children - he encourages them to bring their own distinctive features into the craft, and provides a choice of materials of different colors and textures. In older preschool age, design by design is introduced, when each child comes up with his own idea for a craft. The construction method in the senior group involves a gradual complication of tasks, as well as their varied topics. To stimulate children's interest, the teacher offers them crafts for theatrical performances or collective compositions. Preschoolers come to the preparatory group with a developed set of skills and abilities necessary for paper construction. Therefore, at this age, paramount importance is given to the development of creative imagination. Children are led by the teacher to understand the expressive capabilities of types of paper that differ in texture. In addition, the children learn to work according to markings - to bend and cut blanks along the dotted lines outlined by the teacher. Note that the model in older preschool age is no longer as important as before. In some cases, it can be replaced by verbal instructions. However, if the design of the craft is new and quite complex, then the teacher uses a full demonstration with detailed commentary on the sequence of work. Varieties of design projects: on a plane, three-dimensional, origami, design from strips, etc.
Paper is a universal material for creativity in kindergarten. Construction from this material is presented in various ways. First of all, crafts are divided into planar and volumetric. In the first option, the main part of the workpiece is glued to the base (cardboard or thick paper), while there is a partial volume - some parts protrude above the surface or are not completely glued. B
Three-dimensional crafts are more expressive and interesting for children, because you can play with them. These are a variety of houses, boxes, boxes, furniture for dolls. The volumetric shape here is achieved by folding thick paper. Often in design classes, the teacher uses the origami technique: the product is folded from paper without the use of glue or scissors. In this way you can make a wide variety of animals, birds, flowers and inanimate objects (plane, boat, etc.).
Note that a product created using the origami technique can also be glued to the base.
Another type of three-dimensional design is crafts made from paper strips. Scissors and glue are already used here. This method is used to decorate products that traditionally consist of round shapes (tumbler, snowman, lantern, well), but if you have the desire and imagination, you can make any animal or bird this way.
For paper construction in kindergarten, paper of different qualities and colors is used. The density and color range of the workpiece depends, first of all, on the type of design. Thus, for origami, thick paper of bright colors is usually offered (for example, special colored paper intended for a printer). Oiled paper with a glossy or matte effect is also suitable - it will not form cracks from folds. Note that to create a boat or boat, you can offer the children wax or parchment - in this case, they will be able to launch a homemade toy into the water. The tone of the base, of course, depends on the object being depicted (green is suitable for creating a frog, white for a swan, yellow for a fish, etc.). For voluminous crafts that will later be used for games and theatrical performances (for example, masks), you can use thick paper, thin cardboard and even wallpaper. Some things can be made from wrapping paper, which tends to bulge: using your imagination, you can use it to create an original tree.
Individual things can be made from colorful magazine paper, for example, a fairy bird.
Products made from stripes are also made from thick paper - thin paper will not hold its shape. But cardboard will also not work - in this case the strips will not stick together well. Note that in voluminous crafts made from strips, the teacher can additionally fix the details - fasten them with a stapler, but in such a way that it is not very noticeable. When designing from paper, it is quite possible to include waste material in a craft. For example, a toilet paper roll can be turned into the body of a butterfly or into a tree trunk (the crown can be a cardboard plate). Cardboard matchboxes are an ideal material for creating doll furniture; all that remains is to cover them with bright colored paper.
In addition, matches, toothpicks, and yarn can be included in the craft.
For flat crafts, the optimal base size is an A5 sheet of cardboard, with the image occupying almost its entire surface. For a product using the origami technique, an A4 format base is usually offered.
Paper strip toys usually do not exceed ten centimeters in height or length.
Methods of manufacturing initial parts, the degree of participation of children in this process
As for the production of initial parts for paper construction, in the younger group, all the blanks are provided to the children by the teacher. In the middle group, the main part of the elements is also prepared in advance by the teacher, but preschoolers can already independently cut the paper part along the intended fold. In older preschool age, children already take part in the manufacture of parts; for example, they can easily cut a sheet of paper into strips of approximately the same width and length, and make cuts along the edge. To make the product more expressive, the teacher sometimes offers students curly scissors.
Additional techniques used in creating crafts (elements of drawing, coloring, appliqué, etc.). The relevance of an individual approach when designing from paper in a preschool educational institution
Paper design is very closely related to appliqué, especially when it comes to flat crafts. Applique elements make the product more vibrant and expressive, especially if the subject of the image is a butterfly, a fairy-tale bird, or a tree.
It is also appropriate to include plasticine in the craft - you can use it to form the eyes and nose of a paper animal.
To make the composition more realistic, individual details can be completed with pencils or felt-tip pens, for example, the face of an animal or the face of a tumbler.
At older preschool age, children’s abilities for one or another type of activity are already clearly visible. For children who show interest in paper construction, they quickly cope with the work; you can complicate the task by offering them additional elements to decorate the craft. For example, if the topic of the lesson is “Sofa for dolls,” then you can not just make it, but apply a pattern in the form of polka dots, stripes or flowers to an imaginary fabric. You can decorate a paper cup in the same way.
Options for a motivating start to a paper design lesson: a surprise moment, looking at pictures, conversation, coming up with a fairy tale plot, etc.
Every activity in kindergarten should be like a trip to a fairy tale world, especially when it comes to productive activities. The teacher’s task is to make preschoolers feel like wizards or craftsmen creating a beautiful thing. Therefore, you need to start classes with a surprise moment or a small performance in which some interesting characters are involved and the children themselves are involved. Construction can use the children's skills acquired in music class. Let us give specific examples of motivation. At the beginning of the lesson on the topic “Steam Locomotive” (middle group), the teacher draws the children’s attention to the rails built on a carpet of cubes. The teacher tells the surprised children that on the way to kindergarten she met a dog, who told her that a bunny in the forest had a very bad stomach. We need to take him to the doctor, but there is no way: there are no buses or trolleybuses in the forest. The mother hare really asked me to tell the kids to make trailers for the locomotive, because the cubs had already laid the rails. The teacher finds out from the children that they agree to take on such difficult work. Let us note that at the end of the lesson it is necessary to return to the fairy tale plot: the teacher thanks the children for their help, because now the bunny will be able to get to the doctor and will definitely get better. Another example of attracting the interest of preschoolers to productive activities is the teacher’s story about grandparents (second youngest group): they are expecting guests and want to bake koloboks for a treat. But it turns out they ran out of flour. The children, together with the teacher, look into the magic chest and find paper there. Together they decide to make a bun from this material. A classic motivation for children is to make friends for a character (doll, nesting doll, tumbler) or forest animal so that they have someone to play with. A similar option is for a mother cat (or other animal) to come to the group and she is sad that her kittens have run away. The guys happily agree to help - to make lost animals out of paper. Another reliable option is the children’s desire to make a craft as a gift to their loved ones for some holiday (March 8, February 23, New Year, Mother’s Day). An interesting motivation comes from constructing clothes out of paper. So, for example, to the musical composition “Circus” by V. Shainsky, a toy clown comes to visit preschoolers. The guys tell us who this character is, what he does, where you can meet him. Children are offered riddles about the details of the clown's clothing. And then the teacher offers to make a bright outfit for him on his own. Thus, in a playful way, preschoolers come to the conclusion that details play an important role in forming a holistic image, and it is quite possible to make them with your own hands. Another example is the fairy tale about Cinderella. The teacher tells the children that Cinderella once got ready for a ball, but she did not have an elegant dress. And then she decided to make it out of paper: she cut out a large circle, folded it in half - but the skirt turned out to be too big. Then the heroine folded the semicircle again, but this skirt was too wide. She folded it again - the skirt turned out to be very narrow. Fortunately, at this time the good fairy appeared and gave Cinderella a beautiful ball gown. Children can also help the heroine by making a beautiful star out of paper for her to decorate her dress. Let us note that the design lesson should actively include poems, riddles, and physical education that are appropriate to the topic. All this stimulates children to be creative.
Card file of paper design topics for each age group of preschool educational institutions
Here is an approximate list of topics that can be used in design classes in different age groups in kindergarten.
Junior group:
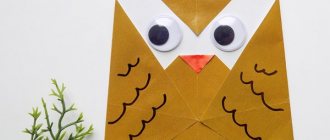
· “Bunny” and other animals of the most primitive form of wide stripes.
· "Rain"
· “Autumn leaves” (gluing voluminous lumps onto a cardboard base).
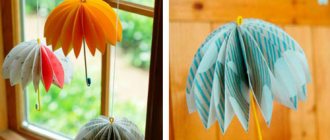
· “Umbrella” (folding the circle in half, completing the drawing and adding missing details).
· “Handkerchief” (folding a square in half and decorating with applique or drawing).
· “Herringbone” (folding a square diagonally, a herringbone is made from several such triangles).
· “House” (the rectangle is folded in half and a triangular roof is glued on). “Month” (folding the round blank in half and adding details).
· “Glasses for Grandma” (connecting two cardboard circles using a narrow cardboard rectangle).
· “Sun” (gluing paper loops to a circle).
· “Heart” (folding from a strip of paper).
· “Bird” (folding the circle in half and adding ready-made parts to it - wings, head, tail).
· “Tree” (gluing a three-dimensional triangle to a drawn trunk).
Middle group:
· “Postcard” (folding a square in half and decorating it with suitable elements).
· “Garland” of rings (as an option – “Caterpillar”).
· “House” (made of geometric shapes).
· “Apple” (bending the corners into the center of the square).
· “Butterfly” (folding a triangle from a square, bending opposite corners, decorating with applique details).
· “Mushroom” (folding a square to get a triangle and a rectangle - the cap and stem of a mushroom).
· “Christmas tree toy” (folding a circle in half and gluing half to half of the same blank).
· “Carved snowflake” (folding a snowflake from basic shapes - a kite). “Aquarium fish” (folding the triangle in half, decorating with applique details).
· “Boat” (Bending part of the triangle, turning the bent part outward). “Bookmark for a book” (introduce the basic “candy” shape, decoration with applique details).
· “Seven-flowered flower” (composing an object from several “candy” shapes of different colors).
· “Kite” (consolidate the ability to make the basic “kite” shape, decorate with applique details). Senior group:
“Flashlight” (applique of stripes, cuts)
· “Home” (optionally – “TV”,
· "Dog kennel")
· Bus (folding the cardboard in half and adding the necessary parts). Basket (origami).
· Bullfinch (origami). Matryoshka (origami).
· “Dress for a doll” (origami).
· “Ladybug” (the wings are made of two folded circles). “Carnival masks” (made of cardboard).
· “Herringbone” (stringing paper parts onto a rod).
· “Toy Theater” (crafts for the theater corner).
· “Bird of Happiness” (the tail is shaped like an accordion, complemented by bright appliqué)
· “Airplane” (origami).
· “Boat” (origami). “Fish” (origami).
· “Rug” (“weaving paper strips”).
Preparatory group:
The object for paper construction at this age can be any animal, bird, insect, natural phenomenon or inanimate object. Here are some of the many possible options:
· “Hedgehog” (based on stripes)
· “Parrot” (based on stripes)
· “Tiger” (based on stripes)
· "Multi-storey building"
· “Amanita” (from a cylinder and a cone, supplemented with applicative details) “Horse” (from matchboxes) Sleigh
· “Car” (from matchboxes and other parts, pasted with colored paper)
· “Elephant” “Octopus” (made from napkins with additional paper parts).
In addition, starting from the older group, you can offer preschoolers design according to plan. As for collective work, they can be practiced from a very early age (for example, “Autumn Forest” in the second junior group, “Furniture for dolls” in the middle group).
Lesson notes "Kolobok" (second junior group)
Educational objectives: teach how to make crafts from crumpled paper, continue to introduce preschoolers to the properties of paper.
Developmental tasks: develop fine motor skills, attention.
Educational objectives: to cultivate perseverance, interest in design Demonstration material: toy figures of characters from the fairy tale “Kolobok”, a basket, a collage depicting a forest landscape.
Handouts: white paper, glue, brushes, oilcloths, rags.
Progress of the lesson: A teacher dressed as a storyteller appears in front of the children and tells the kids about their grandparents, who were expecting guests and were going to bake koloboks. However, they did not have any flour. Grandma looked everywhere, including in the chest. The storyteller shows the children a beautiful chest containing paper instead of flour, and invites them to make koloboks from paper. To cook, you need clean hands. To do this, a dynamic pause is carried out: “Let’s roll up our sleeves, open the water tap, take soap, soap our hands with soap, put our hands under some water, wash our hands, wash each finger, shake them off and dry with a towel. Now we can get to work." The teacher shows the kids how to “knead the dough”: she crumples the paper into a ball and then unfolds it. This must be done carefully so that the “dough” does not tear. Children repeat these actions. The storyteller praises all the guys and asks what the bun needs to see the forest animals and to sing a song to them (eyes and mouth). Children are given painted kolobok faces with eyes and a mouth. The kids are asked to turn the pieces over, spread them thickly with glue (as if a grandmother were spreading sour cream on the bun) and press it onto the bun itself. The teacher informs the preschoolers that the koloboks are rosy and hot - they need to blow on them. Then the storyteller invites the children to the edge of the forest, where the forest animals - the characters of the fairy tale - sit. Children give them their koloboks. The storyteller once again praises the kids and offers to look into the chest again - the children find a treat there.
“Little Foxes” (middle group)
The lesson begins with a surprise moment - a package arrives from the forest. To find out what is there, you need to guess the riddle: A cunning cheat, a red head, a fluffy tail - oh, beauty! And her name is... (Fox) There is a toy fox in the box. Children look at her body parts, the shape of her ears, tail, and find out where she lives. The teacher notices that the fox is sad - she is bored in the forest, she wants to have friends (motivation for productive activity). Physical education is being held: We chop the cabbage, chop it, we grate the carrots, grate it, We salt the cabbage, salt it, we squeeze the carrots, squeeze it. The teacher reminds children about safety precautions when working with scissors. The sequence of constructing a paper fox is explained (preschoolers gradually repeat the teacher’s actions). First, two rectangles are cut out - the head and the body (and the body is larger in size), then the triangular ears. The head is glued to the body, the image is complemented by ears, eyes, nose and antennae. Looking at finished crafts. Children, if desired, talk about their little fox, describe his character: cheerful or sad, affectionate or cunning, etc. “Funny Snowman” (senior group)
“Cheerful Snowman” (senior group) There is a knock on the door - a toy snowman appears. He asks a riddle, and the children perform movements according to the text:
Three balls on top of each other (show the balls with their hands) The kids rolled them up (Children pat themselves on the head) Lastly, very cleverly, they stuck a carrot on the nose (they alternately touch the nose with their index fingers), No, why is it cold (they shake a finger), He’s already sweating carrot nose, And he’s used to snowstorms (Children perform circular movements with their hands), Who is it? (Snowman) The snowman reports that he came for help - Grandfather Frost instructed him to prepare gifts. But the Snowman cannot cope alone - he needs helpers (motivation). A didactic game is played to the music “Find a pair for a mitten”, then a didactic game “Snowflakes” (build a row of snowflakes: from the smallest to the largest, and then vice versa). After this, the Snowman asks preschoolers to make friends for him - the same snowmen, so that they can help Santa Claus prepare gifts. The sequence of the craft is explained: a head, a hat, a broom and a rectangle - the body - are cut out according to the template. A cylinder is made from a rectangle, a head is inserted into its cuts, and a hat is glued to it. The cylinder is decorated with applique buttons, and the mouth, nose and eyes are drawn on the face with a felt-tip pen. The snowman thanks the children and, before leaving, conducts a physical exercise with them: One - hand, two - hand (children extend one hand, then the other) We make a snowman (imitate making snowballs) We roll a snowball - (make circular movements with our palms on our thighs) Here like this (they spread their arms to the sides, showing how big it is) And then a smaller lump (they rub their chests with their palms) Like this (they show the smaller size of the lump) And we’ll put it on top (they stroke their cheeks with their hands) A small lump (they connect their fingers together, show a small lump) So the snowman came out. (put their hands on their sides, turn left and right) Very cute fat guy! (Imitation of walking from side to side). The snowman leaves, and the teacher secretly tells the children that their snowmen are magical: for the New Year they will stay in the kindergarten, and after the holidays they can be taken home.
"House" (preparatory group)
The teacher reads a poem by I. Stolova:
I'll build myself a house, there will be a lot of space in it! There will be a table and a stove in the house. I will let a sheep into my house...
The teacher tells the children that they will make a house out of paper using the origami technique. The work diagram is shown on the board. From a rectangular sheet of paper you need to make a square by cutting off the excess part. It is then folded horizontally with the colored side facing out. From the rectangle you need to make a small square, bending the sides to the center fold line. The square unfolds again into a rectangle. All that remains is to open the side part so that the paper is folded into a triangle at the top. We carry out the same actions on the other side. The paper house is ready. If you unfold the side walls a little, you can put it on a plane.
Physical education “Deer has a big house” is being held:
The deer has a big house, (Hands above his head - we represent the roof of the house.) He sits, looks out the window. (We support the cheek with our right fist, we support the right cheek with our left hand.) The bunny runs across the field, (Running in place.) There is a knock on his door: (Stamping with feet, hands on the belt.) “Knock-knock, open the door, (Imitation of knocking on door in turn with each hand.) There is an evil hunter in the forest.” (Hands on the belt, turn right and left.) “Bunny, bunny, run in!” (Inviting movement with the hand.) Give me your paw.” (We stretch out our hands with an open palm) Independent activity of preschoolers (the teacher first repeats the stages of work with them). At the end of the work, the teacher says that there is something missing in the houses and asks riddles:
1) In the darkness, closer to night, the eyes of the houses will light up. Only they will be closed soon by Thick eyelash curtains. (Window)
2) He greets everyone with one hand, and sees him off with the other. Who comes, who leaves - Everyone leads her by the hand. (door)
3) There is a candle made of brick. Above everyone. She opened her mouth and breathed smoke. (pipe) The children are asked to cut out the missing elements of the house from the remaining colored paper.
Photo gallery of finished crafts for kindergarten students with comments on the completion of the work, step-by-step construction
Photo gallery “Works of pupils of the second junior group”
To make paper crafts in the second junior group, the teacher offers the kids ready-made parts. They just need to be glued to the base (for example, the composition “Sun” and the “collective work “City Street” were made) or glued to each other (“Heart”). Designing on the theme “Birds” involves sequentially gluing elements on top of each other. The “Beautiful Bird” craft is interesting because the wings are not completely glued onto the body, and it seems that the bird is about to take off.
Photo gallery “Works of secondary group students”
In the middle group, the teacher also offers mainly ready-made parts. However, preschoolers must already arrange them in a special way, for example, in the form of a cone (“Giraffe”) or make cuts with scissors (“Crane”, “Flower Bed”). At this age, you can begin to include additional materials in your work, for example, when making the “Christmas Tree” craft, children string paper squares onto a wooden rod. Children are also offered a more complex task - folding a sheet of paper in the shape of an accordion (“Hedgehog”). Poles made of stripes become more intricate (in the work “Caterpillar” there is double weaving). In the middle group, appliqué elements are added to the design (crafts “Giraffe”, “Tea Pair”).
Photo: “Works of senior preschoolers”
In the older group, construction opens up great opportunities for creativity for preschoolers. Children make crafts on a variety of topics, for example, in class they make not just a bird, but a peacock with a luxurious tail and voluminous eyes (“Peacock”). Variations on the theme “Fish” are interesting, often these are fairy-tale images: “Goldfish” with fins and a tail made of multi-colored stripes, a sea creature made using the origami technique with an applique made with curly scissors (“Fish”). In general, origami is used very often in design classes at this age. This is an intricate “Star” shape that can decorate Cinderella’s dress or the interior of a room in the New Year. This technique produces very beautiful dresses (“Dress for a doll”, “Elegant dress”). The dolls are very beautiful and original - here origami is combined with drawing. The children make funny animal faces out of paper and then add eyes, noses and mustaches (“Cat with Kittens”, “Dog”) on them. Floral compositions on a plane (“Tulip”) are very beautiful. The design of strips becomes more complicated: preschoolers round or sharpen their ends, and complement the product with applicative elements (“Hare”, “Airplane”).
Three-dimensional crafts are of interest (“Snowman”, “Basket of Flowers”, collective composition “Houses on Our Street”). Often volumetric design is combined with planar design (“Throne for the King”). The class uses waste materials that make the craft original (for example, “Octopus” made from a toilet paper roll).
Photo gallery “Works of preparatory group students”
In the preparatory group, among the paper crafts you can find real masterpieces. These are voluminous vegetables made from thick paper strips in bright colors (“Vegetables”). The “Pear”, consisting of many paper slices, looks appetizing. Children at this age can design a wide variety of animals by painting or gluing individual parts. Crafts on the theme “House” are very interesting: these are miniature “House” made using the origami technique, “Teremok” made from waste material - an empty paper flour bag, complemented by a roof and windows made of colored paper. The collective composition “Ancient Fortress City” is charming; when creating it, the guys practiced a variety of techniques: gluing a workpiece in the shape of a cylinder and a cone, rounding the corners of a rectangle, cutting a paper strip into pieces, forming a jagged edge on a cardboard piece. Note that in many crafts the basis is a paper cylinder or cone (“Rocket”, “Penguin”, “Family”, “Cup”). The “Family” craft is a plot composition using elements of appliqué and drawing. Note that the faces and hairstyles of mom and dad are drawn very well. Crafts using the origami technique are becoming more complex - this is a “Chair for a Doll”, as well as a “Dog”, made up of two elements (its paws are indicated using scissors). The composition “Autumn Motifs” is unusual, where the basis is wrapping paper, and leaves made of colored paper look bright against its background. A work of art can be called the “Firebird”, which the pupils of the preparatory group collectively crafted using the quilling technique. Of course, such work is carried out under the supervision of a teacher, but the children themselves choose the colors of the stripes, wind them onto a pencil, and form loops.
Photo gallery “Step-by-step construction from paper”
Step-by-step construction diagrams are a good help for a little person, especially when it comes to the origami technique. They are especially relevant for older preschool age: based on such visual aids, children can easily complete the craft on their own, in their free time.
Analysis of design classes in preschool educational institutions and its impact
At an early age, analysis of crafts made from paper is not carried out: at the end of the lesson, the teacher praises all students without exception in order to maintain their interest in productive activities and confidence in their abilities. However, already in the middle group, the teacher must discuss with the children the results of their work. Note that this process should not be reduced to unambiguous assessments like “like” or “dislike”: the teacher, for example, asks those children who think they did a good job in class to raise their hands. Then those who were unable to fully implement their plans raise their hands. After this, the teacher highlights the most neat and expressive crafts, while at the same time suggesting how the rest could have been done better. Mistakes made during the work process should not go unnoticed: you need to find their cause, and it’s good if the children themselves figure this out. In the senior preschool level, at the end of the lesson, children remember the techniques they used to create crafts (for example, folding paper, cutting, gluing parts together), note how successfully they used them, which was the most difficult thing in the process of work. When assessing a collective composition, the teacher takes into account not only the quality of the craft, but also how well the children followed the rules of teamwork and whether they showed respect for their comrades during the work. Preschoolers who showed the greatest initiative are noted. Paper construction is a fun activity for preschoolers of all ages. Such activities are of great importance in the formation of aesthetic taste, creative imagination, and constructive thinking in children. The child is especially happy when he sees the tangible result of his work - a toy with which he can play or decorate his room. The resulting result of labor raises self-esteem, fosters independence, and the desire to develop further. If at a younger preschool age the paper crafts of preschoolers are still quite simple, then older preschoolers often create real masterpieces.
Practical aspects
Papermaking classes are organized in accordance with the federal state educational standard for preschool education (FSES), Federal Law No. 273 of December 29, 2012 “On Education in the Russian Federation” and SanPiN 2.4.1.3049-13. Teachers draw up a work plan and technological maps for each lesson.
Technological maps and diagrams
The technological map should reflect the following points:
- topic of the lesson;
- the purpose of the activity and its objectives;
- preliminary work;
- didactic materials and equipment;
- description of the stages of the lesson (organizational moment, main and final parts) indicating their duration, words of the teacher, expected answers and actions of the children.
Lesson duration
The preparatory group conducts design classes lasting 15-25 minutes.
They include the following steps:
- organizational moment - 1-3 minutes;
- demonstration and explanation of working methods - 3-5 minutes;
- independent activity of pupils - 5-10 minutes;
- discussion of crafts - 2 minutes;
- final part - 1 minute.
Introductory materials
To familiarize children with the topic of the lesson and create motivation, game techniques are used.
Their choice depends on the imagination of the teacher:
- riddles (to introduce the hero);
- game “Hide and Seek” (children find a toy using sentences, for example “The doll is behind the closet”);
- exercise “Guess” (the teacher shows 4 pictures and asks to recognize the guest by naming his signs);
- game technique “Letter” (the wizard sends a letter in which he asks the children to help him do something);
- “The fourth odd one” (out of 4 toys, students must choose the one that is different from the rest - it will be the heroine of the lesson).
Card index of topics
When choosing a topic, the teacher takes into account the time of year, public holidays and other important events in people's lives.
A topic index might look like this:
- “Autumn Forest”: mushrooms, trees, animals, etc.;
- “Favorite fairy tale characters”: bun, hare, pig, bird;
- “My city”: houses, gates around them, streets, traffic lights;
- “My Home”: creation of one- and multi-story houses;
- “Winter”: Christmas tree, bullfinch, snowflake, snowman;
- “New Year”: New Year cards, Santa Claus sticks;
- “February 14”: valentines, paper hearts;
- “February 23”: gifts for dads;
- “Transport”: cars of different types;
- “Furniture”: sofa, bed, armchair, etc.;
- “March 8”: gifts for mothers;
- "Children's Day": paper toys.
Differences between design classes in the senior group
In older preschool age (5-6 years), pupils already know the basic methods of creating paper products. They must become familiar with three-dimensional figures (sphere, cube, cone, cylinder, pyramid, brick) and learn to place them in space, making durable structures.
The teacher teaches children to see familiar elements in product samples, to work not only according to the sample, but also according to the drawings. You can start building with cubes of different shapes and sizes, and then make figures out of paper.
At this time, the already mastered skills of replacing parts with others, connecting them, using different techniques for working with paper of different densities are consolidated. Teachers organize collective activities to create 1 item.
Sometimes classes are held in the form of a role-playing game. For example, an adult says that the hare needs help: his home was destroyed by a fox. Some children can become builders and make a house, another part can become guards and design a fence, a third can design furniture, etc.
The older the children, the more creativity there should be in their work. If with younger students you can limit yourself to creating crafts based on a model, in the middle group you can teach how to work with drawings and diagrams, then in the older group, preschoolers can come up with a product on their own on a given topic.
Organization of the workplace, safety precautions
Before you start designing with paper with your children, you should make sure that the workplace is properly organized. Check that all the necessary tools are available on the children's table: scissors, colored paper, a glue stick, or PVA glue with a brush, a simple pencil, a white base sheet, or a sheet of thick cardboard.
Attention!
- scissors for working with paper should have rounded ends;
- for small children, you should choose small scissors with comfortable ears for your fingers;
- if you plan to work with PVA glue, prepare a small container and a special brush for it, so it will be more convenient for your child to distribute the glue over the surface of the product;
- Do not use materials that leave a colored mark on your hands or have a specific odor! Don't risk your baby's health.
Before starting the lesson, make sure that the work surface is sufficiently illuminated and prepare an apron and sleeves for the child. This way you will protect your clothes from glue or from accidental “cutting through”.