GCD for drawing in the middle group Topic: “Apple-ripe, apple-sweet”
Guzel Sitdikova
GCD for drawing in the middle group Topic: “Apple-ripe, apple-sweet”
-Continue to introduce children to paint apple with gouache paints .
-Show the possibility of depicting half an apple (with colored pencils or felt-tip pens)
.
-Develop aesthetic perception, the ability to convey the characteristic features of an artistic image.
-Cultivate artistic taste.
Preliminary work: Didactic games “Fruits and vegetables”
,
“Guess the taste”
,
“Wonderful bag”
.
Reading the text by L. Tolstoy “The old man planted apple trees ”:
— The old man was planting apple trees . They said to him: “Why do you need apple trees ? fruit from these an apple from them .” The old man said: “I won’t eat it, others will eat it, they’ll thank me.”
Recommended teaching aids, clarity.
Posters "Fruit"
,
“Trees”
,
“Color.
Rainbow" .
Blooming apple tree branch
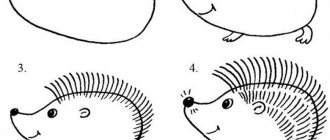
The apple tree in bloom looks great. You can first make a sketch with a pencil, as in the picture below. Flowers appear before leaves, so a bare branch or the entire tree is drawn, as in the previous paragraph, and then large flowers with five petals and small unopened buds mixed in are drawn.
The flowers are depicted quite close to each other, and in the middle of each draw a bunch of stamens with rounded ends. It is advisable to draw flowers in different ways: some look forward, others turn sideways. The buds are drawn differently. A thin stalk extends from the main branch; then a bed of sepals is drawn, from which small petals extend, tightly adjacent to each other.
Progress of the lesson
Educator: Children, I’ll tell you a riddle, and you listen carefully and tell me the answer:
It fell from a branch,
It rolled and disappeared.
- And it didn’t disappear at all!
Yanik got it!
Guess what fell?
What was rolling? What's missing?
Children: Apple (If children find it difficult to say, then the teacher helps)
Surprise moment: Children, someone is knocking on our door. (The teacher opens the door)
.
The group includes a squirrel .
Squirrel: Hello children.
Children: Hello squirrel.
Squirrel: I came to you today with gifts, laying out apples of different varieties on the table. What do you guys think, what is this?
Children: Apples .
Squirrel: That's right, these are apples .
Educator: Well done guys. And now I suggest you look at the apples that the squirrel brought us. What shape are they?
Educator: How do ripe apples
Children: When ripe they are sweet, not when ripe they are sour.
Educator: And now I suggest you draw a ripe , juicy apple with a red side.
Educator: And now I will show you the sequence of work:
The apple is ripe , red,
Apple crispy,
I'll break the apple in half
an apple with my friend.
Educator: And now I will show you an apple , and I suggest you draw a cut apple from life with colored pencils.
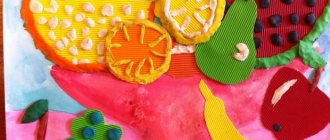
Look at all the drawings with the children, invite the children to clean everything on their tables. And after cleaning, the design of the exhibition of children's drawings “Ripe Apples ”
.
Squirrel: Children, let's play the game "Wonderful Bag"
. This bag contains geometric shapes, you take the object with your hands and tell me what kind of object it is, without looking into the bag.
Children and Squirrel play a didactic game. After playing, Squirrel says goodbye to the children.
Squirrel: Goodbye guys.
Application “Apple” in the first junior group Thinking about something interesting for me to do with my kids, I decided to make with them this original application called “Apple”. For this one.
Application with design elements in the junior group “Apple for little hedgehogs” Application with design elements in the junior group “Apple for little hedgehogs”. Purpose of the lesson: to play out the fairy tale situation - division.
Summary of GCD for modeling “Apple, pear, plum” in the senior group, part I. Introductory. The teacher makes riddles about fruits. 1 riddle. This fruit is round, or rather spherical. It's small at the top.
Summary of an open GCD for speech development in the preparatory group “Retelling the story by V. Sukhomlinsky “The Apple and the Dawn” GCD Development of speech and reading fiction Topic: Retelling the story of V. Sukhomlinsky “The Apple and the Dawn” Goal: To develop speech.
Summary of a lesson on speech development in the senior group “Apple. Compiling a descriptive story" Summary of a lesson on speech development in a preparatory school group Topic: "Apple. Compiling a descriptive story" Correctional and educational.
Summary of a lesson on drawing with plasticine on the topic “Apple” (preparatory group) Summary of a lesson drawing with plasticine Topic: “Apple” preparatory group The lesson of modeling, drawing from plasticine “Apple” develops. Master class “Apple” Today, in honor of the “Apple Saved” holiday, I invited the children to make apples out of colored paper. Of course, everyone agreed and we got started. My art. Knitted napkin “Apple” Today I want to tell you about my old hobby - knitting. Knitting is perhaps one of the very first handicraft arts.
GCD “Wonderful Apple” Goal: to form cognitive interest in a person; introduce the organ of vision - the eye. GCD move: Educate. : Guys, before you know it.
Autumn Festival for children of the middle group “The Last Apple” “The LAST APPLE” 2015 Teachers: Zakharova Alexandra Nikolaevna, Tarasova Olga Nikolaevna. Children run on tiptoes to the music.
Source
Example with chiaroscuro
This method of drawing an apple with a pencil step by step is a little more complicated, since with the help of a pencil shadows and small natural irregularities on the surface of the fruit are depicted.
Let's make a sketch. To do this, mark out the work area in the form of a square.
Inside this square we will draw a circle - the future apple.
Below and above we outline small concavities, characteristic of the location of the stalk and flower.
The sketch is ready.
We outline the main shape with a thin felt-tip pen or pen. Auxiliary lines can be deleted. Add the stem and leaf on top. We will also add lines dividing the fruit into 3 horizontal parts: markings for more precise application of shadows.
Let's clarify the leaf. To do this, make jagged edges and depict veins. The designated spot in the upper third is the future bright spot of light reflected from a smooth surface.
Using shading, we apply shadows to the surface of the apple.
The drawing is ready. Now you can paint it with transparent paint so that the shadows underneath remain visible. For example, it might look like this:
Notes on drawing “Ripe, red, sweet apple” in the middle group
Elena Kolesnikova
Notes on drawing “Ripe, red, sweet apple” in the middle group
Educator: Kolesnikova E.V.
Lesson notes on art activities in the middle group .
Drawing with paints (from life)
“
The apple is ripe , red , sweet .”
Goal: to teach children to create from nature and from imagination the image of a ripe , red apple .
1. Teach children to paint a multi-colored apple with gouache paints .
2. Show the possibility of depicting half an apple .
3. Develop aesthetic perception, the ability to convey the characteristic features of an artistic image.
4. Cultivate artistic taste.
Didactic game “Wonderful bag”.
Preview:
Lesson notes on fine arts (in the middle group)
Teach children to depict an apple using a means of expression: color, shape, size, correct location on the sheet.
Strengthen the skills of shaping movements and moving the brush along the pile.
Education of aesthetic perception of still life.
Examination and description of various fruits.
Examination of the still life by P. P. Konchalovsky “Apples on the table”
Materials, tools, equipment:
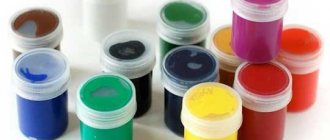
Gouache paints, brushes, cups, napkins, cardboard plates, palettes, apples according to the number of children, a bag, a Bunny toy.
Educator: Guys, look what I found! (showing the bag)
I’ll tell you a riddle now, and the answer is in this bag.
Adults love me
Educator: Well done! You have solved the riddle. There is an apple in the bag.
Educator: Guys, do you hear someone crying!
Interesting, I'll go and have a look. (the teacher brings in the hare)
Educator: Hello bunny! Why are you crying?
Educator: Look, Bunny, is this your bag?
Bunny: Yes! Where did you find it?
Educator: We found it here in the group, but there is only one apple.
Bunny: How come, where did the rest of the apples go?
Educator: Look, Bunny! There's a big hole in your bag. While you were running, you lost almost all the apples along the way.
Educator: I think I came up with it! Now the guys and I will draw apples. Are you a bunny living in a fairy forest? And there everything drawn turns into the real thing.
Bunny: Let's dance together!
Physical school
Educator: Well done! We had a lot of fun!
Let's help the bunny draw apples?
(Children sit at tables)
Educator: We will draw our apples on a plate. These plates are not simple, they are magical, as soon as they get into the fairytale forest, the painted apples will turn into real ones. To do this, we need to try and become artists.
Children: Artists paint pictures.
Ah, now I want to introduce you to the works of real artists who painted still lifes. A still life is a painting that depicts flowers, fruits, household items, and things that a person uses. These artists also depicted apples in their paintings.
(I put the bunny on the stand) Sit down, bunny, and listen carefully.
I. Khrutsky “Flowers and Fruits”.
Educator: Look carefully at this still life.
—What do you like most?
In this picture everything looks like the real thing. Beautiful flowers, juicy apples, velvety peaches, transparent grapes.
K.S. Petrov-Vodkin “Apple and Cherry”
Educator: Oh, this is a still life by another artist.
— How does this still life differ from the previous one?
Here the artist depicted only an apple and a cherry.
Cherry answers: “Yes, I am smaller than you, but very tender, my skin is transparent and thin. I am filled with aromatic juice. And my color is much brighter than yours. I have a deep scarlet color.”
How to draw a tree without leaves
You need to learn to draw a tree from its trunk and branches. So we will show beginners how to draw an apple tree step by step with a pencil, first without leaves and fruits. Start work from the bottom up from a flat part of the trunk. It is drawn in the usual way: from below the trunk expands slightly due to the roots, and closer to the top of the tree it narrows.
The asymmetrical branch located first looks interesting. To do this, a branch is made on one side of the smooth trunk, first a straight part of the branch, and then several small ones are drawn at its end. Next, a small segment of a straight trunk is extended, and paired branches are drawn in different directions. The branches can be placed opposite each other or with a slight upward shift. At the points of their connection with the trunk, expansion is made. The top of the tree has several small branches emanating from a single point. Each detail shows from 2 to 4 small branches.
Leave your comment
Responsibility for resolving any controversial issues regarding the materials themselves and their contents is taken by the users who posted the material on the site. However, the site administration is ready to provide all possible support in resolving any issues related to the work and content of the site. If you notice that materials are being used illegally on this site, please notify the site administration using the feedback form.
All materials posted on the site were created by the authors of the site or posted by users of the site and are presented on the site for informational purposes only. Copyrights for materials belong to their legal authors. Partial or complete copying of site materials without written permission from the site administration is prohibited! The opinion of the administration may not coincide with the point of view of the authors.
Source
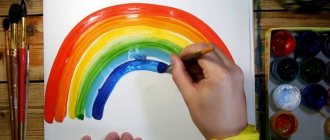
Let's add color
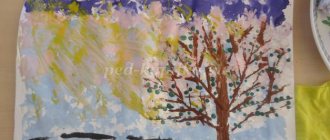
Whatever way you choose to depict this tree - with a round crown or with individual leaves - the picture needs to be brightly colored.
You can use several shades of the same color to make the design more natural.
Now you know how to draw an apple tree step by step with a pencil. Beginning artists will definitely find our advice useful. Take a sheet of paper and try to repeat the sample drawings yourself. Good luck!