Cosmonautics Day on April 12 has been celebrated all over the world for many years. This year marks 60 years since Yuri Gagarin first flew around the Earth. This is where the history of space exploration began.
On the eve of the anniversary, thematic exhibitions and events will traditionally be held in kindergartens and schools. Surely your child was also given the task of creating crafts for Cosmonautics Day with their own hands. We offer you a selection of ideas for inspiration, both from improvised means and from unusual materials. Children can do most of the crafts on their own. The task of parents is to organize, advise and unobtrusively help if necessary.
Corner for cognitive development “Journey into space”
Anna Kuznetsova
Corner for cognitive development “Journey into space”
Starting from the senior group of kindergarten, we develop in children
educational interest in space . For this purpose, in our group, a
corresponding corner " Space "
.
To form in children ideas about
the structure of the solar system and the names of the planets of the solar system
“Solar System” helps
. It's on the wall and
is a blue poster with nine
planets of the solar system and their orbits.
In the corner there is a lapbook “ Space ”, made directly by the hands of the group’s teachers.
In the corner there are illustrations on the theme of space , a selection of
photographs of scientists, astronauts and spaceships .
To obtain and consolidate knowledge about space, there is an artistic and
educational literature.
“Mysterious Space ” is also presented.
.
As a result of activities in corner expanded and systematized
children's knowledge about space , the concept of oneself as an inhabitant of the planet is formed
Earth, the vocabulary on the topic “ Space ” expands and becomes more active.
This activity promotes the development of logical thinking,
creative imagination, as well as children’s ability to establish causality
investigative connections between objects and phenomena.
Summary of a lesson on cognitive development “Travel on the map” Educational area: cognitive development Age group: preparatory. Types of activities: playful, constructive, motor.
Summary of an integrated lesson on the cognitive development of FEMP in the senior group “Journey to Space” Synopsis of an integrated lesson on the cognitive development of FEMP in the senior group Topic: “Journey to Space” Objectives: Educational:.
Abstract of educational activities on cognitive development in the preparatory group on the topic "Space" Synopsis of direct educational activities on "Cognitive development" in the preparatory group on the topic: "Space" Yulia Fursa.
Summary of educational activities on physical development in the senior group “Travel to Space” using fitballs MBDOU “Kindergarten No. 49 “Rucheyok” Summary of educational activities on physical development in the senior group Topic: “Travel to.
Summary of a lesson on mathematical development in the senior group “Journey into space” Summary of a lesson on mathematical development in the senior group. Topic: “Journey into space” Author: Team Tatyana Nikolaevna Purpose: formation.
NOD for cognitive development “Travel with Dunno.” Abstract of the GCD "Travel with Dunno" Program objectives: Educational: To educate and encourage: initiative, independence, goodwill.
GCD in the preparatory school group with a compensatory focus on speech development “Journey into Space” Municipal budgetary preschool educational institution, combined kindergarten No. 27, Uglegorsk, Sakhalin region.
Lesson on cognitive development “Journey along the Volga” MBDOU Kindergarten No. 49 “Jolly Dwarf” Chuvash Republic, Novocheboksarsk, Teacher: Korotkova Ekaterina Sergeevna A melody sounds.
Lesson on cognitive development “Journey to the Land of Knowledge” Summary of the final integrated lesson in the preparatory group “Journey to the Land of Knowledge” Purpose: Consolidation of mathematical concepts.
Source
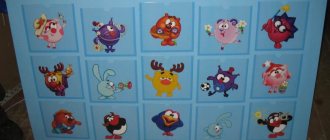
Decorative and educational panels
Quick view
Set of decorative and educational panels “Urban environment”
Quick view
Set of business boards “Professions + transport”
Quick view
Set of business boards “Professions”
Quick view
Decorative and educational panel “Police”
Quick view
Decorative and educational panel “Polyclinic”
Quick view
Decorative and developmental panel "Ministry of Emergency Situations"
Quick view
Decorative and educational panel “Skate Park”
Quick view
Decorative and educational panel “Shop”
Quick view
Decorative and educational panel “Kremlin”
Quick view
Decorative and educational panel “Stop”
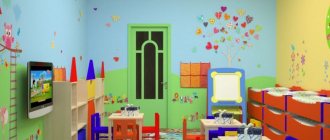
Kindergarten design: decorating walls in a group
Products for kindergarten design from were developed “from scratch” together with teachers and child psychologists. It is unique in its kind, easy to use and safe for children. Our products comply with sanitary standards for children's educational institutions, meet the requirements of the Federal State Educational Standard for Educational Education and the CU TR "On the safety of toys."
With the help of innovative equipment, you will create a preschool design that combines practicality and safety, quality and aesthetics.
What we have for the “wall” design of a preschool educational institution:
- Wall panels. “Honeycombs”, “Puzzles”, “Crackers” and “Tetris” in sets with different numbers of pieces allow you to adapt to the existing design. Design kindergarten groups according to the Federal State Educational Standard, taking into account the height of the ceilings, the width of the walls and the interior style;
- Shelves. Decorate the interior of the kindergarten with practical furniture. With the help of our shelves - “Apple Trees”, “Fir Trees”, “Oak Trees”, “Mega Parking” - you will expand the usable area of the room and complement the subject environment for the development of children;
- Didactic panels. New developmental developments “Umnichki”. Now it’s easy for a teacher to organize classes in a playful way and involve preschoolers in the learning process in 1-2 minutes;
- Height meters. These are wall themed boards with a measuring scale in centimeters. A height meter is useful when you need to find out the height of a child or all students without visiting the nurse's office.
Important! Wall panels in a kindergarten protect walls from damage during active games or when changing the interior design of the group. All shelves, stands, paintings, flowerpots and other attachments can be mounted directly on the “Honeycombs” or “Puzzles” (or “Crackers”) and hung as many times as you like.
Main materials: elite plywood (grade FK 1.2, class A), water-based paints (resistant, odorless). For reliability, dowels are used as fastenings.
We will select products for decorating walls in a kindergarten in 30 minutes
Dial our number. An expert in equipping a preschool educational institution will select products taking into account your needs and budget. Call!
Decoration of the “Space” corner
Anoskina Guzel Rafekovna
Decoration of the “Space” corner
Decorating a group room in a preschool institution for each teacher and parents becomes not just a responsibility, but also a creative process. It implements unique ideas and experiences.
I would like to present to your attention a master class on decorating “ Space corner in a group room .
The first thing you need to do is print out the 4 planets of the solar system on a color A size printer, two pictures of each planet.
The only thing is that we printed the planet Sun in a larger format.
Then cut them out in pairs as well.
Glued together, you can sign and laminate.
That's how easy and simple your corner is ready .
In addition, you can also add stars, comets, meteorites. but this is still in our work, and you have your invention and creativity.
Thank you for your attention, I will be glad if it is useful to anyone.
“St. George’s Ribbon” master class on decoration for May 9th We started preparing for Victory Day in advance. One of the symbols of Victory Day was the St. George ribbon. For decoration we needed a big one. “Field Mail” master class on decorating a window for Victory Day using the vytynanka technique Dear colleagues, I want to share with you the idea of decorating a window using the vytynanka technique for the upcoming Victory Day holiday. While I was drawing and cutting out... Master class for teachers on organizing and decorating a mini-vegetable garden on a windowsill Dear teachers, today I would like to share with you options for decorating a “Mini-vegetable garden on a windowsill.” For this you need everything. Master class on designing an information corner for parents in the “Locomotive” kindergarten Summer has flown by and a new school year has arrived. It's time to think about decorating a corner in the group. For this we need: squares for glue. Master class on window decoration “Spring is coming to us...” I invite you to another master class on aesthetic design in kindergarten. It has become a good tradition for us to decorate the window and staircase. Master class on decorating a music hall for the 70th anniversary of the Great Victory Our whole country was preparing to celebrate the 70th anniversary of the Great Victory. Now our children live in peacetime, but we, teachers, are trying. Window decoration for Victory Day. Master class on vytynanka with an emphasis on color. May 9th is approaching. Preparations for this important holiday are also taking place in our kindergarten. I bring to your attention a master class on vytynanka.
Source
Furniture
A children's room in a space style is similar to a room in a minimalist style - the room needs a small amount of practical and comfortable furniture.
The style of all furniture is exclusively modern:
- a lot of glass;
- a lot of steel chrome fittings;
- interesting futurological forms;
- the color is light, steel-gray or bright, juicy.
The desktop can be equipped with LED lighting, as can the shelves of the rack. Such a table will become a captain’s cabin for a child.
In such a room, a wardrobe with a spacesuit or star clusters depicted on the doors would be appropriate. The space room is suitable for modular storage systems, which can also be used as seating.
A bed in the shape of a rocket or on the second floor, where you need to climb a ladder, unusually shaped comfortable hanging ball chairs or bean bags on the floor - all this creates a unique atmosphere of star travel and the conquest of new planets.
Design of the space corner “Road to the Stars”
Nadezhda Dudnik
Design of the space corner “Road to the Stars”
This is the name of our space corner , which was jointly designed by the teachers of the MADOU “Kindergarten No. 21”
Engels, Saratov region Nadezhda Sergeevna Dudnik, Olga Dmitrievna Zagoruiko with the participation of Elena Zharkova.
The corner occupies two walls , a window and a ceiling.
On the left wall, the artist colorfully painted the space world : cartoon astronauts , aliens, space rockets and ships .
On the same wall there is a place for creative exhibitions of our students, where crafts and drawings of children, teachers and parents are placed. Once a year, on Cosmonautics , a creative competition is held in the garden, the jury selects the best drawing and craft, and the winners in various categories receive prizes.
We hung a blue curtain on the window, blue is the color of space , with gold stars , in front of the window on the floor there is a photo zone, figures of a rocket and an astronaut
and a mock-up of a rocket that can take off and land.
On the right wall there is information for older children, preparatory and senior groups. The wall depicts the solar system and the planets located on it with names, information about each planet, and an imitation of the Mir
.
Three-dimensional papier-mâché planets hang on the ceiling.
In our kindergarten we conduct excursions for children to the space corner , where our kindergarten children and guests learn a lot of interesting things and receive useful information.
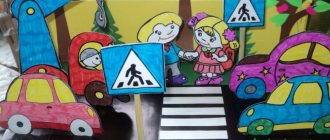
Layout of a kindergarten for the traffic rules corner “The road to kindergarten” Purpose: To consolidate knowledge of traffic rules (pedestrian crossing, traffic lights); develop the ability to navigate the terrain; form the foundations of safety. Decorating the “Space” corner Decorating a group room in a preschool institution for each teacher and parents becomes not just a responsibility, but also a creative one. Decorating a Christmas corner With the onset of the New Year holidays, the soul itself is filled with a feeling of celebration. And we all suddenly want to share and create. Decorating a theater corner Our kindergarten “Beryozka” recently held a competition for the best design of a theater activity corner. Each group began to prepare. Decorating a theater corner Hello, dear colleagues! Today I continue the conversation about the design of the group. It's time for the theater corner. How interesting everything is happening. Decorating a theater corner “The theater is a magical world. He gives lessons in beauty, morality and ethics. And the richer they are, the more successful the development of the spiritual world is. ". Decorating a corner for parents “Winter” Decorating a corner for parents “Winter” While walking outside, introduce your children to nature. On a sunny day, draw children's attention to beauty. Design and filling of the traffic rules corner Good day everyone! I want to show you how my partner Svetlana Nikolaevna Peskova and I designed a corner according to the “Rules of the Road. Decorating the corner “Everything for girls” Hello, dear colleagues! Let me remind you today how we played with dolls in childhood. I had a doll house made from a big one. Decoration of the Cossack corner Good day everyone! I hasten to share with you a joyful event that happened in our group. On your first working day.
Source
Spaceship
If your young astronaut already has a helmet, it is quite expected that he will start dreaming of a real spaceship. Well, everything is doable. Such a large-scale craft will have to be done by all family members: adults assemble and connect parts of the ship, children take part in developing the layout and decor. What's not a reason to spend the evening together, without gadgets? In addition, a rocket or spaceship will be an excellent playground for children to play.
You will need:
- various large boxes;
- scissors and cutter;
- large size cardboard, for example A2;
- paints or colored paper;
- foil;
- hot glue, tape.
Progress:
- Assemble the future shuttle, secure the boxes together with glue.
- Cut through portholes, make an entrance.
- Cut out supports from cardboard and secure them into the slots on the sides of the spacecraft.
- Glue the top together from cardboard or a box.
- Paint the parts or cover them with wallpaper/paper.
- Decorate with decor: stick on stars, sparkles. You can add a battery-powered garland, securing it with tape.
Tip: Use foil to imitate a metallic sheen.
Send well-prepared young researchers into space: provide children with juice in boxes and purees in soft patches, like real astronauts.
Crafts based on one of children’s favorite themes for games can be made not only for Cosmonautics Day, but throughout the year. This is a great way to spend time with the whole family in the evening or on a weekend. Space crafts can spark a lot of interest in the topic among your children. And who knows, maybe a real future cosmonaut is growing up here!
Design of the group “Space Corner”
Irina Kalinina
Design of the group “Space Corner”
Space has attracted and continues to attract the views and thoughts of man of all times. There are so many secrets, so many inexplicable and amazing discoveries and opportunities.
We tried to tell children about space as clearly and interestingly as possible.
I would like to present to your attention a corner in which information about space , astronauts , and celestial bodies is presented in an accessible form.
— create conditions for the development of curiosity in children in the process of getting to know space and space objects ;
- to form a holistic picture of the world in children;
— replenish the development environment for cognitive development;
— organize joint activities of children, teachers and parents.
For this purpose, in our corner we selected and manufactured:
— illustrations on this topic, didactic material;
- encyclopedias and books about space that the children brought from home;
— poems and riddles, a card index of sedentary games on the theme “ Space ”
;
— planetary caps for outdoor games, entertainment and free physical activity.
Educational activities are organized: appliqué, drawing, design, etc.;
— presentation of the “First in Space ”
;
- examining with the teacher illustrations of books about space , photographs of the first cosmonauts , designers;
— a Lego “ spaceship ”
;
- independent creative activity;
- participation in competitions together with parents.
Children continued their cognitive activities in their free time
Photo report “Excursion “Space Corner of Moscow”. Part 3 The history of the Museum of Cosmonautics began in the second half of the 20th century, when in 1964 the monument to the Conquerors of Space appeared on the map of Moscow. Integrated lesson for children of the 2nd junior group. “Space landscape” (draftage) Educational areas: Cognition, communication, socialization, speech development, artistic creativity, fiction. Summary of educational activities with children of the middle group “Space Robot in Kindergarten” “Space Robot in Kindergarten” Purpose: To introduce children to electricity and the rules for safe handling of it. Objectives: Educational:. Summary of a lesson on plasticineography with children of the senior group “The Amazing Space World” Program objectives: 1. Clarify and expand children’s knowledge about space. 2. Learn to create an expressive and interesting plot in half volume.Source
On the topic: methodological developments, presentations and notes
I suggest designing corners in groups, made in Word and easy to edit.
I suggest continuing to design the corners in the group.
forms and methods of working with parents are listed by section.
The consultation provided recommendations for equipping Children's Creativity Centers with a specific list of didactic games for all age groups.
Together with the children and parents, we created safety corners in the group, and each corner had its own owner. The Good Doctor is the owner of the healthy lifestyle corner. Brave Fireman is the owner of the corner.
This methodological development includes information about which sections can be included in the parent corner and what materials are posted. .
Source
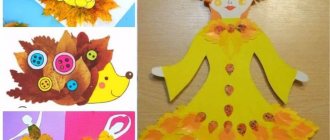
Crafts on the theme of space for kindergarten and school. Original DIY ideas for Cosmonautics Day
How are you, dear readers and guests of my blog? Did you have time to take a break from crafts for Easter? I think it’s not stressful to make something and do it with the kids. And now there is still one more holiday ahead - Cosmonautics Day. And it falls on April 12th. On the day when our Soviet cosmonaut Yuri Gagarin flew into space for the first time.
Usually this is a boyish theme - space. They really love inventing flying machines, saucers and rockets. But some girls are not far behind either. Still would! This is very exciting, and from waste and natural materials you can make such works that they will win any competition.
Let's look at a selection of interesting ideas. Most likely, they will give you some interesting thoughts and you and your children will create your own masterpieces. After all, there is room for imagination to run wild here. The work can include planets, satellites, flying vehicles, UFOs, rockets and much more.
I would like to note that I also get ideas from the Internet, from its publicly available sources. Basically, these are cool and original creations for kindergarten and elementary school children. Plus, I can recommend excellent options for paper airplanes in the note https://mognotak.ru/kak-sdelat-samoletik-iz-bumag.html
Well, here we go! As Yuri Gagarin once aptly said).
Interesting ideas on the theme of Space with your own hands
First, let's look at what can be made on this topic. For younger kids, it will be possible to make (with the help of their parents) such a layout from colored paper. All the planets of our Solar System are located on it. At the same time, of course, we teach the kids the names of the planets.
Application Solar System
You can make such applications from small plasticine balls. It’s better to draw such compositions first and even paint them with flowers. And then you can roll small balls and just stick them on.
After all, it’s really possible to submit it for a competition?
Squirrel in a rocket
We make figures of astronauts and a lunar rover from salt dough. I described a simple recipe here. This material is pleasant to work with for several reasons:
Russian cosmonauts and lunar rover
Children 4-5 years old can make simple paper rockets. This turns out to be a simple form of origami. And you can glue them onto a dark blue background, which will represent outer space.
Rockets in the universe
Let's make these funny aliens from toys, jars, tubes and plasticine.
Funny aliens
Another option for the competition using the modular origami technique.
We turn on our imagination and use everything: polystyrene foam, tree branches, foil, wire. Bushings will even be useful for making rockets.
Gagarin in flight
Plasticine composition with Saturn, stars, rocket and our green planet.
Milky Way
Cat in a hat from the planets of our solar system
I hope that we have already more or less chosen something for ourselves, that we will make it and move on.
Wire solar system
This is an ideal craft for younger students. At the age of 6-8 years, children become more diligent and will be able to build such a craft without difficulty. While working, you can tell your child about space or fantasize about space adventures together.
You will need:
- foam balls;
- plasticine;
- wire;
- fishing line;
- scissors:
- gouache, brush;
Progress:
- Color the planets with paint of a suitable color.
- Small planets can be created using plasticine.
- Using flexible fishing line, make orbits and string planets on them.
- Connect the orbits together with fishing line, leaving the last free tip.
- Make a loop from the tip on which you can hang the solar system.
Simple crafts for kids in kindergarten on Cosmonautics Day
I suggest making a rocket with the kids from a sleeve (you can even use toilet paper) and colored paper. It turns out such a long and stable little thing that can be placed on a blue background and next to an astronaut figurine.
Add some foil and you'll have a more realistic spacecraft.
Let's make a starship out of paper. You can do this simply according to the diagram below.
And here is the finished version. Color it as you wish.
Or we’ll make an unidentified flying machine out of thick paper. You can make several of these things and put them again on the blue sky.
Look how colorful and at the same time original UFOs we produce.
Let's use the baby's favorite toy - plasticine. It is pliable, soft and adheres well to almost any surface.
Here are some applications you can make with it in disposable plates.
Saucers - open space
Oh, and we parted ways! Let's sculpt a cute alien. It will look good next to a paper flying saucer.
Funny alien
Don't feel like folding paper? So let's blind her too, because there is a lot of plasticine!
When working with plasticine, the first thing you need to do is explain to children that this is an inedible material and should not be put into their mouth.
Alien and flying saucer made of plasticine
Space helmet
The theme of space is relevant for children of any age, not only on the eve of Cosmonautics Day. UFOs, aliens, travel to distant galaxies are one of the main topics for games for both preschoolers and older children. A helmet, like that of an astronaut, can become a favorite accessory in the “space adventures” of young explorers.
You will need:
- balloon;
- paper, newspapers or napkins;
- bowl of water;
- PVA glue;
- foil;
- wide brush;
- scissors and a stationery knife.
Progress:
- Inflate the balloon.
- Cover it with several layers of paper over the entire surface.
- Allow to dry thoroughly (about 24 hours).
- Cut a hole for the head, cut a window for the eyes using a utility knife and scissors. Pull out the ball.
- Cover the inside with foil.
- Decorate if desired: with drawings, stickers.
Space idea made of paper and cardboard for April 12
From components such as paper and cardboard, it is easiest to do work for kindergarten and school. Because they are always present in any home. And also scissors and glue. If all this is available, then I propose to build such a composition from a flying spaceship, the sun and Saturn on a black background.
To work you need:
Manufacturing:
1. Cut the sleeve in half. At one end we cut off the edges to create the nose of the rocket.
2. From blue paper, cut out three blue cones, which we bend in the middle. These will be our rocket engines. We glue them to the uncut (back) part of the sleeve.
3. Glue the rocket onto a black background.
4. Cut out two petals from red and gold paper. This will be fire coming out from behind the ship.
5. Glue the flame and the cut out window.
6.Draw the sun on gold foil, and Saturn with a ring on silver foil. Cut out and glue both shapes onto black cardboard.
7. Apply glue to the background and sprinkle semolina on top. This is our milky way. Beautiful craft is ready!
Did you like the collage? If you have schoolchildren, you can make a flying luminous object below.
star ceiling
An ordinary white ceiling in a starry room is boring and wrong.
The ceiling sets the direction of the style, so you can design it in the following ways:
- Tension. Such a ceiling can demonstrate galactic spirals, the surfaces of other planets, or become part of the night starry sky - the choice of pattern on the surface of the stretch ceiling is up to the owners of the room. If you install fiber optic threads and a projector behind the stretched fabric, then in the evening the ceiling will become a real sky, on which stars shimmer and galaxies replace each other.
- Plasterboard structures. With their help, the most complex design solutions are implemented, including semicircular vaults of the ship’s interior. A multi-level suspended ceiling with built-in spotlights and fluorescent lighting fits perfectly into the space theme.
- The metal beams on the ceiling look original, supporting the associative row associated with the interior view of the interplanetary spacecraft.
- Stickers and stickers. Ready-made luminous stickers with images of stars are attached to the ceiling to create constellations. In the evening, the pictures will glow, creating a special atmosphere in the room.
- Drawings. Made with luminescent paints or voluminous textured materials, such images will become an exclusive decoration of the room, fully meeting the needs of the little owner.
How to make crafts from disks on a space theme?
CDs are already being thrown into the trash, but in vain. After all, this waste material is very suitable for souvenirs for Cosmonautics Day. Its shiny and round flat surface is very suitable for the production of unidentified flying objects.
Here is a second grader's masterpiece. She used the disk under a flying saucer with a very cute alien.
And this is the alien himself with antennas made of springs and foil.
Interplanetary taxi from the children from the preparatory group in kindergarten.
The cutest plate made of rhinestones and fluffy antennae.
ABOUT! And here is a whole group of funny humanoids with their own transport.)
And one more idea on how to use CDs.
This is just the beginning
Now the “Umnichki™” team, together with teachers and psychologists from the “Territory of Development” educational center, is working on a methodological basis for the space site. The goal is to provide our customers with user-friendly and relevant manuals. Such that will allow educators to use the playground equipment daily, fully and without additional training, for the comprehensive development of children in accordance with the Federal State Educational Standard for Education.
Buy a space playground for your kindergarten and be the first among preschool educational institutions in Russia!
Step-by-step 3D postcard in the form of a rocket
If you have never created three-dimensional postcards, here is a step-by-step method for you. Again, everything is as simple as two and two. Templates can be found at the end of my post.
We need:
Manufacturing:
1. Fold the A4 sheet in half. On the fold we draw half a rocket.
2. Part of the rocket in the photo below is marked with a dotted line. This means that we will not cut here. And we will cut out all the straight lines using scissors.
3. We try to do everything as carefully as possible.
4. We turn our spaceship inside. It will fold inward and the entire card will fold outward.
5. Draw the details of the ship: nozzles, porthole, nose and flame below.
6. Paint the background black with gouache. And the rocket itself in suitable colors.
Here you can get creative and make an astronaut’s face in the porthole window.
7. Draw beautiful flames.
8. Cut out different planets from colored paper. We glue them all over the background. You can also make stars from foil.
Voila! Our cool three-dimensional card is ready. We give it away for its intended purpose.
Making original works for a school competition
Let's be inspired by the ideas of the kids who won space-themed craft competitions. They all tried, working out every detail in their masterpieces.
Any available materials were used in the work. These are twine, foam balls as planets, glass pebbles, felt and much more.
International station
Composition of planet Earth, a rocket and two astronauts in outer space.
Russian cosmonauts
Solar System with satellite and planets.
And here is a magnificent model made from plastic bottles.
We use felt for voluminous applique.
Beautiful applique made from napkin balls.
To make it, you need to roll out many, many balls from colored paper napkins. But the work seems to be worth it!
The squirrel and the salt dough arrow are waving their paws at you).
A little imagination on the theme of the galaxy, starships and UFOs - and a wonderful work is ready for the competition!
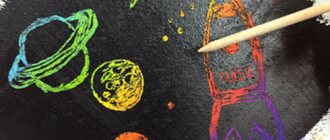
Salt painting
Simple table salt is an unusual material for painting. You can offer this craft to both kids and primary schoolchildren.
You will need:
- cardboard;
- paints;
- sponge;
- pin;
- PVA glue;
- pipette;
- colored water;
- salt.
Progress:
- Use a sponge to paint a sheet of cardboard to your liking.
- Make splashes - constellations (using a brush or toothbrush).
- Use PVA glue to draw the outline of future cosmic figures (planets, rockets, etc.) and fill them inside with glue.
- Sprinkle the picture with salt. Let the glue dry.
- Shake off excess salt from the painting.
- Pour water into several glasses, paint it in each container a different color.
- Use a pipette to collect colorful water and use it to paint the shapes made of salt. Let dry.
More details in the video: