Lesson 1. Cubes
Goals. Teach children to paint with stamps using wooden figures; navigate on a sheet of paper; clarify and consolidate knowledge of colors and shapes; develop interest and a positive attitude towards drawing.
Materials. Paints - gouache or watercolor; a large sheet of paper for a collective drawing, sheets of A4 paper (according to the number of children); wooden figures - cubes (with a smooth surface, not treated with varnish or paint); polyethylene covers; water in cans; rags, napkins; multi-colored cubes from a building set.
Technique. Drawing with a stamp.
Progress of the lesson
Prepare the paints and pour them into the lids. Before starting work, show the kids the colorful cubes. Tell them that today they will paint cubes.
Educator. Look what I brought you today. That's right, these are cubes. Let's not just draw, but print them. See how this can be done quickly and easily.
Show how to pick up a stamp cube, dip one side of it in paint, apply it to the paper and press down, then carefully lift it - a bright imprint will remain on the paper.
When changing paint, use a sponge to wash off the previous paint from the cube and wipe it dry with a cloth.
Invite the children to take turns printing the blocks on a large piece of paper. Monitor the consistency and quality of actions, if necessary, help and correct errors. At first, you should use one ink and print squares of the same color (so that you do not have to wash the cube before changing the ink). You can use several cubes - each for a specific paint.
Give the children paper and encourage them to print the blocks themselves. Help place the prints evenly over the entire surface of the sheet of paper.
Subsequently, teach children to apply paint to the surface using a brush. In this case, you can use several colors - each cube turns out to be different colors.
Lesson 2. Balls
Goals. Teach children to paint with a stamp using cut vegetables; navigate on a sheet of paper; clarify and consolidate knowledge of colors and shapes; develop interest and a positive attitude towards drawing.
Materials. Paints - gouache or watercolor; a large sheet of paper for a collective drawing, sheets of A4 paper (according to the number of children); carrots cut crosswise; polyethylene covers; water in cans; rags, napkins.
Technique. Drawing with a stamp.
Progress of the lesson
Before class, prepare the paints and pour them into the lids. Tell the children that during the lesson they will draw colorful balls.
Educator. Let's not just draw colorful balls, but print them. Now I will show how this can be done quickly and easily.
In front of the kids, cut a washed carrot of medium length and thickness in half, then show how to pick up half a carrot, dip the cut side into the paint, apply it to the paper, then carefully lift it - a bright imprint will remain on the paper. When changing color, wash off the previous paint from the cut surface of the carrot and wipe dry with a cloth. Accompany each step of the action with an explanation.
Have the children take turns printing circles on a large piece of paper. Monitor the consistency and quality of actions, if necessary, help and correct errors. At first, you should use one paint and paint circles of the same color (so that you do not have to wash the carrots before each change of paint). Or use several carrot halves, each for a different color.
Then give the children paper and encourage them to draw the balls themselves.
Subsequently, you can teach children to apply paint to the cut surface of carrots using a brush. In this case, use several colors - each ball will turn out to be different colors.
Lesson 3. Stars
Goals. Continue teaching children to draw using a stamp; navigate on a sheet of paper; clarify and consolidate knowledge of colors and shapes; develop interest and a positive attitude towards drawing.
Materials. Paints - gouache or watercolor; a large sheet of paper for a collective drawing, sheets of A4 paper (according to the number of children); several pieces of carrots cut across with an asterisk cut out on the cut; polyethylene covers; water in cans; rags, napkins.
Technique. Drawing with a stamp.
Progress of the lesson
Before starting the lesson, prepare the paints and pour them into the lids.
In front of the kids, cut washed carrots of medium length and thickness in half, then cut out a star on the cut (prepare several of the same shapes in advance). Show how to print figures using this stamp.
Invite the children to take turns printing stars on a large sheet of paper and come up with a plot for the drawing on their own - it could be flowers in a clearing, stars in the sky, or multi-colored holiday fireworks. You can use different paints.
Then give the children paper and invite them to print the stars themselves, coming up with a name for their drawing.
Lesson 4. Towers
Goals. Continue teaching children to paint with stamps using wooden cubes; maintain rhythm when using two colors; navigate on a sheet of paper, place the prints in a certain way relative to each other; clarify and consolidate knowledge of colors and shapes; develop interest and a positive attitude towards drawing.
Materials. Paints - gouache or watercolor; sheets of drawing paper in A4 format (according to the number of children); wooden figures - cubes (with a smooth surface, without varnish or paint); polyethylene covers; water in jars; rags, napkins; multi-colored cubes from a building set. Technique. Drawing with a stamp.
Progress of the lesson
Before class, prepare the paints and pour them into the lids.
Show the kids the cubes and ask them to build tall towers out of them, alternating two colors. When the towers are ready, compare them in height. Tell the children that today they will draw towers of blocks using paints on paper.
Show the children how to stack the prints on top of each other (in this activity, the paper is placed vertically). To make it easier for them, you can use one color at first, then alternate colors next time. You should also draw a line at the bottom of the sheet to indicate the surface on which to place the cubes.
Give the children paper and encourage them to print the towers themselves. If necessary, help position the prints one above the other.
Lesson summary “Landscape. Unconventional drawing techniques"
Summary of an open lesson in fine arts
6th grade
Subject:
"Scenery. Unconventional drawing techniques"
Goals :
familiarizing students with the history of the genre, its varieties, creating a favorable emotional environment for studying fine arts
Tasks :
- educational
– to form in students an idea of landscape as a genre of fine art, to study types of landscape, to teach how to depict natural objects based on simple geometric shapes; familiarize students with non-traditional methods of drawing (using wax in watercolor painting)
- developing
– develop students’ creative abilities: imagination, fantasy; promote the development of attention, memory, associative thinking; improve skills in working with graphic and painting materials (graphite pencil, watercolor); familiarize students with the features of working with wax (mixed painting techniques)
- educational
– education of accuracy, discipline, aesthetic attitude towards the surrounding reality and works of art
Lesson type:
thematic drawing
Methodical techniques:
conversation, teacher's story, frontal survey, practical work of students
Lesson equipment:
computer, tape recorder, board
Visual range:
new terms, landscape images (charcoal, pastel, watercolor, gouache) made by students, reproductions of paintings by painters
Musical series:
sounds of nature
Equipment (for students):
watercolor paper (A4 format), graphite pencil, eraser, watercolor, brushes (No. 1, 3, 5), palette, water jar, white paraffin candles
Lesson Plan
1. Organizational moment (2 min.)
2. Main part
(communication of the topic of the lesson, presentation of new material), (
13 min.)
3. Practical task (23 min.)
- Final part ( View work. Lesson summary ) (2 min.)
During the classes
1.Organizational moment
(checking the availability of tools and materials for drawing) –
2 minutes
.
2. Main part (13 minutes)
.
Today we will go into the wonderful world of fine art. In front of you on the board is the name of the topic of our lesson. Which of you is the most attentive? What is the lesson about? That's right, the landscape. What is “landscape”? Landscape is a genre of fine art whose central theme is nature and landscape. The name of the genre comes from the French word “pays” - country, locality. The landscape genre originated in China in the 4th century AD. e.. In European art, the genre became popular only in the 16th century. The views of nature amaze with their beauty, help you relax, and inspire.
We can admire the landscape, which was created by graphic artists using pencil, charcoal and ink, and the wonderful works of painters.
The history of the development of landscape as an independent genre
Landscape has been part of a wide variety of images since ancient times. Elements of landscape are found in ancient Russian painting: the so-called “slides” and “chambers”. In the fine arts of the ancient world, Egyptian and Greek masters worked on landscapes. However, all these images were simply the background against which the main action unfolds. The importance of landscape increased during the Renaissance, when discoveries in the field of perspective, chiaroscuro, made it possible to make it more realistic.
Art historians believe that the first “pure” landscape belongs to the brush of Albrecht Altdorfer (first half of the 16th century). The heyday of the landscape occurred in the 19th century, when plein air (from the French word “open air”) - painting in nature - appeared for the first time in art. Previously, only sketches were made in nature, and paintings were painted only in the studio. After the invention of paint in tubes, it became possible to work entirely in nature. Landscapes appear, permeated with light and air.
Types of landscape
By level of human participation:
- Village (rural);
- Natural (sea);
- Urban (industrial);
According to the plot, the landscape can be divided into the following types:
Seascape (“marina”)
is a type of landscape with a marine theme.
The direction was popularized during the active development of shipping, navigation, and the Great Geographical Discoveries. The most striking example of this type is the work of the 19th century Russian marine painter I. Aivazovsky. Futuristic landscape
is a variety whose adherents paint pictures with images of space flights and fantastic extraterrestrial worlds.
The cityscape
("vedata") appeared in Italy in the 17th century.
In essence, this is a detailed image of buildings in the city, down to the smallest detail. The main feature of the landscape is the accurate representation of all the nuances of the architecture of a house or an entire block. 3. Practical work of students
(independent work is carried out with musical accompaniment, “Sounds of Nature”) -
23 minutes
.
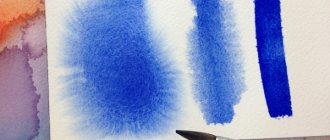
And now we will look into the impromptu art gallery. Look carefully at the landscapes. What technique was used to perform this work?
(watercolor and gouache painting techniques) What makes this drawing stand out?
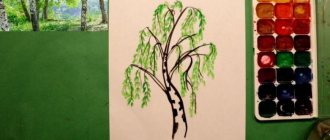
At first glance, this work is practically no different from the others, but the young artist used an unusual material here - a paraffin candle, which acts as a fixative: white-trunked birches look great against a bright background precisely because of the wax, it prevents the paint from flowing onto the surface of the tree. We will also try to use this technique today, prepare pieces of paraffin, we will work with them at the first stage.
Sequence of drawing a winter landscape:
- Drawing the contours of trees (birch) and the plane of snow (paraffin candle). Smooth lines - trunks and branches of birch trees, abrupt, short strokes - reflection on the water, shading with the side surface - snow planes
- Filling the background (watercolor). The work uses a smooth transition from violet and blue to light yellow - in the background color scheme, and in the reverse order - in the filling of the river plane.
- Working on the details of the composition (watercolor). In the foreground there is a hillock with trees and yellowed grass, on the surface of the water, in the central part of the sheet there is an image of a dark brown fishing boat. The details of the composition in the foreground are bright, saturated, and 3-5 shades are used in the picturesque solution.
(students work on the composition in parallel with the teacher)
4.View works. Lesson summary (2 minutes)
You did some wonderful work. What do you think is the most successful job? Explain your decision (discussion of students’ creative works). And now we will check who was the most attentive of you during the lesson (a survey on terminology is being conducted)
- The birthplace of the landscape.
- In what century did the first “independent” landscape appear?
- How is the word “PLEIN AIR” translated?
- What is "VEDUTA"?
- What type of landscape is the image of space?
- What invention allowed artists to paint sketches in nature?
-Well done! You did a great job today: you got acquainted with a new drawing technique, learned interesting facts about the genre of landscape and its varieties. I hope that my next meeting with the world of fine art gave me vivid impressions. All the best!
"Flowers for Mom." Lesson notes on non-traditional drawing with stamps
Svetlana Stolyarchuk
"Flowers for Mom." Lesson notes on non-traditional drawing with stamps
Strengthen children’s ability to depict in drawings the structure of a flower (stem, leaves, petals)
using a variety of materials.
Educational: To introduce children to non-traditional drawing techniques - the technique of drawing “ stamps ”
.
Continue to learn how to make additions to the drawing that enrich its content. Use familiar drawing techniques when completing the drawing . Instill interest in an unconventional type of drawing .
Developmental: Develop aesthetic feelings, accuracy, imagination, creativity; ability to draw with different techniques .
Educational: To cultivate accuracy and composure when performing work techniques; listening skills; the ability to perceive the beauty of the surrounding world.
Develop skills of kindness and cooperation.
Equipment and materials: Picture “Spring”
, gouache, sheets of paper, napkins;
illustration of flowers , cotton swabs, bottle caps.
Planned results: Children learned about a new type of unconventional drawing - drawing “ stamps ”
Preliminary work: Reading fiction; memorizing poems and proverbs about mother; examination of illustrations depicting flowers , application “ Flowers in a vase ”
game
“Gardener”
, looking at illustrations of
flowers , drawing flowers using different techniques : circular movement of the brush, dipping.
Targets: The child shows curiosity;
inclined to observe and experiment.
Children are included in the group - welcoming children with guests!
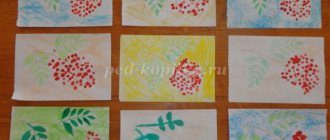
Non-traditional drawing with “stamps” (printing) in kindergarten
Marina Fursova
Non-traditional drawing with “stamps” (printing) in kindergarten
Printing ( stamping )
- a technique for producing images on paper using
stamps previously immersed in jars of paint. Stamps are made from pieces of foam rubber, polystyrene foam, chopped fresh vegetables and other similar materials. They also use ready-made factory stamps with images of animals, cartoon characters and alphanumeric symbols.
painting technique goes well with stamping . Using a thin brush or using graphic techniques, children draw the outline of an object or living creature on a sheet of paper. Then, if the dot technique of drawing with stamps , you can invite the child to depict fruits on an apple or pear tree, colorful leaves in the crown of a tree in the fall, spots on the skin of a leopard, etc.
Through an unconventional method of drawing with stamps, you can study certain geometric shapes with children if you make prints of the appropriate shape on paper, combining them with each other.
In this way you can get a house, some kind of animal, and even show kids how to draw a person .
"Violets". Unconventional drawing with a foam rubber poker. Photo report on children's creativity Good evening, dear colleagues! We had a project-themed week “Friendship with indoor plants” in our group. How much new and... Master class “Flowers for Mom”. Drawing in an unconventional way - with stamps from cardboard tubes. The good and bright holiday of Mother's Day is approaching. Both adults and children prepare gifts. Our children also try to please their loved ones. Do-it-yourself non-traditional physical education equipment in kindergarten Instilling healthy lifestyle skills, creating motivation for sports, exercises and gymnastics is one of the priorities.
Source