Nitography is a drawing technique for children where woolen threads are used to embody an artistic image. The design can be made in several ways: by soaking the threads with paint and sliding it over the paper, laying out the appliqué according to the pattern, and also using stamps. In kindergarten, classes on non-traditional drawing techniques are held in the middle and senior groups, that is, with children 4–6 years old.
What it is
Nitcography (a combination of the words “thread” and “grafo” - I write, that is, “I write with thread” or “I draw with thread”) is the creation of paintings using threads.
Nitography is a type of fine art that allows you to create bright and expressive images
The main goal of artistic and aesthetic education of preschoolers is to awaken children's interest in visual arts. As for the purposes of using non-traditional drawing techniques, in particular, nitcography in the older group, these include
- developing the ability to select a color palette to reveal the meaning of the plot of the drawing;
- develop the ability to see a whole image from its individual elements;
- improve fine motor skills;
- foster a positive perception of the creative process.
Nitography - unconventional drawing techniques for children over 5 years old
Nitography for children
Author: Krutenkova Alena Dmitrievna, additional education teacher, Municipal Budgetary Educational Institution of Children's Education "House of Children's Creativity" p.
Molchanovo, Tomsk region Dear colleagues, I bring to your attention a material where you can get acquainted with a powerful and unjustifiably forgotten tool in the artist’s visual arts -
“nitcography”. The word “threadography” consists of two words: thread and graphics (from “grafo” - “I write”) - a type of fine art that uses lines and strokes as the main means of representation... That is, it turns out, “I write with thread” or, more simply, “ I draw with thread.” The main task of the artist - threadographer: to find in the loops and hooks left by the thread on the sheet, images that can be recognized and used in drawings. The main goal of such classes is to create conditions for the child’s experimental activities in the field of mastering imagery and color symbolism. Objectives: - teach children to turn to their experience, analyze their feelings, create new meanings and forms; — develop children’s creative potential: imagination and imaginative thinking; - instill artistic skills and aesthetic taste. Form of organization of activity: individual-practical.
The lesson is aimed at an audience of 5 years and above, without age restrictions. To practice thread printing, we will need Her Majesty, Your Imagination, in large quantities. What is fantasy? The generous and brilliant storyteller Viktor Yuzefovich Dragunsky will help us figure this out. Fantasy
I am a sky climber, I climb in the sky, And then from there - one! - I sink to the ground. You do not believe? Well, well... Anyway, this is not a lie, But my fantasy. Her Majesty Fantasy also woke up in my head, and a small poem was born dedicated to this method of drawing.
Nitcography
I would like to invite you to create masterpieces - Draw with ordinary thread.
Here is an image of a wolf, a cat or a lion, Or maybe there is a long-nosed owl? The little mice rustled from under the thread: “Where are our elegant capes!” A wonderful bird stood on its wing - Everything was spinning, head over heels... And thoughts suddenly stirred, A wonderful song poured onto the sheets, They wrote a magical fairy tale for us, They glorified the needle and thread. And they are happy to dance on paper, We would like to capture our wild imagination! To bring Her Majesty Your Fantasy to life, you will need the following materials and tools : paper, gouache, ink or watercolor, pen, brush, threads of different thicknesses, needle, napkins.
So, let's get to work! The technology for performing “nitcography” is extremely simple.
1. Take a white sheet of paper, A-3 format, and fold it in half - this option is acceptable for initial training, but if you get carried away, you can take 2 sheets that are not fastened together. We put paint on the thread using a brush: we dip the thread into ink or paint. 2. Randomly lay the thread with paint in loops and zigzags on a sheet of paper.
3. After the thread moistened with paint is laid, it is covered with a second sheet. Both sheets are pressed tightly against each other by hand, and the thread is pulled out by the end.
It is good to use a thick woolen thread - the pile leaves the most intricate silhouettes on the paper.
4. You can put several colors of thread on one sheet. They can be intertwined with each other, or they can be printed separately from each other.
5. To create more interesting images, add a needle, with which we pierce the top sheet in the right place and pull the thread through the hole.
6. Once the thread is pulled out, you have two mirror copies with intricate designs that can be further modified. Each time you get two identical drawings. They can be viewed from any side...
This is an inverted previous drawing...
The same imprint gives new images.
If you are observant, you will soon be able to deftly manage the thread and needle.
And now I want to tell you a fairy tale that I wrote with pleasure and tell my students in class.
The extraordinary journey of Threads and Needles
Little princess Thread sat and was bored in her secret corner. She explored all the expanses of her kingdom, learned how to perform simple and complex seams: from basting details to amazing fine satin stitch embroidery. She wanted something new, unusual. Mother-nannies Fingers never allowed her to take a step without them, but she so wanted independence... - What are you doing? – the maid Igolochka violated her privacy. “Yes, I miss you,” Princess Thread said sadly. - Listen, let's go on a trip! – Needle suggested cheerfully and joyfully. “I would love to,” sighed Thread, but the nannies are unlikely to let us go. And where will we go if we never know anything except our kingdom,” Thread said even more sadly and almost in despair. “Just think,” Igolochka objected smartly, “that’s why travel is needed, to study different countries... Do you remember how old Count Tangle told us a fairy tale about the extraordinary country of Izizilia.” - Yes, I remember, but how will we get there, to this country of Image? - Stop whining! - Needle interrupted. - Let's go! She grabbed Thread by the hand and dragged her along. -Where are you taking me? Let go of my hand and tell me where we are going. - Where where? Of course, to Grandpa Tangle,” Igochka answered with a smile and mischief. “What, it hasn’t arrived yet?” - What if he complains to our nannies about us? – Thread still spoke in a plaintive voice as she walked, barely keeping up with Needle. - How do you imagine it? – Needle stopped dead in her tracks. — So that such an avid traveler as Count Tangle would run to complain? Well, I beg you! Does he have nothing better to do? “You’re probably right,” Thread answered in a more cheerful voice. - Let go of my hand. I myself will go to Grandpa Tangle with pleasure. The friends quickly ran along Pugovichkina Street, turned onto Spitsynykh Street and ended up on Klubochkina Street in front of the count’s house. - Oh, what should we tell Grandpa Tangle? – indecision again took possession of Thread. - Girlfriend, you are so strange. Of course, we will tell him everything as it is. Be brave, follow me! The needle knocked loudly on the count's door. “Who’s there?” a cheerful, slightly hoarse voice was heard. - Grandfather Count, this is us, Igolochka and my friend Thread. “I’m coming, I’m coming,” answered the grandfather. - Well, hello, young princesses. How can I help you? “Hello, Grandpa Tangle,” the girls answered in unison, as if spellbound. It was their first time in the count's domain, and they really liked the garden and its snow-white castle. Knitted columns towered above the trees and flowers. A white gazebo, with lace trim, was buried in a blooming apple tree; in all corners, like a multi-colored carpet, there were all kinds of flowers: chic peonies, arrogant daffodils, beautiful roses. Everything was done in the same style, it was immediately clear that real masters had done a great job here. “Well, what are we talking about?” Grandfather Tangle asked with a smile. - We wanted... - You know what, let’s go to the gazebo and calmly discuss everything there. Grandfather Tangle led the girls into the depths of the garden, to a fabulously beautiful gazebo. He rang a knitted bell, and immediately his thin, very graceful assistant, Spica, appeared. “Dear Spica, please serve us tea with honey and strawberry jam,” Grandfather Tangle ordered. “Right now,” answered Spica, and immediately appeared with a knitted tray laden with various dishes. She set the small elegant table, which was located in the middle of the gazebo, and quietly left. “Help yourself, beauties,” suggested Grandfather Tangle. “Thank you,” the girls answered in unison, as if in a dream. They began to drink tea infused with rose petals and peppermint with strawberry jam. - So tasty! – Thread admired. - What a treat! – Igolochka did not hide her delight. – Grandfather Tangle, could you take us to the country of Image, which you told us about at the festival of dreamers. - To the country of Imagination? – Grandfather Tangle asked slyly. - Why do you need to go there? “We’re tired of sitting in our kingdom, we’ve already studied all the sciences well and decided to go on an exciting journey to learn something new,” Needle blurted out in one breath. - Travel? This is cool! What will Mother Pink Bobbin and dear Needlecushion say about this? “We are already five years old, and we ourselves can be responsible for our actions,” said the hitherto silent Thread with firmness in her voice. - Okay, since you are so grown up and independent, then of course I will take you to the land of paints and brushes. It’s not like being in a kingdom far away, and not far away, but here, nearby, in a neighboring kingdom. - Hooray! – the girls shouted in unison. – When will we go there? – they asked impatiently. —Have you finished your tea? - Grandfather Tangle asked. - Yes, thanks a lot! We have never drank such amazing tea before. - Do you want more? “No,” Thread and Needle answered in unison. - Well, then we can hit the road right now! “What should we take with us?” Igolochka continued. “A good mood and a little imagination,” answered Grandfather Tangle. - Then let's go! - Thread chirped cheerfully and joyfully. They left the Sewing Kingdom without any obstacles and five minutes later stood on the Main Exhibition Square of the country of Iziziliya. The elegance and beauty of the paintings on display made Thread and Needle dizzy out of habit and took her breath away. They have never seen so many paintings made in different techniques and genres. And how beautiful and believable the captured moments were! The girls, together with Grandfather Tangle, moved from one picture to another, admiringly looking at various historical subjects, portraits of famous people, picturesque landscapes and animalistic genres. “Do you want to see one of the workshops where such miracles are created,” asked Grandfather Tangle. “Of course,” the girls clapped their hands. – We will be happy to watch the birth of paintings. “Then we should come here,” said grandfather, and the whole company turned onto Inspiration Street. They went into the nearest workshop and witnessed an argument between two young ladies, Brushes. One of them was as thin as a reed, the other was the complete opposite: a very well-fed and wayward lady. “Interesting,” said the well-fed Brush. - Why do we need skinny people like you? — We are very needed in the country of Iziziliya. After all, not a single worthwhile drawing can be completed without us, thin brushes,” retorted the Reed Brush. “Somehow I doubt it,” the plump lady did not stop. - Look, what a rich stroke it turns out from under my pile. She quickly dropped into a jar of gouache and ran over a snow-white sheet of paper. “But I leave a thin, barely visible mark.” And the reed brush left a thin, barely visible mark on the leaf. “Can I try it too?” Thread couldn’t stand it and interrupted their argument. “Maybe something will work out for me,” said Needle hesitantly. Both Tassels instantly turned their gaze to the strange company. - Who's squeaking here? Weren't you taught not to interfere in other people's conversations? - they said in unison, as if they had not noticed the girls. — Dear ladies! “We came from the Sewing Kingdom,” Grandfather Tangle stood up for his charges. These young talents decided to try their hand at a new field. “Let them try,” Aunt Gouache stood up for Thread and Needle. “I love it when someone comes up with something new,” and she opened her domain to Thread. “Wow,” Thread was delighted, and dipped her tail in the yellow paint. But she was so small and light that she could not sink even three millimeters into the gouache. “Come on, come on,” Brushes began to gloat. - Let's see what you can do. “I myself don’t know what I’m capable of,” Thread almost cried. “Ladies, actually, it’s not proper to greet guests from a neighboring kingdom like this,” the snow-white, gallant Sheet of Paper stood up for Thread and deftly spread it out in front of her. “Come on, girl, don’t be timid.” - Forgive us, girl, it’s just that when my sister and I start quarreling, the whole world ceases to exist for us. “I’ll help you pick up some paint,” said Reed Brush guiltily. She carefully helped Thread to plunge up to her shoulders into the paint. Soft paint caressed Thread’s body, tired from the journey. Thread was happy. She came out of the paint and happily twirled herself on a piece of paper into an unusual shape, but she didn’t know what to do next. The snow-white leaf felt sorry for the girl, and he gallantly covered her with his other free half. - Where are you! - the nannies shouted and forcefully pulled the thread from under the sheet. “We’ve been knocked off our feet, looking for you, and you’re just lying here quietly, chilling out,” they didn’t let up.
- Look! - the gallant Liszt interrupted them, and he revealed his halves. - Oh, how beautiful! – that’s all all the participants in this story had time to say. Everyone saw in Thread's trail (although in fact, there were two tracks at once, equally similar to each other, like twin brothers) something unique, extraordinary... Some were beautiful airy flowers of an unusual shape, some were a dancing mouse, and someone a little mouse. “Wow,” the well-fed Brush was surprised, and this was the first time. “Hurray,” shouted Needle. - You're just great! “Great debut,” the nannies praised. It turns out that independence sometimes does not interfere with our children. We shouldn't have been so worried. “But you can, I’ll help you,” Needle said with a plea in her voice. “Of course,” Thread was delighted. After all, you and I are inseparable friends. — Dear Liszt, can I sometimes pierce you in the places we need? – Needle asked the snow-white sheet of paper. - Of course, I really like it when someone thinks in their own way. I'm at your service! And then it started! A thread dived into one or another jar, a brush helped her pick up paint, a needle pierced a sheet of paper in the right places, brushes gladly added their contribution and vision to new masterpieces, nannies all around helped the young talents, and old Count Tangle stood and I admired more and more new paintings. There was not a single drawing that would have been repeated by Thread and Needle. - ABOUT! “But this is “Nitkography,” old Tangle said with a smile.
Some works of my students:
Trey Roma, 14 years old
Birulina Yulia, 14 years old
Pashkova Katya, 13 years old
And now I suggest you guys start this exciting activity. At the end of the lesson, I ask the children: “Finish the sentence: “What I liked most about the lesson today was...”. Emotions are overflowing...
Thank you all for your attention!
We recommend watching:
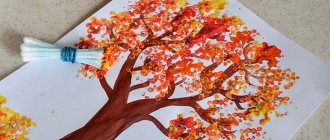
How to draw a winter tree Nitography as drawing with thread Isothread “Water Lilies”. Master class Primroses using thread printing technique. Master Class
Similar articles:
Unconventional drawing techniques. Nitcography
Master class for preschool teachers. Unconventional drawing techniques
"Wet" drawing technique
Parents about non-traditional drawing techniques
Application with drawing elements
Types and techniques of nitcography used in kindergarten
There are 4 types of visual arts using threads.
Option No. 1 - actual nitcography
A type of technique with which children begin to get acquainted with the visual possibilities of threads. This usually happens in the middle group.
What do you need:
- woolen threads (the more fleecy it is, the more intricate the image will be);
- paint (gouache or watercolor);
- 2 sheets of thick paper (watercolor sheets are ideal, but regular sheets are fine).
Instructions:
- Take a woolen thread 40–60 cm long.
- We dip it in paint (gouache is more convenient to use than watercolor), leaving a clean tail.
- Place it on a sheet of paper (it’s better to take thick paper).
- Apply a clean sheet and press down.
- Without opening the top sheet, we move the thread left and right by the tail.
- Remove the top sheet and remove the thread.
- We complete the patterns left by the thread, inventing images.
This is interesting. The base sheet can be folded in half and the thread covered with half, then the pattern will be symmetrical.
Gradually, the technique can be complicated with several threads dyed in different colors.
Video: how to work using the nitcography technique
Option number 2 - thread writing
In this case, you need threads of different colors, textures, glue (PVA or silicate) and a sheet for the base.
This is interesting. Thread painting can be done on fabric, then the threads are simply laid out on the base. No need to use glue. Only the pictures will be temporary - until the threads fall off.
Instructions:
- On a sheet of paper we draw the outline of the plot of the picture (you can use your own, or you can take a regular coloring template).
- Apply glue along the contour.
- Before it hardens, lay out the thread and press lightly so that it sticks.
- Now we fill the pattern element by element with threads of suitable colors.
The technique can be complicated by the way of laying out the threads:
- in a spiral;
- round;
- straight lines;
- zigzag lines, etc.
Video: learning to draw with threads on fabric
Option No. 3 - applique with threads
As a type of thread painting, instead of whole threads, pieces are used, that is, the threads are cut into small pieces, with which the space of the drawing is filled. This method is considered more convenient when working with younger children. In addition, it does not require much time to complete the task.
This is interesting. Familiarity with thread painting with a single thread usually occurs in the senior group, while mastering the technique from pieces is used in the middle and sometimes in the second junior group (only as 1-2 additional elements of the composition).
Option No. 4 - isothread
This technique of nitcography is not used in all kindergartens due to the fact that children have to work with sharp objects. Usually, isothread is the prerogative of preschool institutions with an artistic and aesthetic orientation. Mastering this type of thread printing technique begins in the senior group.
For the basis of the drawing using the iso-thread technique, you need to take medium-density cardboard
What do you need:
- threads;
- buttons in the form of studs;
- tablet;
- drawing on paper;
- scissors.
Instructions:
- We attach a drawing to the boards (can be from a coloring book).
- We insert studs or pins along the contours of all elements.
- Carefully, so as not to pull out the carnations, remove the paper sample.
- We wrap the carnations with threads, making two turns around each, and stretch the threads well.
This is interesting. As a simpler option, holes are pierced along the contour of the design, into which children pass threads with a needle.
Recommendations before starting work
It is important not to spoil the drawing by smearing. An upset child will not want to experiment later. Tips for parents before starting work:
- Selecting the color of the base material. The priority is white tonality. It makes it easier to control color changes. A wider palette is not forbidden.
- Material thickness. The ideal figure is 40-60 mm. Otherwise, the drawing will definitely be blurred.
- Thread length. The stated parameters should not exceed 35 cm. Children are uncomfortable working with such material. After all, it will be difficult to pull it out. If the thread is shorter than 30 cm, it will not be possible to lay it.
- Texture of the material. The floss adds elegance to the image. Acrylic and wool help create volume. It all depends on the age of the children. Some parents complain that wool reduces the quality of the pattern. It’s hard for kids to work with it at first.
- Possibility of replacing paint. You can use ink or ink. They will not harm the child.
- Buying paper. It all depends on the expected end result. The pattern appears more clearly on a smooth sheet. The rough surface allows you to create particularly unique images.
- Purchasing dishes. A one-time option will not work. The bottom of the container should maintain a flat surface. Otherwise, you can’t expect a clear application. Disposable products quickly become deformed. Some parents make do with a regular soap dish.
- Use of additional items. It wouldn't hurt to make a thread box for your child to keep his desk tidy. You will need felt-tip pens and pencils to draw the outlines.
- Application of frameworks. From childhood we need to instill the desire to create beautiful things. Without a frame, the drawings lose significantly. Baguettes are popular if there is no wooden frame. Its weight is insignificant, as is its price.
There is nothing complicated in the recommendations. They will simply help you create a unique image. There is no need to stop children if they want to show their maximum imagination. Prohibitions provoke a refusal of any kind of creativity in the future.
Scheme for compiling lesson notes for the senior group
A successful lesson plan is the key to successful activities for children. You need to start working on your notes by describing the goals and objectives of the lesson. In addition to the general purposes of using this technique in the senior group, we can highlight
- systematization of knowledge about obtaining shades by mixing paints;
- fostering a tolerant attitude towards the creative process.
Objectives are formulated based on the topic of the lesson. In general, the “skeleton” looks like this:
- develop memory, thinking, creativity;
- expand your understanding of the world around you;
- work on developing imagination.
Once goals and objectives have been identified, it is necessary to clearly distribute time between all stages of work on the topic.
It is important that children have enough time to complete the thread drawing.
A kindergarten lesson lasts 30 minutes. During this period, the teacher must work through 3 stages with the kids.
- Introduction (about 5 minutes). Includes motivational techniques: reading fairy tales, showing an excerpt from a dramatization, learning songs/poems, etc., depending on the topic of the lesson.
- The main part (about 20 minutes) is work on the drawing, physical education and finger gymnastics.
- Conclusion (about 5 minutes). It involves adults’ approval of the children’s work, as well as children’s reflection, which can be in the form of answers to the questions: “Did you like drawing with strings?”, “Do you think your drawing was a success?”, “Whose picture do you like more than others?” etc.
Example of a summary
Daria Muravleva “Summary of a lesson in visual arts for the senior group on the topic “Flowers for Mom” (Nitcography technique)” (fragment)
| <...Today I offer you an unusual way of drawing. You've never drawn like this before. Want to try and learn? It's called "nitcography". (Drawing technique is shown) - Take a thread, and now, using circular movements from the center in a spiral, lay the thread on a sheet of paper. Now you need to dip the thread into the chosen paint, holding the end of the thread, carefully helping with a brush, roll the thread onto a piece of paper in a spiral, as you did with dry thread. We direct the end of the dry thread downwards, holding it in the right hand, and with the palm of the left hand, pressing lightly, slowly pull the thread out from under the palm. Magic happens! Want to try it yourself? First, wake up your colors, but not all of them, but only those that are suitable for your unusual flower. – Try it and let’s see if you can do magic? I'm sure it will work! (Children do the work) As the children complete the task, I admire the bright colors they chose and the successful manifestation of their magical skills, and while they dry out, turn into flowers themselves and play a little...> |
Snail made of twisted threads
Considered one of the most popular and at the same time simple applications made from twisted threads is the snail. For this craft, it is best to choose threads for knitting or embroidery, as well as a sheet of cardboard, glue, pencil, and felt-tip pens.
Step-by-step master class on creating such an application:
- Draw a fairly large snail on a sheet of cardboard.
- Prepare yellow threads, carefully unravel them so that they are not tangled and too wrinkled in appearance.
- Place the tip of the thread in the center of the snail shell and carefully place it in circles (in a spiral), tightly touching each other and gluing well.
- Glue the snail's horns from pieces of thread, and decorate the remaining parts with felt-tip pens.
Long-term plan for thread printing and thread writing
A long-term plan for non-traditional drawing techniques helps organize children's work by combining the topic of the lesson with a suitable technique for depicting it. The plan form is standard. Usually indicated
- month of work;
- topics of classes and drawing techniques;
- goals of using the methodology;
- sources that describe in detail the progress of work on this technique.
There is a separate column for notes, in which the teacher makes notes regarding work with a specific group.
Since when working in the technique of thread printing, the subject of the drawing is revealed after the image is received, it is difficult to integrate the technique into the general theme of the classes. In the middle group, thread printing and thread writing are used in those classes in which the “technique” column is marked “various.” As a rule, these are topics related to natural phenomena (rain, snow), creating patterns, for example, for a vase, etc.
In the older group, non-traditional techniques with threads are usually devoted to classes on a free topic or lessons dedicated to talking about dreams, fantasies, in other words, abstract topics.
Elizarova Olga “Perspective planning for drawing (senior group)” (fragment)
| <…MAY “Land of Colorful Dreams”. Goal: to consolidate the ability to use non-traditional techniques – drawing with “threads”...> |
As for thread painting, it is used in those topics where it is possible to use ready-made templates for coloring or abstract drawings.
Alekseeva Nadezhda “Perspective work plan for non-traditional drawing in the senior group” (fragment)
Drawing with colored threads
Goal: to introduce children to the technique of drawing with colored threads, to develop fantasy and imagination, and to cultivate accuracy. |
Pictures with threads. Examples
Master classes for children should be simple and interesting, as in the pictures above.
A complex version of nitcography is accessible to an adult. A simple drawing of a flower for an activity with a child.
Cat - thread painting.
Stages of working on a drawing using the nitcography technique
"Goat"
For this drawing, children must turn the thread in a certain pattern.
The unusual thing about this drawing is that the children receive a task in advance: they need to draw a Dymkovo toy - a goat.
Instructions:
- “Look carefully at the Dymkovo goat, determine in which direction the thread should be turned by the upper tail, and which by the lower one (top - to the right, bottom - to the left).”
- “We cut the thread about 40 cm.”
- “Pour some gouache into a plate and dilute it with water.”
- “We dip the thread, holding it by the upper and lower tails.”
- “We apply the thread to a sheet located horizontally in front of you.”
- “Cover with a clean sheet and, holding it with your left hand, move the upper tail of the thread to the right with your right, and then the left tail to the left.”
- “Remove the top sheet.”
- “Using a black pencil, we draw the contours of the goat, the outlines of the muzzle, nose, and mouth.”
- “We outline the contours with a brown pencil.”
This is interesting. The above example can be worked on with children who are already well acquainted with the technique of making drawings using thread printing, since according to the instructions, children draw the plot as if “blindly”. Easier options are creating flowers, butterflies, etc., that is, those subjects that are invented on the basis of ready-made patterns made randomly with threads.
Photo gallery of drawings using the technique of nitcography
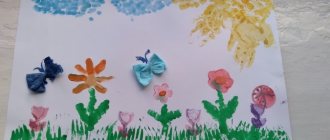
It’s very interesting when children come up with names for their pictures themselves.
To make a butterfly, you can take 1-2 colors to dye the threads, and paint the remaining shades along with the body
With the help of thread printing, children get ideas about different color combinations
Sheep made of wool threads
An interesting applique made of woolen threads has the shape of a sheep. This craft is simple and can be done by both schoolchildren and preschoolers, the main thing is to prepare a neat template or you can print it from the Internet.
You will also need wool threads, scissors, PVA glue, a sheet of cardboard, 2 black beads.
Work plan:
- Cut out the drawn or printed drawing of a sheep.
- Cut wool threads into small pieces.
- Glue the threads to the template, press down a little with your hand. If there are gaps, fill them with pieces of thread.
- Glue the blank onto a sheet of cardboard.
- Glue 2 beads as eyes.
- Using your hands, smooth out the appliqué a little so that the sheep turns out to be more voluminous and fluffy in appearance.
Stages of working on a drawing using thread writing technique
Let's give an example of working in the thread writing technique using whole thread and pieces.
"Flowers"
For drawings with threads on colored paper, it is better to use silicate glue so that there are no marks left after drying.
Instructions:
- “We place a sheet of green paper vertically, and use glue to make a “path” for the stem of the flower.”
- “We take a green thread and lay out the stem with it.”
- “We make large drops of glue and put leaves on them, placing the threads in a circle, as if wrapping a ball.”
- “Again we make large drops of glue, distributing it evenly over the entire area of the bud of the future flower.”
- “We fill the element with pieces of thread, laying out first one layer, and then the second in the other direction.”
- “Add a couple of green threads for the calyx of the flower.”
Photo gallery of drawings with solid thread
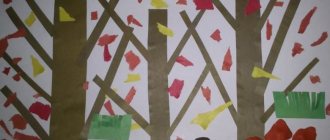
The house and tree can be made without pre-applied contours
In this drawing, folding threads in a spiral and in a circle is practiced.
Such plots do not require small folds on the threads
Orchard
To create an applique in the form of an orchard, you should prepare embroidery threads of different colors, PVA glue, a pencil, a sheet of cardboard, scissors, and colored pencils.
Step-by-step work plan:
- On a sheet of cardboard, draw 3 trees in a fairly orderly manner.
- On the crown of one tree draw small balls - these will be cherries, on the other a little larger - apples, and on the third draw pears.
- Take brown threads and cut into pieces, approximately 0.7-1 cm.
- Glue threads as trunks to all trees.
- Take a dark green thread and paste it around the rim of the crown of each tree.
- Cut light green threads into 0.5 cm pieces and glue them along the entire perimeter of the tree crown.
- Cut red and yellow threads into small pieces. Place apples in red and pears in yellow.
- Use colored pencils to draw the sun, clouds, and grass.