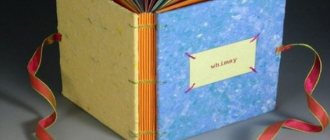
How to make paper with your own hands at home from newspapers, grass and other available materials, which your child can then use for various paper crafts, read our article with a detailed master class on making paper.
An experiment with making paper with your own hands combines three important and interesting components for a child: science, creativity and design. This method relatively simply describes the process of making paper from inexpensive and accessible materials that can be found at home and in the country.
An important role here is played by the fact that paper making in this master class can be adjusted to the child’s wishes. Do you want something girly? Try making glitter paper. Need to do something about the excess plants in your garden? Make paper from plants. Do you have a lot of scraps of unnecessary paper that you hate to throw away? Mix them in paper in patchwork style.
The paper making process itself is not complicated, but quite labor-intensive, requiring materials and preliminary preparation.
To make your own paper you will need:
For a special frame shape:
- 2 wooden frames or two embroidery hoops;
- fiberglass;
- stapler or staple gun and paper clips;
- hammer and nails.
For paper:
- used paper;
- blender;
- warm water;
- pieces of felt;
- large flat tray;
- sponges;
- newspaper;
- large plastic container (basin) - it should accommodate the frame and deckle in a horizontal position and allow your hands to hold the frame;
- Velcro tape (optional).
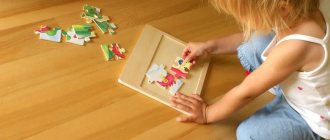
How to make a frame and deckle for DIY paper crafting
What is this deckle? This is a paper form, a special format frame. The hole in the deckle will determine what size the finished piece of paper will be. Imagine cupcakes that spread without a tin. The same will happen with paper. For the master class, the “you will need” item listed two ordinary wooden frames. Buy ones that don't have a layer of laminated paper on them, otherwise it will start peeling off the frame once submerged in water.
To make a paper craft frame, follow these steps:
- Remove the packaging and cardboard backing from the frame. Cut a piece of fiberglass about 1/2 inch smaller than the edge-to-edge size of the frame.
- Using a staple gun or staple gun, attach the fiberglass to the frame. Make sure it fits snugly. Try to nail so that the fiber does not sag in the middle.
- Secure the frame joints by driving a nail into each edge. Inexpensive frames are often glued only at the joints and fall apart after repeated exposure to water.
A deckle is the same frame, only without a backing.
How are books made?
If you love to read, you are probably very interested in how books are made. Let's take a walk around the publishing house and printing house, and I'll tell you the secrets of making books.
So, after the author writes the text and the editor of the publishing house approves it, the proofreading process . The work is checked for errors. Ideally, the proofreading team reads the text several times. After this, illustrations are selected for the book.
Then the layout . Using a special computer program, the layout designer selects the book format, margin size, types and sizes of fonts, and determines the location of illustrations and text.
The next stage is called color separation . Did you know that to print a fashion magazine cover you only need four colors: blue, pink, yellow and black? Therefore, now the designer must divide all illustrations into four components.
Next, a printing form - the digital image is transferred to a special film and developed.
The most important stage is printing the book . Using rollers on a printing machine, the ink is rolled out to a thin layer, fed onto a printing plate, which rotates and applies the image to a continuous roll of paper.
Interesting! Printing house workers can print several thousand sheets in one shift.
Next, the paper is cut, folded into notebooks and stitched.
It is difficult to imagine any book without a cover. Therefore, the next stage is creating the “face” of the future book. If the cover is ready, it is placed on the book block and trimmed. If a hard cover is being made, the book is trimmed before the cover is glued on.
That's all - the book is ready to delight the eyes of admiring buyers, all that remains is to pack it. You can see with your own eyes how books are made in the next video.
Preparing a “station” for making paper yourself at home
Before you start making your own paper, you need to set up an assembly line to ensure the process goes smoothly. Arrange all the necessary equipment in stages:
Stage 1. Blender: This is where warm water comes in handy. Stage 2. Basin: it should be filled with warm water about 7-8 cm. Also at this stage you will need a frame, deckle and Velcro tape. Stage 3. Draining the water: the felt, flat spacer and sponges should be right here, right next to the basin. Stage 4. Drying: Lay out several newspapers to dry the paper.
Now you're ready to make paper! Stock up on warm water, 8-10 sheets of scrap paper and start making paper with your own hands with your child.
Wooden paper: what is it made from?
Paper is consumed by people in huge quantities. One hundred and fifty kilograms per person per year. Read the article about what and how paper is made from.
Historical information
Long ago, in 105 BC, Cai Lun, an imperial subject from China, made paper from mulberry tree. He made a mixture of his wood, hemp, rags, added wood ash and put it all on a sieve to dry. After which I polished the dried mass with a stone.
The result was paper made from wood, and the Chinese eunuch Cai Lun became the first author of its technology. The Chinese think so. But scientists have a different opinion. This is due to the fact that archaeologists often find paper scraps in China that date back to an earlier period.
Raw materials
Paper is made from wood pulp, other fibers of plant origin: cane, rice, straw, hemp, as well as from rag waste, waste paper and other materials. To obtain cellulose, wood from different tree species is used. Wood pulp can be produced in several ways.
The mechanical method is considered the most economical. At a wood processing plant, the wood is crushed into crumbs. It is mixed with water. Cellulose paper obtained in this way is fragile, and newspapers are made from it. High quality paper is made from cellulose, which is produced using a chemical process. To do this, small chips are cut from a wooden beam. It is sorted by size. Then they are immersed in a solution with chemicals and boiled in a special machine. After this, it is filtered and washed, as a result of which excess impurities are removed. This produces paper raw material called wood pulp. It is used to produce paper for magazines, books, brochures, and high-strength wrapping materials.
DIY sawdust paper
Sawdust from pine or spruce is filled with water and boiled for exactly one day. Caustic soda is added to the water. If you don't have it, you can use baking soda. After cooking, the mixture is washed with water and squeezed out. Then the sawdust is again poured into a pan of water and put on fire. As soon as it boils, the pan is removed from the heat and its contents are crushed using a mixer. The result is a mushy mass of uniform consistency.
While the sawdust is boiling, a frame is made, placed on a pallet, and gauze is stretched over it. The mass is poured onto the prepared frame and distributed evenly over the entire surface. Excess water will drain into the pan. But to quickly remove moisture, it should be blotted with absorbent wipes. Then the frame is turned over and the sheet obtained from the mass is easily separated from it.
The sheet must be covered on both sides with paper or newspaper and placed between the boards, pressed on top with something heavy. He should lie under such pressure for about five minutes. After this, the sheet is carefully placed on foil and dried in the sun, in the oven, near the radiator.
Compound
Wood paper is made from wood pulp obtained using a mechanical production method. Sometimes other materials are used as a basis. This paper can be made even at home. But it will be of low quality.
Nowadays, cellulose is produced chemically using technological processes. To obtain high quality paper, it must contain the following ingredients:
- The sizing is hydrophobic, which prevents ink from spreading on the paper. They do not appear on the reverse side of the sheet. Rosin glue is used as sizing.
- Resin, glue or starch. Thanks to these substances, wood paper becomes more durable and resistant to various influences on it.
- Kaolin, talc or chalk make paper less transparent and increase its density.
Types of wood
It can be hard and soft. The first type of wood is obtained from coniferous trees: pine, fir, spruce, sequoia and hemlock. Softwood is obtained from broad-leaved species: beech, maple, poplar, birch, oak. In regions with a tropical climate - from teak, ebony and mahogany.
Paper made from these types of wood is highly valued. But, unfortunately, they are growing slowly. They are being cut down more than they are being reproduced. Therefore, there are fewer valuable trees in tropical forests.
Paper production today
Real paper is considered to be that which is made from a mass, the individual fibers of which are obtained by soaking cellulose raw materials. The mass is first mixed with water and then scooped out with a mold over which a mesh is stretched. Excess water drains off, the mass dries out, and a sheet of paper is obtained. This is how Chinese citizen Cai Lun received his first piece of paper. During this time, although about two thousand years have passed, no significant changes have occurred.
Today, paper production is carried out in modern factories with huge workshops, on the equipment of which various operations are performed. After obtaining wood pulp, the fibers are given shape and structure, for which paper raw materials are mixed with adhesives and resins. The glue repels water from the paper, and the resin prevents the ink from bleeding. Paper made of wood, the photo of which is presented for review, does not require such processing for printing purposes, since printing ink does not spread.
The next step is coloring. To do this, the paper is placed in a mixer with pigments or dyes. The mushy mass then enters a machine called a paper making machine. After all the processing stages in this machine, the mass becomes a paper roll, which passes through many rollers: one squeezes out the water, another dries the tape, the third polishes it.
At the next stage, the paper is sent to the wet pressing workshop. Here the fibers are degreased and further compacted. The result is dry white wood paper, wound into huge rolls that are sent to the printing house. There they are cut according to the required sizes.
fb.ru
How to make paper with your own hands at home
A step-by-step master class on how to make paper with your own hands from waste paper.
Stage one - blender
Tear the paper into small pieces and pour them into a blender. Add water there so that its level is slightly higher than the level of the paper. Close the blender with a lid, hold it tightly and grind the paper. You should end up with a papery pulp.
Stage two - basin
Pour the paper pulp into a bowl and gently stir with your hands. Take the frame with the grain facing up and cover it with deckle. Using Velcro tape, you can secure the frame and deckle, or hold them firmly with your hands.
We lower the frame and deckle into a basin with paper pulp and water. Carefully move the frame and deckle to grab the mush. Your goal is to have as even a layer of paper pulp on the fiberglass as possible. Moving quickly and harshly will result in an uneven layer, and not applying enough pressure will make the layer very thin, so this requires patience and practice. Once the layer of paper pulp is ready, carefully remove the frame and deckle from the bowl in a horizontal position. Let the water drain.
Stage three - draining the water
Remove the frame from the bowl. Remove the Velcro tape and deckle. Place a piece of felt on the wet future sheet of paper and carefully turn the paper over onto the tray. Using a sponge, squeeze the water out of the paper through the fiberglass. Now you need to very carefully remove the fiberglass. The thinner the paper, the more likely it will stick to it. If this happens, put the frame back on the tray and try to soak up a little more water with a sponge.
Stage four - drying
Now the sheet of paper should lie on top of the felt. Transfer it in this form to the drying area. Carefully turn the felt over onto the laid out newspaper. The wet paper should now be under the felt. Carefully lift one corner of the felt and remove the entire piece. If the paper is still sticky, you haven't removed enough water. Take the sponge again and blot the paper through the felt. Leave the piece of paper to dry overnight. Or you can iron it through newspaper.
Tips and tricks for making DIY paper at home
- The first sheets will be thicker, and the subsequent ones will be thinner, as the paper pulp will be consumed.
- The thinner the sheet, the more carefully you need to remove it from the frame and peel it off the felt. The paper can tear easily.
- It is easier for children to work with thicker sheets of paper.
- The paper pulp will lighten in color as it dries, so don't worry if you end up with a gray colored mess in the blender.
- To even out the dried paper, you can iron it. Paper with confetti and glitter cannot be ironed, and for regular paper you should not use high temperatures so as not to burn the paper you make yourself.
- Do not mix paper that may fade, otherwise you will end up with a grey-brown incomprehensible mass.
- After repeated use, the fiberglass will begin to sag, so it needs to be reattached more tightly.
History of paper for children
M. Ilyin The Chinese invented paper. About 2000 years ago, when the Greeks and Romans in Europe were still writing on Egyptian papyrus, the Chinese already knew how to make paper. Their materials were bamboo fibers, some herbs and old rags. Having placed the material in a stone mortar, they ground it with water into a paste. From this pulp they cast paper. The mold for casting was a frame with a mesh bottom made of thin bamboo sticks and silk threads. After pouring a little slurry into the mold, they began to shake the mold in all directions so that the fibers intertwined and formed felt. The water drained, and a damp paper sheet remained on the mesh. It was carefully removed, placed on a board and dried in the sun. A stack of sheets was finally pressed under a wooden press. The Chinese made paper using this manual method. These people are amazing! From a paper lampshade to a book or a porcelain vase, the Chinese put a lot of patience and ingenuity into everything. The Chinese, before the Europeans, came up with porcelain, printing, gunpowder, and paper. Many years passed before paper reached Europe from Asia. This is how it happened. In 704, the Arabs conquered the city of Samarkand in Central Asia. Together with other booty, they took away the secret of paper making from there. Paper factories appeared in the countries conquered by the Arabs: Sicily, Spain, Syria. There was such a factory, by the way, in the Syrian city of Mambidshe, or, as the Europeans pronounced it, Bambitsa. Along with other oriental goods: cloves, pepper, fragrant oils, Arab merchants brought “bambitsa” - paper made in the city of Bambitsa - to Europe. Our word “paper” probably came from this word. Baghdad paper, which was sold in the form of large sheets, was considered the best. Many varieties were produced in Egypt, ranging from huge sheets of Alexandrian paper to tiny leaves that were used for pigeon mail. This oriental paper was made from old rags. It looked yellowish, with dark spots. Even pieces of rags were visible here and there. Centuries passed before Europe had its own paper mills, or “paper mills,” as they called it then. In the 13th century, such mills could already be found in Italy and France. It sometimes happens that an old document or historical record falls into the hands of a historian, in which the year of its compilation is not indicated. How can I find out this year? The scientist turns to the paper itself for clarification: he holds it up to the light. And then he says: “This letter was written no earlier than 1317, because the paper on which it was written was made in 1317; but this letter was written so many years later.” How did the scientist know this? And what does he see when he holds the paper up to the light? He sees a transparent watermark on the paper. Each master had his own watermark, his own brand. Often the master, in addition to the mark, also put down the year and his last name. There were a wide variety of stamps: a stamp could be the head of a man, and half a deer, and a tower, and a camel, and a glove, and a unicorn, and a lion, and a mermaid, and a winged lion with a bird's head, and a Pope crowned with a tiara, with a key in hand. The watermark was obtained in this way. The paper was cast in a mold with a wire mesh bottom. A figure was also made from wire, which was placed on the bottom of the mold. Where there was wire, the paper was laid out in a thinner layer than in other places. Therefore, when you hold the paper up to the light, you see transparent stripes in the place where the wire mesh was, and a watermark where the wire figure was. The oldest watermark is a circle. When you see this mark on the paper, you can immediately tell that the paper was made in 1301. Paper came to us in the 14th century through Novgorod, where it was brought by Hanseatic merchants. This paper was Italian. In the 17th century, the traveler Barberino visited Moscow. In his diary he writes: “They also decided to introduce paper making and even make it, but they still cannot use it because they have not brought this art to perfection.”
The first Russian paper mill was built on the Ucha River, 30 versts from Moscow. But she didn't work for long. A hundred years later, a paper mill was built again, this time on the Pakhra River, next to the flour mill. The papermaker's assistant was the "grain miller." They started making paper, but in the spring of 1657 “water came from the mountains and began to spoil the dam.” The mill was destroyed. Instead, they built another one, on the Yauza River. The paper was made at this factory in a large size with a watermark depicting the coat of arms of the city of Amsterdam. This is because our “paper millers” tried to make paper based on the Dutch model, which was then considered the best. In the 17th century, we were already using paper in large quantities. It printed books that were sold in the book row in Kitay-Gorod. On it, in the administrative offices, endless statements and formal replies, memorials and decrees, petitions and searches were written and rewritten. Along with the paper, paperwork also appeared, like its shadow. Often some “detective case about witchcraft and corruption” dragged on for years. “And the cases were glued into columns and collected into large annual pillars, which, lying in the chambers, became unstuck and rotted due to dampness, and mice spoiled them. And because of this, many old files, reports and decrees, lying around in different places in negligence, were lost and completely disappeared.” This is what it says in one old “charter” - from 1700. One traveler left us a description of the Moscow office of the 17th century: “Meanwhile, I looked at the office rooms located in the same building. They are all under arches, with small windows and look like dungeons. This time there were only clerks there, sitting two by two on boxes, chairs and benches, some higher, others lower, without any order. I even saw one kneeling. They were all busy writing or sorting out scrolls of papers, which they unfolded and rolled up with great dexterity. These scrolls are long strips made up of sheets of paper, torn and glued along them.” Paper came to us at this time mainly from Holland. Peter I ordered the construction of a paper mill near Duderhof in 1716, and in 1720 a second “mill” was built behind the “Galern Yard”. The paper of these “mills” can be recognized by the watermark: like on the coat of arms of St. Petersburg, anchors were depicted on it. A decree was issued that the paper would be sold at the Admiralty, and this was announced publicly with the beating of drums. Of course, the story of paper does not end there. Much could be said about modern paper mills, where gigantic machines operate - the largest machines in the world, about pulp and paper mills, which, like a fairy-tale giant, daily “absorb” an entire small grove of trees. But this is a separate topic. Here we only talked about the “infancy” and “adolescence” of paper.
How to make your own paper from plants
This paper smells amazing! Small flowers and leaves will add natural magic to the paper, and for the smell you need to choose aromatic herbs: oregano, fennel flowers, marigolds, curry, rosemary and mint. To make herbal paper, collect a cup of a variety of plants and add to the paper mixture. To make it more beautiful, tear the grass finely and separate the petals. If there are still natural materials left, make a flower stained glass window from paper with your child.
Presentation for the lesson on the topic: Presentation “From wood to paper”
Slide 1
State budgetary preschool educational institution kindergarten No. 61 of a combined type, Kolpinsky district, St. Petersburg “FROM WOOD FROM PAPER” Mekhnina Olga Nikolaevna Teacher of the highest qualification category
Slide 2
Goal: To introduce and interest educators in the production and use of paper pulp. Reveal to educators the significance of this work in the cognitive and artistic activities of children. Help develop creative abilities in teachers.
Slide 3
Journey into the world of beauty In the silence of the forest, listen to the sound of the pond and the breeze. It is gentle and very quiet, like the wings of a moth.
Slide 4
Landing "Plant and grow a tree!" A tree is planted soon, but not soon its fruits are eaten.
Slide 5
Plants under our protection
Slide 6
Integration of this topic in educational areas: Cognition Health Artistic creativity Physical education Safety Reading fiction. Socialization of literature Labor Communication Music
Slide 7
Cognitive - speech development Cognition Teacher's story with discussion Why trees need leaves. Can frost kill a tree? Inside a tree. Where do trees live? Conversation Journey into the past of the book. From seed to tree. Creating a collage “From tree to paper” Experiments: The root is the stability of the tree. How tree roots absorb water. The wind disperses trees to new places. Search activity “Find a leaf that fell a long time ago...yesterday...today.” “Count the birch trees around the kindergarten.” “How many coniferous trees grow on the territory of the kindergarten.” Experimenting Paper from napkins; Waste paper; Paper pulp. Fun mathematics Educational games, problem situations based on FEMP. Creation of the album “In the World of Paper” Communication Conversations “The country in which we live. Nature of Russia." "Needs of plants." "Nature and the man-made world." "Books as a gift." A story about the history of the creation of the book. "About caring for nature." Compiling a descriptive story based on I. Shishkin’s painting “Morning in a Pine Forest.” Compilation of stories "If I were a tree." Guessing riddles about trees Writing poems about trees; Literary quiz “Trees in Fairy Tales” Reading fiction “Reading is the window through which children see and learn about the world and themselves.” V.A. Sukhomlinsky Reading V. Zotov “Forest Mosaic” I. Tokmakov “Conversations”. I. Sokolov-Mikitov “Russian Forest” M. Prishvin “Conversation of Trees.” V. Bianchi “Forest Tales”. E. Sinitsina “Clever Tales”, “Apple”, “Pine Cone”. P. Mikhalkov “Christmas tree” Retelling of V. Bianki “Teremok”. Learning by heart “Song of Oak Seedlings.” “Wind and Leaves.” “Birch.”
Slide 8
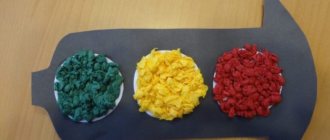
Social and personal development Safety Reading, conversation, looking at illustrations “When you are in danger”, “How and with what we breathe”. "Rules of conduct in the forest." Socialization S/r game “I am visiting the library”; S/r game “Forester”. D/i “Library”, “Man + nature = amazing things”. “What is paper for?” “Who is the odd one out”, “Loto”. Educational games “Chain”, “You are a part, I am the whole”, “What was, what will be”. Construction and construction game "Building an ecological city." Outdoor games “One, two, three, run to the tree”, “Branch, branch, where is your baby.” “Guess the tree”, “Hurry up to escape.” Work, observation, duty, work assignments Observation of trees; Caring for indoor plants; D/i “Who needs what for work.” Making Attributes for s/r games; Landscape production; Making a “volcano”; Making paper for postcards; Making animal figures from paper dough. Handmade from natural material “Sunflowers”; "A flower for mom."
Slide 9
Artistic and aesthetic development Artistic creativity Examination of reproductions I. Levitan “Golden Autumn”, A. Savrasov “The Rooks Have Arrived”, I. Shishkin “Morning in a Pine Forest”, “Birch and Rowan Trees”. A. Kuindzhi "Birch Grove". Drawing using techniques: leaf printing, spraying, signet imprinting - “Golden Autumn”, “Rowan Branch”. Application “Branch with autumn leaves”; "Maple" using paper pulp; Modeling “Fruits”, “Forest in autumn dress”. Paper design “Heart”, “Flower for Mom”; “Books - babies”; Postcards using paper pulp." Music Listening Tchaikovsky “The Seasons”. F. Liszt “The Sound of the Forest”. We fantasize and improvise “Paper Carnival” (introducing children to rustling sounds, object and musical instruments that produce them). We voice the poems “Talking of Leaves” by V. Berestov (to attract children’s attention to the beauty and richness of the sounds of the surrounding nature). Round dance “There was a birch tree in the field...”. “Wooden stories” (introduction to wooden tools).
Slide 10
Physical development Physical education Morning exercises, movement exercises, physical education classes of a thematic nature “If I were a tree” (according to the exercise of Maura O Conner) Health Got up in the morning, washed, put myself in order - And immediately put my planet in order. Antoine de Saint-Exupéry The Little Prince Conversation: “Help nature!” Working with parents Great importance is given to working with parents. Joint events raise the authority of the family, unite children, parents and us teachers. Once a quarter, the group publishes an environmental newspaper for parents, “Toward Nature with Kindness.” Our parents participated in collecting waste paper. Together with the children we made crafts from natural materials. With the help of their parents, children replenish the collection of words “Find a beautiful word about a tree.” Folders about trees are published every month.
Slide 11
Don't stop being surprised!
nsportal.ru
How to make DIY paper with confetti at home
Instead of using white paper, reach for multi-colored paper scraps, like old Christmas lights and confetti from a kid's birthday party. After mixing most of the paper into the mass, add a few extra colored scraps and spin in the blender a couple more times to get larger pieces of colored paper into the product. A great way to recycle paper yourself.