Paper applique
Everyone has such a material as paper in their home. Therefore, making our Traffic Light will not be difficult.
What we need:
- Sheet of cardboard
- Colored paper
- PVA glue
- Scissors
- Stationery knife
- Scotch
- Gouache
- Brushes
- Sippy cup and water
So, let's get started:
- First we need to take a sheet of cardboard, it should be rectangular in shape.
- Dip the brush into water and then into black paint and decorate our cardboard.
- While the sheet dries, let's work on colored paper. We need certain colors: red, yellow and green. It is these flowers that our craft consists of.
- Take scissors and cut out circles. To make them even, you can use a compass or use improvised objects.
- This could be a glass or mug.
- You can add originality to our traffic lights and cut them into different shapes, so that you can then glue them onto our signal circles.
- They can be in the shape of hearts or small flats with which you can decorate everything.
- You can use glitter or eggshells this way. It all depends on your imagination and the imagination of your child. As shown below in the picture.
- In the meantime, the cardboard has dried and we can connect all our parts.
- You need to make marks on the cardboard so that the circles are glued at the same distance from each other.
- Then we smear the colored circles with glue and carefully glue them each into place.
- There is red at the very top, yellow in the middle, and green at the bottom. We wait. Let it dry. And look what we got.
DIY “Traffic Light” applique made from paper. Master class with step-by-step photos for children
Master class with step-by-step photos for children 6-8 years old.
Craft “Traffic light” made of paper with origami elements Author: Elena Borisovna Tarazanova, teacher of additional education, Municipal Budgetary Educational Institution of Preparatory Children and Youth Children and Youth “Our Harbor”, Tomsk. Description: Joint activities with your child are a wonderful alternative to computer games and cartoons. Folding origami from paper is a fun and useful activity for both adults and children. This is a wonderful exercise for developing fine motor skills, perseverance, imagination and spatial thinking. After active and noisy games, you can interest and calm the child with the help of a simple craft. The great advantage of paper crafts is the accessibility of this type of creativity. The classes do not require large expenses. Purpose: This master class may be interesting and useful for educators, primary school teachers, additional education teachers, and parents who are passionate about creativity. Can be used for classes at school, kindergarten, summer camp and home leisure. Creative work can be used to conduct integrated lessons with children on traffic rules, as well as to decorate a school office, a group in a kindergarten, a home room, or for participation in exhibitions and competitions. Goal: Mastering the techniques of creating an application with origami elements. Objectives: Educational:
- expand children's knowledge about traffic rules;
- learn to complement the image with details that make the craft more expressive; — learn how to create paper crafts using the origami technique. Developmental:
- develop the ability to work with paper (bend a square sheet of paper in different directions, ironing the folds well);
— develop the ability to work with scissors; - develop fine motor skills of fingers, precision of hand movements, eye; - develop imagination and creative abilities. Educational:
- cultivate accuracy and hard work;
- cultivate interest in creativity. Riddle: At the crossing strip, On the side of the road, A three-eyed, one-legged beast, Of an unknown breed to us, With multi-colored eyes, Talking to us. The red eye looks at us: - Stop! - says his order. The yellow eye looks at us: - Be careful! Stop now! And green: well, go ahead, Pedestrian, to the crossing! This is how the Silent One conducts his conversation... (Traffic light.) Poem: If the red light is on, The traffic light tells us: Stay still!
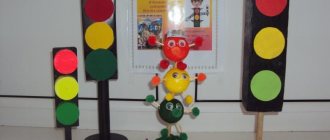
Do not go! Wait a little. The bright yellow light is on, “Get ready,” it says. The traffic light warns that it is switching the light. He turned on the green light and allowed us the path forward. All the cars are waiting together: Children and mothers are coming. Application "Traffic light" made of paper with origami elements
Necessary materials: Colored paper, black cardboard, scissors, glue pencil, felt-tip pens, eraser, pencil, templates, product sample, illustrations, poems, riddles.
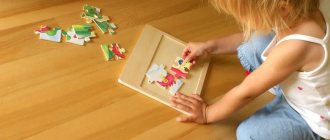
Make a traffic light template yourself or you can print it from the Internet in any shape you wish. Take black cardboard. On the reverse side, trace the traffic light template along the contour.
Cut out the traffic light part. To make white circles, take three squares of white paper. Place a circle template on the aligned squares.
Trace the circle template.
Cut out the details. It turned out to be three circles. Glue 3 white circles onto the traffic light part.
To make the dog head part, take a square of paper and bend it diagonally.
Fold the resulting part in half again. In the resulting triangle, the upper corners need to be bent down, departing the same distance from the middle (fold line).
The ears can be folded back further and made long, or left small and protruding.
Make 3 dog parts of different colors - red, yellow, green.
Draw and cut out 6 circles for the eyes from white paper.
Glue on the eye details for each dog.
Look carefully at how the smile is drawn in accordance with the color of the emoticon.
Draw faces in accordance with the traffic light signal. The red dog has a stern look (you cannot cross the road).
The green dog has a kind look (you can safely cross the roadway). Yellow color warns that the color of the traffic light will change.
Glue the parts of the dogs in a certain order. The application is ready. Creative success! (The poem and riddle were taken from Internet sites)
We recommend watching:
DIY traffic light applique for older children. DIY paper applique for kindergarten. Traffic light Construction from waste material. Traffic light. Master class for children 5-6 years old DIY “Traffic light” application for children of the senior preparatory group
Similar articles:
Traffic light - do-it-yourself tablet. Master Class
Plasticine traffic light
What child doesn’t like to stretch their hands with plasticine? But don’t just stretch it, create something. In this case we will make a traffic light. For this we need:
- Plasticine
- Chupa Chups stick
- Pen refill
Progress:
- First we need to make the body of our road assistant.
- Let's take a piece of black plasticine and knead it thoroughly, giving it the shape of a rectangle.
- Next you will need to use red, yellow and green plasticine. From these pieces you need to roll into small circles.
- Then, carefully take them with your fingers and flatten them a little.
- And at the end we assemble the traffic light craft. Glue the circles to our body.
- A traffic light, as everyone knows, is mounted on a pole; you can use a candy stick or a pen rod as a pole.
- The fake is ready.
Edible traffic light
Well, everything here is generally very simple. All children love sweets. And here, when making crafts, they can not only enjoy themselves, but will also forever remember the role a traffic light plays in traffic.
- For the base we need a wafer or cookie. Make a rectangular shape and fill it with chocolate.
- Then add red, yellow and green caramels. You can use M&Ms.
That's all! Looks very tasty.
Traffic light from a plastic bottle
This fabulous option is very easy. Let's turn on our imagination. We will need:
- Plastic bottle
- Brushes and paints (preferably gouache)
- Colored paper
- PVA glue
- Scissors
Work progress:
- We choose a plastic bottle, it is better to take the one with a longer neck.
- We paint it a neutral color (meaning not red, not yellow, not green). Let it dry.
- Next, we cut out circles from colored paper for the traffic light itself and details for our fairy-tale character. These are eyes, mouth, nose, ears, hands.
- The bottle is dry. Carefully glue the finished parts and, of course, the circles, making sure that the distance between them is the same.
- But our hero cannot be without hair! We also make hair from paper. Cut into thin strips and twist with scissors.
- We also make the cap out of paper. And look what happened. To fully complete our hero, we will add a rod or a road sign to the handles.
For older preschoolers
For children 6-7, it is better to complicate the task so that the kids themselves cut out shapes for traffic lights from the proposed stencils and draw facial expressions on them. To interest them more, you can offer to draw the faces of emoticons or emojis, which are so popular nowadays, on the craft mugs.
Traffic signals can be decorated with various elements. To highlight a lit signal, the rest can be shaded in the form of a hash mark. Or, conversely, you can emphasize the desired color by gluing or drawing rays around it.
At older preschool age, you can already safely create trimmed appliqués. The applique also has a wonderful combination with origami. Traffic signals will look original in the form of figures created using folded sheets of multi-colored paper.
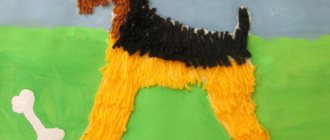
This combines 2 types of craft making techniques and increases children’s interest. An example of such a product is a traffic light made from cats.
Fabric craft
This version of the traffic light is more suitable for girls and real needlewomen. A sewn fake can also serve as an educational toy if the circles are made with Velcro.
So, let's begin:
- You need to take rectangular pieces of black fabric and lay a small layer of foam rubber between them. Sew it together.
- Next, cut out circles from felt (red, yellow, green). We sew them along the edges. You need to sew one part of the Velcro to the traffic light body itself, and the second part directly to the circles.
- For a more interesting design, you can make a fabric lid on top. Having previously divided it into three parts. Thus, each color will be opened separately, or all at once. The fabric craft is ready.
Themed traffic light
We all love balloons, but kids especially. Our traffic light is made from these and can be used as an educational game.
Any child will love a party dedicated to Traffic Rules.
For production we need:
- Airy small black balls
- Balls with more signal colors
- A thread
- Rack
Work progress:
- The stand can be made from long balloons.
- First, we inflate black balloons and tie them to our finished stand. We try to give it a rectangular shape. We tie red, yellow and green balls in the middle in the correct order.
- The airy structure can also be decorated with balloons in the shape of cars or road signs, which correspond to our themed party.
Summary of a lesson on application in the middle group. Traffic light
Abstract of GCD on application using cotton pads for non-traditional drawing “Traffic light” in the middle group
Educational objectives: To introduce the meaning of a traffic light and its signals. Reinforce the names of red, yellow, green colors, consolidate the ability to draw in an unconventional way. Developmental tasks: Develop visual perception, fine motor skills. To develop knowledge of the rules for crossing the street at a traffic light, spatial orientation, and the ability to act on a signal. Develop connected speech. Educational objectives: To foster a culture of behavior for children on the roads. Be careful when working with paints. Methodical techniques: Introductory conversation, demonstration, explanation, search questions, reminder, comparison, artistic expression, individual assistance. Preliminary work: Reading and looking at pictures on safe traffic on the roads, guessing riddles, memorizing poems about traffic lights, listening to a song about traffic lights, watching a presentation about traffic lights and traffic rules. Equipment and materials: Demonstration: Layout of a traffic light, pictures of road signs, musical performances, presentation - a game on the theme “Friendship of road signs with traffic lights and pedestrians.” Handouts: Cardboard template of a traffic light, cotton pads, paints, brushes, glue – pencil, sippy cups.
Progress of the GCD
Educator: guys, guess the riddle and you will find out who will come to our lesson: He always has three eyes, He does not look with all of them at once: He will squint any two eyes, And one is not sleeping, he is on duty. He says with his eyes: “You can go! ", "The path is closed! ", Il "Attention! Wait! " Who is this guard? Children: Traffic light Teacher: Well done. Here's another mystery. Here's a three-eyed fellow. How cunning he is! Whoever comes from anywhere will wink at both this and that. Knows how to settle a dispute, Multicolored... Children: traffic light! Educator: That's right, well done ( the teacher shows the layout of the traffic light
).
Educator: Guys, what is a traffic light for? ( children's answers
)
Educator: now let's play the game “Yes and No.” I will ask you questions, and you listen carefully and answer “yes or no.” Are traffic lights familiar to all children? Does everyone in the world know him? Is he on duty by the road? Does he have arms, legs? There are flashlights - three eyes?! Does he turn them all on at once? So he turned on the red light. Does that mean there is no movement? Which one should we go to? Blue - can it be an obstacle? Shall we go to yellow? On green - binge drinking? Well, we’ll probably stand on the green then, right? Is it possible to run on red? Well, what if you're careful? And then, of course, you can walk in single file? I believe my eyes and ears. The traffic light is familiar to all of you! And, of course, I am very happy for the literate guys! Educator: Three traffic lights: red, yellow, green regulate traffic (the red light comes on). Guys, do you think it’s okay to cross the road now? Children: You can't. Educator: Why not? Children:
Red color prohibits.
Educator: His red eye will shine - He doesn’t allow us to go, And now what traffic light is on? (yellow light comes on). Children:
Yellow.
Educator: The yellow color is in the middle, And it has its own picture: Pedestrians are all standing, Waiting, watching, Like the color of the sun in a traffic light Replaced by green. It warns drivers and pedestrians that the signal is changing and they must be very careful. Guys, do you know who is called pedestrians? ( Children think
).
Pedestrians are people walking along the street. What traffic light is on now? ( green light turns on
).
Children:
Green.
Educator: Well done! And the green eye will light up - Walk boldly, pedestrian! Where can a pedestrian cross the road when the light turns green? What is the name of this special path on the road? (children's answers). Children:
at what traffic light can you cross the road?
Children:
On green.
Educator: Which one is not allowed? Children:
On red.
Educator: That's right, guys. How are the colors arranged on a traffic light? Children:
red on top, yellow in the middle, green on the bottom.
Educator: let’s remember where you can cross the roadway. Only in designated areas that have pedestrian markings ( zebra or stripe
) and a “Pedestrian crossing” road sign.
Where there are many cars and lanes for their movement, crossing points are equipped with traffic lights. Now I suggest you play the game pedestrians, cars and traffic lights. ( The children of one half of the group wear hats with pictures of different cars, the other half wear pedestrians. The teacher has in his hands a model of a traffic light that lights up its lights. There is a pedestrian crossing on the floor made of ribbons.
) At the traffic light signal, each team performs its action.
The task of pedestrians is to have time to cross the pedestrian path at the green light so as not to be hit by cars. The task of cars is to go through a red light without hitting pedestrians. Educator: - And now, guys, I suggest you make your own traffic lights. Today we will create them using the appliqué method, using unconventional drawing. You have traffic light templates on your desks. Your task will be to place three eyes on the traffic light. Red, yellow and green. But these colored eyes will be unusual. Let's see what else is on your tables. Children:
paints, cotton pads, brushes and glue sticks.
Educator: Well done, you named everything correctly. Now, think and tell me what we will use today to depict the three eyes of a traffic light. (children's answers). Right. What shape are cotton pads? Guys, why are they called cotton wool? (children's answers). Examining a cotton pad. What else can we use these cotton pads for at home, guys? ( children's answers
).
Do they suit our traffic light, do you think? Maybe you already guessed what we will do? ( children's answers
).
Educator: That's right, we will glue cotton pads onto our traffic light and then paint them with paint. Children do their work to the music “Traffic Light Song”.
Educator: Guys, how beautiful your traffic lights turned out. Educator: Now let’s play a game for attention. On red - stop! On yellow - wait! And when it turns green, go ahead! The game is played using a mock-up of a traffic light and switching signals on it. When the color turns green, children lightly stamp their feet, imitating walking; when the color is yellow - clap your hands three times (attention); When the color is red, complete silence is observed. The game is played until the rules for following traffic signals are learned. You did a very good job today, and for this the traffic light brought you this three-color treat.
We recommend watching:
Summary of the GCD for the application in the senior group on the topic: Winter Integrated lesson on traffic rules in the middle group of the preschool educational institution Summary of the lesson - walks on the traffic rules in the middle group: Observation of city transport Lesson on traffic rules in the middle group. Rules of conduct in transport
Similar articles:
Summary of a lesson on traffic rules in the middle group on the topic “Rules of conduct in public transport”
Summary of a lesson on traffic rules in the middle group of kindergarten according to the Federal State Educational Standard. Topic: Tram
Summary of a walk according to traffic rules in the middle group. Traffic light
Traffic light from packages
The option is a little more complicated, but quite interesting.
Required:
- Bags (can be trash or cellophane)
- Scissors
- Plastic cover
- A thread
Progress:
- You need to fold the bags into an even stack, carefully cut off the bottom and top from them to get even rectangles. Cut them into even strips.
- Next, take a plastic lid and cut out two rings from it. We put them next to each other and wrap the polo with nets. Then we cut everything along the outer edge, push the rings apart and tie the pom-poms with thread. Trim the edges to make the pompoms even.
- We should end up with three pompoms of different colors. You need to connect them together with a thread. And our traffic light is ready.
- Very funny crafts can also be made from disks; you can crochet a traffic light, or you can simply make one from balls of thread. Much depends on your imagination, and there will always be enough available means.
Volumetric traffic lights from scrap materials
If you show imagination and ingenuity, you can make not only a flat traffic light, but also a three-dimensional one. To create it we use:
- packaging boxes;
- yogurt jars;
- plasticine;
- plastic containers;
- plywood;
- yarn;
- colored paper.
From cardboard boxes
- For this craft you need to take a rectangular box.
- Trim off the top.
- Cover with black paper.
- Glue colorful circles onto paper.
- Attach a handle from a rope, threading it into the side holes that need to be pierced in the box.
Now you can play with a traffic light by moving it from place to place.
From a toilet paper roll
Don't throw away cardboard toilet paper rolls. They make great crafts:
- To work you will need three pieces. They need to be glued together to form a cylinder.
- Cover it with black paper. We glue three multi-colored circles onto it.
- Now you need to make a cylinder from two sheets of black paper, in which circles will be made the size of those glued to the traffic lights.
- When we turn the upper cylinder of black paper, the circle on the traffic light will be visible in the circle on the upper cylinder.
- This way we will get a moving traffic light.
Made from plasticine
Little children can make a traffic light out of plasticine. They will like this kind of work because it is not difficult at all. You need to make circles from different colors and attach them to cardboard.
Older children can make a more complex design. To do this, you need to mold a traffic light structure from plasticine and attach multi-colored balls to it. You can decorate the traffic light with visors made of plasticine or colored paper.
No matter what kind of traffic light you get, it is important to tell children the rules of the road so that they remember what color they can cross the road with. And for this, not only crafts are important, but also poems and stories that talk about traffic lights.
From a plastic bottle
For this craft, it is advisable to take a rectangular bottle, then the traffic light will turn out not only three-dimensional, but also with circles on four sides. The bottle should be painted a dark color. The traffic light colors are glued onto it on all four sides.
If you need support for the craft, then insert a stick into the neck and attach the bottle to it. On each side of the bottle you can highlight the light that signals with brighter colors. If you show your imagination, you can make a real traffic controller with a cap on his head and a baton in his hand.
From plywood
Children and their parents will be able to master this craft. After all, you need to cut parts out of plywood and connect them with nails:
- A rectangular frame is made.
- Circles are drawn on each side and painted with paint of the appropriate color.
- You can use LED bulbs, then you need to cut out circles in the plywood and stick colored mica onto the holes.
- When the light turns on, the traffic light will look like a real one.
Instead of plywood, you can use fiberboard.
Knitted
Girls can be asked to knit or crochet a traffic light. If you have the skills to work with beads, you can make a teaching design out of it. A traffic light made of yarn can be voluminous in the form of a rectangular pillow or flat, like a napkin.
The main thing in the work is to show maximum imagination, and then the craft will turn out original and original. In knitting, you do not need to use complex patterns, but simply knit the design with multi-colored circles using knit or purl stitches.
Origami
If you are familiar with the origami technique, then there will be no difficulties in making a traffic light. The main thing is to find a material for the base on which the parts will be glued. They use both paper base and plastic and wood.
The origami technique itself is not complicated, but you need to learn how to fold the parts correctly. And multi-colored circles are made from them and glued to a selected base.