We sculpt a person
It is a pleasure and pleasure to create a human figure from plasticine with your own hands. Plasticine is easily kneaded by hand and does not harden without additional processing. Plasticine has an oily base, so you should not work with it on surfaces that may deteriorate due to fat. It is best to use a piece of linoleum or cardboard as a surface for modeling. If it is not possible to find a suitable surface, you can buy a special set that contains a knife for cutting plasticine, various molds for modeling and, of course, a special board. Plasticine tends to stick to the surface, so before starting work you need to moisten the board with water.
Autumn plasticine composition with mushrooms
Figure modeling is considered easier for children. Mushrooms in the preparatory group should be sculpted more naturalistically than in the middle and junior groups. You no longer need to limit yourself to bright fly agarics or boletus mushrooms with smooth, rounded caps.
Modeling “Mushrooms” in the preparatory group involves more diverse options: honey mushrooms, russula, chanterelles, saffron milk caps. Their hats have a variety of shapes. Some mushrooms should be sculpted from a single piece of plasticine, rather than attaching a separately made cap.
It is also interesting to show children the play of colors, in some cases even the transition of one shade to another. You should also draw the attention of novice sculptors to the fact that in nature the edges of mushroom caps can be uneven, as if slightly torn.
How to make a man from plasticine
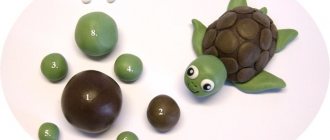
- Prepare plasticine bars for work, guided by our recommendations, or at your own discretion. To sculpt the body, take yellow plasticine, knead it and roll into a ball with a diameter of approximately 2.5 cm. Press the ball on all sides, forming a rectangular block. Squeeze one side of the block on the sides with your fingers. This way you will show off broader shoulders.
- To sculpt the short sleeves of a T-shirt, prepare 2 more balls, each about 1 cm in diameter. Make small cones from the balls. Then use your fingers to move the top of the resulting sleeves, gluing them to the shoulders.
- To sculpt the trousers, take a soft black ball with a diameter of about 3 cm. Pull the ball into a sausage, pressing on top with your palm and rocking it back and forth. You should end up with a sausage approximately 11cm long.
- Bend the sausage in the central part to create trousers. Place the trousers vertically and press down on the structure.
- Attach the pants to the T-shirt.
- Prepare three beige balls with a diameter of approximately 1 cm for sculpting the head and two arms.
- Pull out the ball intended for the head.
- Attach a straight nose, squeeze out the holes in which the eyes will be placed.
- Insert white eyeballs with blue irises into the holes. Add eyelashes, but not too long, eyebrows.
- Attach the mouth. Use brown sausages and free-form cakes to form hair. It is convenient to put the head on a match so that it can be easily attached to the body in the future. Ears should also be added to the head.
- Place a round piece simulating a collar on the top of the T-shirt, add a beige neck bump and insert a match with the head in the center.
- Pull the remaining two beige balls into tubes. Cut one side of the tube with a stack and press the ends with the stack to show the fingers.
- Accessorize your outfit with a belt and attach boots to your trouser legs. Glue the arms to the sleeves of the T-shirt.
The plasticine man is ready. Our figure turned out to be proportional, and most importantly, flexible, which children cannot but like.
Read also: Parents' Saturdays in November 2022
Shared master class
Remember: how long have you held plasticine in your hands? So long ago that you can’t even remember? And now your own children are asking you to help them make a man out of plasticine? We give you a great chance to please your children, have a great time with them, and at the same time remember how to sculpt funny figures!
Christmas tree
If the winter holidays are at stake, then green plasticine will come in handy for sculpting a Christmas tree. The corresponding process does not take much time:
- First, a large cone and a wide trunk are molded from green and brown plasticine;
- Next, the cone is placed on the barrel;
- The next step is to thin out the needle patterns from the very top to the bottom (for thinning, use the corner of a bank card or the edge of a coin);
- Small balls are rolled out from bright plasticine;
- Variegated toys are attached to the Christmas tree.
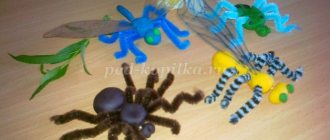
What you need to sculpt Spider-Man
Prepare all necessary materials in advance. Use:
- blue and red plasticine - the costume will be created from it, so these are the main shades;
- white material - for the eyes;
- black - to imitate the eyes and chest decoration of a spider.
You will also need a felt-tip pen that is as dark a color as possible. You will use this to draw the fine lines of the web. We advise you to study in advance the instructions on how to make a figurine from plasticine. Be sure to draw it to represent the character's appearance.
Expert opinion
Catherine
Sculpting expert
Don't forget about matches - parts are attached to them - and stack (or wire): it is used for processing plastic material.
Whistle, egg stand or pencil holder in the shape of a bird
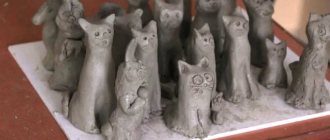
During modeling classes, you can invite children to make a gift with their own hands, which their mother, grandmother, father, brother or sister will be pleased to receive. Modeling a bird is perfect for achieving this goal. In the preparatory group, it is extremely important to instill in children a sense of the significance of what they do, to connect their creativity with practical application in life. Therefore, you need to teach them to sculpt not just a bird, but, for example, a whistle or a pencil holder, an egg stand or a salt shaker.
For these purposes, you should use additional materials: a plastic cup, a whistle, an old salt shaker. The peculiarity of this type of creativity is that during the sculpting process the child takes some object as a basis and hides it with plasticine, giving it the shape of a bird. It is important to do this as carefully as possible, so that the necessary holes remain operational.
An interesting option in this type of creative activity could be modeling not from plasticine, but, for example, from salt dough, ordinary or polymer clay. You can bake (if necessary) finished products in a microwave oven in several stages, periodically removing the item and cooling it. In the microwave, you need to set the “defrost” mode to the minimum temperature and time of one minute. Then the thing will be able to serve for a long time without deforming. After hardening, the product will need to be painted and varnished - this can already be done in art classes.
Although children begin to sculpt birds in early childhood, more complex and important skills should be instilled in the preparatory group. It is very useful to teach children to give shape to the entire piece of the original material at once, and not to sculpt a head, tail, body separately and then connect everything together. Of course, not all children will learn this right away, but this goal should be set for them now. During the lesson, you can introduce students to Dymkovo toys and invite them to do work in this style.
Continuous coating
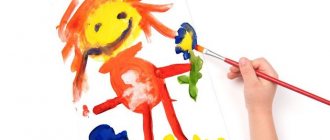
An interesting craft using the smearing technique, suitable for very young children who are just learning how to sculpt from plasticine. A pre-printed drawing is used as a basis (you can take any picture from a children’s coloring book) and soft and pliable plasticine is used for filling.
It is best to choose a high-quality product from well-known manufacturers that does not leave greasy or colored marks on the hands of children. The drawing is filled with plasticine along the contour; under the influence of the warmth of the hands and light pressure, it should be gently distributed over the entire area without going beyond the outlined contours.
Preparatory stage
Children have grown up, and new techniques for working with plasticine are available to them. From sculpting on a plane, which involves creating a kind of painting, plasticine bas-reliefs on a sheet of cardboard or paper, and from simple forms (balls, lumps, figures without complex details), the children move on to three-dimensional standing and walking figures that require taking into account proportions and the laws of balance.
Playing with plasticine is an important part of preparing for school.
What methods of modeling from plasticine can be used
Children aged 6–7 years are already familiar with constructive (the composition is created from individual parts, like a construction set), sculptural (all parts of the figure are made from one piece) and combined methods (combination of constructive and combined). To sculpt a figure in motion, it is more convenient to use a constructive method - this way it is easier to convey small details, such as, for example, palms, facial relief, etc.
Modeling techniques
In this group, children consolidate previously mastered modeling methods, including:
- rolling out elements (creating a “ball”);
- rolling (rolling “sausages”);
- indentation, that is, creating depressions on the form with your fingers;
- flattening (making “pancakes” from balls);
- pinching (pinching a piece and flattening it with two fingers);
- pulling (pulling an element out of a piece);
- accession;
- smearing (building up elements onto the base and smearing the boundaries of the connection);
- pinching (clamping the part, but without flattening);
- stretching (stretching elements while maintaining the overall shape);
- smoothing (smooth transition of craft elements into each other).
Almost all of these methods are useful when working with the human figure.
Composition options on the theme “Man in Motion”
Modeling of a non-static figure can be presented in the following variants of themes for composition, which can be dedicated to a specific educational block:
- “Girl Plays Ball” (when studying topics related to summer fun);
- “Skier” (in the process of studying materials related to winter sports);
- “A girl and a boy are dancing” (for example, on the eve of the New Year);
- “Soldier” (this composition can be dedicated to February 23 or May 9), etc.
As can be seen from these examples, most of the options for such modeling in calendar and thematic planning correlate with the winter theme. This is explained simply: by the 2nd semester, the children repeat and consolidate all the basic techniques and methods of sculpting, which allows them to create complex designs, which include the human figure.
Preliminary work with the group
Although the technique of sculpting a human figure is relatively simple, the teacher, during classes on speech development and physical education warm-ups, first examines with children the features of a person’s posture, drawing their attention to such nuances as:
- body angle;
- turning the head;
- bend of arms and legs, etc.
In addition, even before starting to work with plastic material, the adult individualizes the process as much as possible. That is
- divides the responsibilities for preparing the workplace and the necessary tools between the guys;
- allows you to choose the color range of plasticine for crafts;
- helps determine the position of the limbs (if children are performing a composition where the pose of the figure may vary), etc.
It is advisable that the choice of color scheme for the little man’s costume remains with the child.
Motivation
Already at the stage of individualization (that is, preparation for the lesson), the motivation of the little ones begins. However, the first part of the lesson should be planned so that the kids become interested in both the result of the work and, what is very important, the sculpting process itself. To do this, the teacher can use a number of techniques.
This is interesting. The famous Italian teacher, philosopher and humanist of the late 19th and early 20th centuries, Maria Montessori, said: “Do not limit yourself to just one teaching aid, for example, cards. Cover one topic in different ways: in games, posters, books, cartoons.”
One of the options for motivation could be a preliminary drawing of a sample of a man in motion
Conversation and visibility
If we rank the most effective ways to get children to work, then, of course, conversation will take first place. The main thing is to build it correctly. Usually these are questions from an adult, which the kids answer one at a time or in chorus. For example, before creating a figure of dancing children, questions might be:
- When do people dance?
- Do you like to dance?
- How are the legs and arms of the dancers positioned when moving?
- What should a person doing dancing wear?
However, these questions cannot be speculative. Children perceive the world figuratively, so they cannot do without clarity. These could be pictures of athletes, frames from famous cartoons (for example, “Well, just wait!”), or photographs of the children themselves. If the kids are sculpting the composition “Girl Plays with a Ball,” then for motivation you can invite all the kids to repeat 2-3 exercises with the ball, and then discuss which movements were the same, which were different, and also what poses the body took.
A game
The story-based game gives the lesson a particularly interesting working atmosphere. If we talk about working on plasticine figures, then such a character, including children in work-play, can be a cartoon or book hero. For example, during a lesson on the subject of a skier’s figure, the symbol of the Sochi Olympics, Cheburashka, may come and invite the kids to create their own ski team.
Children work in class with special pleasure if their favorite character “comes to visit” them
Poems
The rhythm and dynamics of rhymed lines also organizes the children well and puts them in a working mood.
- One day nature and people started a dispute about primacy. Storms and blizzards rushed in and covered everything up to the roofs with snow. "Hooray! - Nature rejoiced, “They can’t get through the snow, they won’t survive!..” It’s not in vain that the people have ingenuity... And people came up with SKIS!
- If you can’t sleep in the morning, the dream has run away somewhere, and you’re tempted to start dancing - So the day for dancing has come!
- I'm a military captain! I'm not afraid of a hurricane! The whole team is recruiting, We are leading the ship into the storm. It’s not in vain that we stand at our post! We will protect you, country!
Plasticine cartoons
A caricature is a sarcastic depiction of something. If we talk about a person, then he is portrayed as absurd, unpleasant, funny, and sometimes even terrifying. Let's try to make a caricature out of plasticine.
- Firstly, the head. How to sculpt a person's face from plasticine if it is a caricature? The head is usually made very large.
- The man's body should be frail, his arms and legs thin (compared to his head).
- The facial expression is always stupid. Facial features are also usually sharp or unrealistically convex: nose, eyes, lips.
An arm, a leg, a cucumber - here comes the little man!
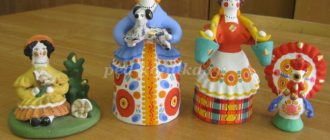
The modeling of a person in the preparatory group can also be associated with the Dymkovo toy. It is best to start working with a female image, since a girl or “young lady” is usually depicted in a long dress reaching to the ground, which greatly simplifies the process. Clay should be used for production - this is the material that is traditional for Dymkovo toys. But there’s nothing wrong with trying your hand at using plasticine.
It is impossible to make a person realistically at this age. Therefore, you should not set impossible tasks for your kids. Let the man be “cartoonish”, completely different from the real one. It is important in this type of creativity to give the child the opportunity to fantasize using existing skills. Children really like to sculpt story compositions on the theme of famous cartoons and fairy tales - so let them create for their own pleasure!
Classes on working with clay, plasticine, and salt dough are fertile ground for raising a well-rounded personality. There is a place here for developing speech, and for replenishing vocabulary, and for gaining knowledge about the world around us and art. And, naturally, for the opportunity to realize creative potential.
How to mold a man from plasticine: sculpting Spiderman
The second master class will describe the process of sculpting Spider-Man. To work you will need plasticine in red, blue, black and white colors. The red color should make the hero's head in the shape of an oval; two large eyes made of white plasticine with a black edging should be attached to it. In order to make a torso, you must first sculpt a torso with muscles from red plasticine, then attach thin layers made of blue to the sides. In order to make hands, you need to form two red tubes and add blue inserts to them, and to make legs you also need to connect pieces of red and blue plasticine. The resulting arms, legs and head can be attached to the body using matches. You can also attach a web of black plasticine to the back.
"Plasticine" design
In addition to traditional creative tasks for creating three-dimensional figures, there are other ways to work with this magical material. For example, designing from plasticine parts is also modeling.
A lesson in the preparatory group on creating a car, bus, wheelbarrow for transporting soil, manure, bricks, helps kids learn the basics of constructing objects that move with the help of wheels. True, for such activities, little craftsmen will need axles to attach the wheels. These could be matches with broken sulfur tips, toothpicks with sharp ends ground off, or pieces of wire with twisted ends.
All professions are important
When sculpting a person from plasticine, not only his figure is important, but also what this figure is wearing. Clothes are an integral part of a person.
We can imagine the same person in different ways by changing only his attire. Let's look at how to make clothes for representatives of various professions.
Let's take a nurse for example.
In order to mold her clothes, we need pink plasticine, we create a classic shape from it. For a better effect, you can also mold a syringe and a phonendoscope, as shown in the photo. The doctor can be depicted simply in a white coat.
Next, we’ll look at how to make a firefighter costume.
It is enough to “dress” him in a typical firefighter uniform and put a helmet on his head, as in the photo above.
If you or your child can’t make a person out of plasticine the first time, don’t be discouraged. The main thing is to try again and again, and in the end everything will work out.
The benefits of practicing with plasticine
Modeling in the preparatory group helps to expand knowledge about the world around us, helps to form the first basic concepts about the physical properties of materials, the shapes of objects, and their colors.
The teachers always tell them something new about what they are going to ask the children to fashion. During the initial introductory speech, teachers involve the children themselves in the conversation. Thus, modeling in the preparatory group helps expand the vocabulary of children, teaches them to express their thoughts not only through created images, but also verbally.
During the work, various muscles of the fingers and hands are used, which later helps children learn to write without any problems during school. It has been noticed that those children for whom modeling in the preparatory group in a preschool institution and at home was a favorite activity, write at school much more accurately, smoothly and with more pleasure than those who neglected these activities.