Summary of the lesson on designing “Round Dance of Friendship”
Municipal autonomous preschool educational institution
"Kindergarten No. 36 of a general developmental type."
Summary of the lesson on designing “Round Dance of Friendship”
in the preparatory group
Conducted by Pozdeeva L.V.
Tasks:
Continue to teach children how to design a toy based on a cone, independently cut out and connect the parts together in the specified sequence and according to the pattern. Practice making patterns from strips of paper of different colors, beautifully placing them on the details of clothing: the hem of the dress, the sleeves
· . Give children an idea of planet Earth; introduce dolls of different nationalities; teach the ability to work with paper and cardboard; consolidate skills in working with scissors and glue, form auditory attention, memory, thinking; the ability to reason and draw conclusions based on the information received.
· . To deepen children's understanding of kindness as a valuable, inherent quality of a person. Develop children's creative abilities and teamwork skills.
· Cultivate moral and emotional qualities: patience, attentiveness, sympathy, empathy, friendship.
Vocabulary work:
Round dance, friendship, harmony.
Preliminary work:
Examination of the globe, dolls of different nationalities, conversation about the native land, friendship of the peoples of the world.
Materials used:
Globe, dolls of different nationalities, cardboard, colored paper.
Methods:
Verbal, Visual and demonstration, Practical.
Integration of educational areas:
“Cognition”, “Communication”, “Work” “Music”.
National Unity Day. For this holiday, the teacher should invite students to make an applique of a round dance of children in costumes of the nationalities of Russia with the corresponding national symbols.
National Unity Day. For this holiday, the teacher should invite students to make an applique of a round dance of children in costumes of the nationalities of Russia with the corresponding national symbols
Progress of the lesson
Educator:
Hello guys. I invite you to my workshop, where we will make a round dance of friendship with dolls. And the magic rope will help us with this. But before we start work, we will talk with you. I ask you to sit down at the table.
Educator:
Children, what planet do you and I live on?
Children:
On the Earth.
Educator:
Right. Let's look at the diminutive model of our planet - the globe.
If we travel around the globe, we will meet people of different nationalities who have their own traditions, culture, and customs. But they differ not only in this, but also in appearance.
Look, this doll is from Japan. Japan is the land of the rising sun, which is located in the East of Russia. What country do you think this doll is from?
Children:
From Africa.
Educator:
Right. Africa is a whole continent where Arabs and blacks live.
And this doll is from Austria. Austria is located in the center of Europe.
This doll is from Portugal. Portugal is located in South-West Europe
Show of dolls.
Educator:
Look, they differ from each other in skin color, hair color, eye shape, national clothing. But all over the planet people dream of living in peace and friendship. Guys, let us do a “Round Dance of Friendship”.
Educator:
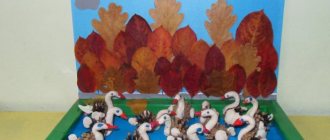
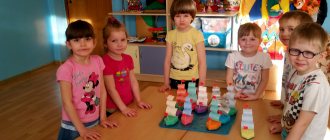
And for this we have cardboard and colored paper, we will make a cone from cardboard - this will be the basis for making a doll.
We coat the edges with glue and glue them together, cut out the head using a stencil, draw eyes, nose and mouth with a felt-tip pen, decorate the clothes with various patterns.
Children complete the task.
Educator:
Look what wonderful dolls we have made. They are different, like all people on the planet.
Educator
: Guys, did you enjoy traveling around the countries?
What object helped us with this? (Globe).
What nationalities of dolls did we meet?
Guys, let’s take our round dance of dolls and stand in a circle with them, and the song “Let the sun shine” will help us with this.
Let's hold hands and stand in a circle.
Every person is a friend to another.
Let's hold hands - let it pass
There is a huge round dance on Earth.
Children perform a song.
Educator:
Thank you guys for your round dance. I think that all the dolls will be happy with such a beautiful round dance.
The teacher offers samples of dolls for viewing.
—What are these dolls made of?
-What's on their head?
—What are the clothes decorated with?
Then the teacher shows and explains the sequence of making the doll:
1) Cutting out all the details (the teacher has them cut out in advance);
2) Partial demonstration of drawing a face and patterns on clothes with an explanation of how best to place patterns on parts of clothes;
3) Making tukhia: drawing an embroidery pattern and gluing foil circles - “coins”;
4) Gluing parts to obtain a doll.
Next, the teacher reminds you what Chuvash embroidery patterns can be used to decorate clothing details.
Children go to the tables and begin to work independently. The teacher provides assistance in choosing patterns for drawing embroidery, colors, and location of patterns on parts.
At the end of the lesson, children arrange a round dance of dolls, choose the doll they like, motivating their choice. You can invite children to talk about their doll.
Preview:
Summary of direct educational activities on design in the senior group on the topic “Magic transformation of a cylinder”
Prepared and conducted by: Irina Sergeevna Kolmakova, teacher of the First Moscow Gymnasium, 2013-2014 academic year.
- Strengthen the ability to transform flat material into three-dimensional forms: twisting a cylinder.
- Learn to construct a tiger cub toy from cylinders.
- Develop the ability to independently analyze finished crafts from the point of view of identifying the general method of their manufacture.
- Develop imagination and creative imagination.
- Instill interest in constructive activities.
Soft toy sparrow. Magic box and sample of the “Tiger Cub” craft.
Yellow or orange squares 8x8 cm for each child.
Scissors, glue, napkins, glue boards.
Colored paper for making small details - eyes, nose.
Preliminary work: examination of photo illustrations “Animals of Africa”; didactic games “Collect a picture”, “The third wheel”; reading: S. Marshak “Children in a Cage”, “Where did you have lunch, sparrow?”
- Creative artistic design. L. Paramonova / Preschool education, No. 2 - 2005.
- V. Kozhevnikov. Kids about kids. – M.: “Fine Art”, 1991.
- Lesson plans for the “Development” program for the senior group of kindergarten. – M.: UTs im. L.A. Wenger "Development", 2000.
Task: to attract children to the upcoming activity.
All the children gathered in a circle:
I am your friend and you are my friend!
Surprise moment. A sparrow flies to visit the children.
- Hello, sparrow! Where have you been? What did you see?
“I wanted to fly to distant countries, but I’m a sedentary bird, I don’t fly far from home.” But I really want to meet animals from distant countries.
— Guys, where can you see animals from different countries? - children's answers. - Yes, of course, at the zoo. Sparrow, stay with us, today the guys and I will make a kitten toy.
A noise is heard from a box on the teacher’s desk, and a toy appears, a sample of a tiger cub’s handicraft.
Hey, don't stand too close -
- Hello, tiger cub. Guys, look what an amazing beast was hiding in our magic box. Why, guys, did I call the tiger cub a kitten? - children's answers.
— Guys, look at a sample of the craft and tell me which parts can be identified in the toy? – head, body, paws, tail.
—What figure does the body of a tiger cub remind us of? Head? – cylinder.
- You and I have already learned how to twist a cylinder. Let's remember how to tighten the cylinder?
The teacher and the children read a poem and show step by step the transformation of a square into a rectangle, and then into a cylinder.
Summary of the lesson on designing “Cheerful Man”
Lesson notes for first year groups
"Merry Man"
Target:
Distinguish between natural and artificial materials.
Tasks:
Educational:
- learn to name the properties of natural and artificial materials, be able to find the difference;
— teach children the rules of using materials and tools;
Educational:
- develop creative imagination, imaginative thinking, fine motor skills;
— develop the ability to evaluate and describe the result of one’s own creative work;
Educational:
— educate and teach children to respect nature;
— introduce children to observing safety precautions when working with piercing and cutting objects.
Expected Result:
They will know:
— properties of natural and artificial materials;
— safety rules when working with piercing and cutting objects.
Will be able to:
- be able to find the difference between natural and boron materials;
- evaluate and describe the result of your own creative work;
Materials and tools:
34 plastic lids of different colors, 5 plastic Kinder Surprise eggs, elastic band, scissors, awl, gypsy needle, plastic eyes, glue gun.
Progress of the lesson
| Name of the lesson stage | Activities of a teacher | Student activities |
| Organizational part | The teacher creates a favorable atmosphere for work in the classroom. Game "Hello, everyone!" Each child should shake hands with the children standing next to them. Attention is focused on the fact that you need to shake hands kindly, look into the person’s eyes and say your name. Teacher: Children, today we will visit a fairy tale. Close your eyes and count to ten. Here we are in a fairy tale. Funny people live here. Where are they? They want you to work hard and come up with them. Children are surprised, show interest, want to make little people from waste and natural materials | They play a game. Consider. Children are surprised, show interest, and want to make little people out of waste material. |
| Main part | Getting to know waste and natural materials. Children are invited to divide into groups, examine the materials, and talk about their properties. Leads children to conclusions about the properties of natural materials : has size, color, shape, smell, wrinkles, bends, tears, breaks. Working with illustrative material: task on drawings: carefully examine the pictures and determine which is natural and which is artificial material. conclusion. Artificial material was invented by man. Natural material is given to us by nature. You can make wonderful crafts from natural materials. Nature must be loved and protected | Complete the task. Complete the task. Children speak out and offer options. |
| Fizminutka | The teacher invites the students to stand in a circle and repeat the words and actions: I have such hands! Look! They clap their hands loudly, One, two, three! Your hands too, they look like mine It's good for you, my friend, Spin with me once! I have such legs! Look! I'll stomp a little, One, two, three! Your legs also look like mine, It's good for you, my friend, Spin with me once! I have such a back! Look! I'll pat you on the back, One, two, three! Your back is also similar to mine, It's good for you, my friend, Spin with me once! | Repeat the movements after the teacher. |
| Main part | Safety precautions . The teacher reminds the rules of working with piercing and cutting objects. | |
| Practical work | Children are invited to design little people from plastic corks. Children get to work accompanied by cheerful music. | Complete the task. |
| Fizminutka | Finger game "Funny men" Funny little people were running past the river (“little men” - fingers running along the “paths” - the hands of children standing opposite each other). They jumped and jumped with their fingers to “jump” on each other’s shoulders). We greeted the sun (gently put our hands on each other’s cheeks). We climbed onto the bridge (make the bridge with your hands). And they hammered in a nail (knock with fists). Then - splash into the river (bend over and shake your arms freely). Where are the little men? (hide your fingers under each other’s armpits). Girls and boys are friends in our group, And now Little Fingers will become friends. One, two, three, four, five - Let's start counting them. One, two, three, four, five - Let's start counting them! | They play a game. |
| Reflection | Did you like working with natural materials? What difficulties did you experience during the lesson? Tell us about your craft. | Answer questions. They talk about their craft - what they called it, what materials it was made from, how they will use it. |
| The final part. | Invites children to choose the neatest craft. | Choose a craft. Analyze and express their opinion. |
Master class “Jolly little man”
1. Make a hole in the center of each lid using an awl.
2. Prepare a long piece of elastic and insert a gypsy needle.
3. Thread the plastic egg onto the edge of the elastic and secure with a knot.
4. Form a human leg by stringing 8 caps, then set it aside.
5.
Make the second leg in the same way.
6. Make 2 holes in the larger lid and attach the legs to it.
7. String 2 caps on the body, a plastic egg, a cap on the neck, an egg as a head and 2 caps on top.
8. Secure the structure with a tight knot.
9. Tie a piece of elastic around your neck as arms.
10. String 6 caps and a plastic egg. then secure with a knot.
11. Weave the other arm in the same way.
12.
Glue on the plastic eyes.
Preview:
Abstract of GCD for design
“Making toys from cylinders for a puppet theater”
Subject. Making characters from cylinders for a tabletop theater based on familiar fairy tales (children's choice).
Artistic creativity. To promote the development in children of the ability to create artistic images. Form their aesthetic taste. To develop imagination, ingenuity, the desire for creativity, knowledge of the properties of materials, and the desire to experiment with them.
Cognition. Introduce them to making crafts based on a cylinder and learn how to perform them according to the teacher’s verbal instructions. Learn to manage your activities, organize your work independently, and perform a variety of intellectual actions.
Communication. Learn to reason, explaining your point of view. To develop intonation expressiveness of speech in children.
Socialization. Develop the ability to determine mood. Foster empathy and group cohesion.
Health. Develop expressiveness of movements (facial expressions, pantomime).
Safety. Strengthen the skills of safe use of scissors.
Material. Toilet paper rolls, paint, brushes, markers, colored paper, glue, scissors.
Preliminary work. Reading fairy tales, looking at illustrations, playing games in the theater corner.
Progress of direct educational activities.
Teacher. Guys, today Pinocchio came to visit us, he ran away from Karabas Barabas and decided to organize his own puppet theater. But he doesn’t have artists, he asks you to help make characters for a tabletop theater from cylinders.
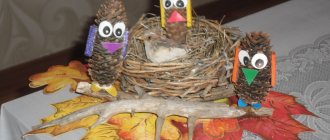
The teacher shows the children how to make an owlet from a cardboard toilet paper cylinder.
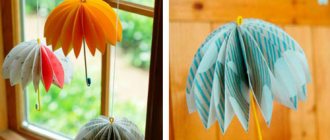
- We paint the cylinder or cover it with colored paper.
- Cut out the wings, tail, eyes, beak.
- Glue the parts to the body.
- We draw feathers with a brush or felt-tip pens.
Children are offered templates for making various toys.
Children with a high level of training can invent and design their own characters for the theater.