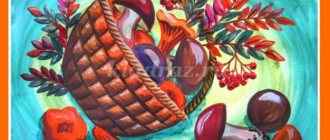
Notes on application in the preparatory group “Autumn Still Life”
Notes on application in the preparatory group “Autumn Still Life”
Notes on application in the preparatory group “Autumn Still Life”
Goal: Implementation of independent creative activity of children (constructive-model).
Program content
Educational objectives: teach children to create plot compositions using the entire area of the sheet;
Developmental: develop children's creative abilities, fine motor skills;
Educational: to cultivate interest in artistic creativity; independence; artistic taste.
Preliminary work: Excursion along the ecological trail. Consideration of autumn compositions.
Vocabulary work: reading poems about autumn by A. S. Pushkin “The sky was already breathing in autumn”, A. Fet “In autumn”, K. Balmont “Autumn”.
Materials and equipment: scissors, cardboard of different colors, colored paper of different sizes and shapes, glue, glue brush, napkins; autumn leaves, rowan branch, vase.
Progress of activities
1 part. Organizational
Educator: Guys, look what's new in our group?
Children's answers: Autumn bouquets, rowan branches.
Educator: Children, what is autumn?
Children's answers: Autumn is when the leaves on the trees turn yellow or red, they fall and cover the paths in the park, the tropics in the forest... There are a lot of fruits and vegetables in autumn. Collective farmers are reaping a rich harvest. They take him in cars to the city.
Educator: Why do you think the harvest is brought to the city?
Children's answers: People and pets need vegetables, fruits, and grains for nutrition.
Educator: What do birds and animals in the forest eat?
Children's answers. Berries, mushrooms, forest apples.
Educator: That's right.
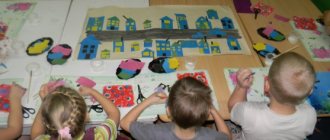
Part 2. Practical
Educator: Children, you would like to create an autumn still life.
Children's answers.
Educator: But first, remember what colors autumn gives us.
Children's answers: yellow, red, brown.
Educator: Okay. Try to create an autumn composition yourself. Children, you can create the same still life, only with paper, scissors and glue.
Children's answers: Yes, we'll try.
Educator: Guys, our leaves are square. How to make berries from them?
Children's answers: Cut off the corners and you will get a circle. It will look like a berry.
Educator: Well done. Please look at our composition. What shape are the leaves?
Children's answers. Carved, oval.
Educator: Yes, they are carved. Guys, aren't you tired? Isn't it time for us to get some rest?
I ask you to rise this time.
The head turned - that's two.
Hands up, look forward - that's three.
Let's spread our arms four wide.
Squeeze your fingers with force, unclench them - that's five.
All the guys sit down quietly - it's six!
Educator: Guys, what do we have left to make an autumn composition?
Children's answers: Cut out a vase, a basket.
Educator: Correct.
Part 3. Independent work of children
Educator: Let's prepare our fingers for difficult work with paper.
One two three four five! (bend your fingers, starting with the thumb);
We will collect leaves. (clench, unclench fists);
Birch leaves (bend your fingers, starting with the thumb);
Rowan leaves,
poplar leaves,
Aspen leaves,
We will collect oak leaves.
Let's take an autumn bouquet to mom! (“walk” on the table with the middle and index fingers
fingers).
Educator: Have you rested? Fine. Before we get to work, let’s say the magic words: “I’ll sit up straight, I won’t bend, I’ll get to work.” Now you can get to work.
Part 4 Final
Educator: Well done, guys! Look how beautiful our pictures turned out! What are the names of these compositions?
Children's answers: Still life. "Autumn still life"
Educator: Correct. Children whose work did you like best? Why? What should we do now with our still lifes?
Children's answers: You can make an exhibition; I can hang my work on a stand so mom/dad can see my work.
Caterpillar
Let's take a closer look at how to make a caterpillar from bottle caps.
You need: colored paper, colored cardboard, scissors, glue, markers, 5 bottle caps. The photo shows an option made from chestnuts, but the same thing can be made from bottle caps.
STEP 1. Using a template, cut out a large sheet from a sheet of green cardboard.
STEP 2. Draw the leaf veins.
STEP 3. Glue the lids to the sheet.
STEP 4. Cut out circles with a diameter slightly larger than the lid, and glue them to the top of the lid.
STEP 5. Add the caterpillar's face and legs.
STEP 6. Decorate the work according to your own wishes. This work is ready!
Fruits in quilling style
Twisting narrow strips into spirals is a labor-intensive process, but understandable to older preschoolers. Fruit slices are made using the quilling technique.
Materials that will be useful for creativity: colored paper, disposable cardboard plate, glue. Tools: pencil, ruler, scissors, toothpick.
How to make kiwi slices
For 1 slice, cut 8 green strips 0.5 cm wide and 30 cm long:
- Alternately twist onto a toothpick with a spiral.
- They are formed into drops by squeezing one part of each shape with your fingers.
The center of the kiwi is made from a white strip of the same width and length. A tight roll is made from it, loosened slightly, and then flattened with the palm of your hand.
Last step: 4 brown strips are glued together with one long strip. A ring is made from it, which is glued to the base. Inside, fix a white center in the center, and green drops around them, placing them in a circle.
How to make orange slices
Cut strips of white, yellow and orange paper:
- Combine the yellow and white stripes into one.
- Screw onto a toothpick, starting from the yellow end.
- Form a triangle - squeeze the spiral in three places with your fingers.
- Glue the blanks together to form an orange slice.
Three orange stripes are combined into one strip and pasted around the triangular blanks.
Looking through photos of children's crafts, you might think that stunning still lifes are created by young talents.
Paper fruits made using different techniques are simply impressive in appearance.
I want to decorate the walls of my apartment with appliqués and decorate the New Year tree. And also give as a gift to relatives and friends from the whole family.
Theoretical nuances
Applique is a type of productive activity that is based on the creation of plot compositions from paper, fabric, natural material, glued or sewn onto a thick cardboard or paper (rarely wooden) backing.
Paper appliqué in the preparatory group is complicated by cutting out bends and curls, including along diagonal lines
The goals of applique classes, while being the same for working with preschoolers of any age, in the preparatory group have a number of features:
- the development of highly coordinated movements of the muscles of the hands helps children master the skill of writing;
- stimulation of the skill to concentrate and manage one’s activities;
- assistance in complicating the mechanisms of thinking with images (at 5–6 years old, children composed coherent descriptions of their crafts, and in the preparatory group they learn to fantasize about a topic, breaking the plot into fragments, a kind of “series”);
- consolidating the skill of completing a task according to a model, that is, the priority way of working in the lower grades;
- the practice of orientation in space in the process of arranging the details of the composition within the boundaries of the substrate;
- speech development (kids learn to come up with stories based on crafts, using not only simple sentences, but also complex and complicated phrases);
- cultivating the ability to evaluate one’s own activities and the work of one’s comrades.
In the preparatory group, developing the skill of working both together and just side by side continues
Tasks aimed at achieving these goals include:
- the practice of creating subject and plot compositions from nature and from imagination (that is, individual objects, for example, “Bookmark”, and combinations of objects within the framework of a general scene, for example, “Swans swim in the pond”);
- developing the ability to combine different types of techniques in one craft (for example, in the work “Food”, children make vegetables in a cut-out form, a plate in a flat form, and cutlery in a silhouette form);
- practicing cutting out parts that differ in shape and size;
- the practice of cutting out symmetrical elements from a sheet of paper folded in half, as well as paired parts from a sheet assembled with an accordion;
- familiarization with cut-out decor, when the decorations of the elements are not glued on, but cut through (for example, “Snowflakes”);
- developing the ability to share responsibilities while performing a task in a group or pair;
- nurturing a sense of color, proportionality of composition, measures in the use of decorative elements (beads, buttons, etc.);
- stimulating interest in creating stories on nature and fairy tales;
- training the skill of reflection (older preschoolers not only say whether they like their craft or not, but also justify why).
New appliqué techniques for children 6–7 years old
In general, at 6–7 years old, kindergarten students systematize all the skills that they have previously mastered. But still the emphasis in the work is on:
- the ability to use scissors to cut out elements by eye, observing proportions (for example, vegetables and fruits), silhouette and ribbon appliqué (the difficulty of cutting out such details lies in the fact that the child, when cutting out individual details, for example, the outlines of the paws and tail of an animal, holds a complete image of the image in the head, coordinating the movement of the hand with the imaginary form);
- drawing up plot pictures (for example, based on fairy tales), as well as compositions that are as close to realistic as possible (still lifes, landscapes);
- developing the skill of making markings on paper, using a stencil, template, carbon paper, sketching against the light, by eye, or by folding the sheet;
- developing the ability to compose a composition from several elements, evenly placing them on a substrate and thinking through the decorations of each (for example, when making a “Country House” craft, children not only convey all the details of the real picture - a fence, a vegetable garden, paths, etc., but also they come up with decorations for the house itself - tiles on the windows, carvings on the railings at the entrance, etc.);
- practicing a broken type of appliqué to create clouds, sea foam, etc.;
- complication of color combinations (children practice combining elements of more than 4-5 shades within one plot).
In the preparatory group, children continue to experiment with the shape of the substrate
Methodology for preparing an open lesson
The process of preparing a demonstration lesson on application is no different from writing a script for a regular lesson. However, a number of nuances still need to be taken into account:
- an open lesson should have a plot (children help a fairy-tale character by going to visit a doll, giving her a gift, etc.);
- Children are expected to be more independent, so during demonstration lessons you should not involve types of appliqué that children have not mastered very well, for example, cereal or silhouette applique, despite the fact that most often the children dealt with tape and cotton pads;
- At the end of the lesson, mandatory reflection is carried out (the ability to evaluate one’s work is an important indicator of a child’s readiness for school).
An example of a demonstration lesson on applique involving drawing can be found in the publication of R.F. Bagieva “We are building a multi-storey house.”
How an open application lesson is analyzed
When considering a demonstration lesson in the artistic and creative direction in the preparatory group, inspectors pay attention to:
- compliance of the topic, goals and objectives of the lesson with those indicated in the course work program;
- the relevance of the methods and techniques used for children of this age and level of proficiency in the necessary skills and abilities;
- visual accompaniment of the lesson;
- availability of explanations;
- level of general training of children;
- timeliness of finger exercises and physical education;
- how the individual approach is implemented;
- emotional background of the lesson;
- How the teacher’s work was assessed and reflection was organized.
A spontaneous exhibition of children's works is a mandatory element of both open and regular classes.
A sample analysis of a lesson on applicative creativity can be found here.
Ideas for preschool crafts
Children's crafts for the preparatory group can be made on a variety of topics. As a rule, every child starts making crafts for the New Year, for mother and grandmother on March 8, for father and grandfather on February 23, also for Easter, cards for Mother’s Day, and for relatives on their birthday. In kindergarten, children also make themed crafts for the seasons, as well as their favorite fairy-tale heroes, cartoon characters...
There are many options for crafts for every occasion, and you can also come up with your own. Children in the preparatory group very often create postcards, appliqués, sculpt from plasticine, and draw.
Circle applique
The first paper products that even three-year-old children can make are fruit appliques from multi-colored circles. Riddles, songs, counting rhymes, sayings and proverbs on the topic will help to interest the kids.
Creative activity will not be boring if you make a note that reflects what goals you need to achieve:
- Talk about the benefits of the fruit.
- Learn how to glue round shapes using glue.
- Fix shapes and colors.
- Instill neatness.
Preschoolers do not yet master concepts and think only in visible, concrete images. Therefore, for practicing applique, visual material is prepared: apples of three colors of different sizes on a plate. Adults also cut out blanks from paper:
- A white circle with a radius of 20 cm is for the base.
- Yellow, red and green circles are for fruits.
With children, they look at each apple on the plate, analyze the sizes and differences. They offer to capture them by accurately laying out colored circles on the base.
Then they begin the practical part: they are introduced to the simple technique of paper appliqué. They show how to smear parts and press them onto paper using a napkin.
Vase with Flowers
Let's consider the option of a combined application as a craft for March 8th for the preparatory group.
To complete this you will need: cardboard, colored paper, buttons, glue, scissors. Children work on ready-made cut out flower details.
STEP 1. We attach the vase template to a sheet of colored cardboard, trace it and cut it out.
STEP 2. Glue the resulting vase to cardboard of any color.
STEP 3. Next, the children gradually collect and glue the flowers, starting from the largest to the smallest petal.
STEP 4. Place buttons in the centers of the flowers.
If desired, you can decorate the vase.
The gift is ready!
Winter applications for children
Bear on an ice floe
This master class presents a simple three-dimensional applique “Bear on an Ice Floe”, made of blue and white paper and cardboard.
Read more: applique “Bear on an Ice Floe”
Trees in winter
A simple winter applique made of cotton wool “Trees in the Snow” for children's creativity. A child-friendly plot, easy actions, and a combination of textured materials. How to interest a child in creative activities? This is a question many parents ask. Try offering your child to work not with colored paper or plasticine, but with cotton wool. Using this material, you will get an interesting winter-themed applique.
Read more: winter applique made of cotton wool “trees in the snow”
Applique with a voluminous bullfinch
You can start working on this craft with a riddle. Let the child try to guess the bird whose breast is brighter than the dawn. It is by their bright red breast that we recognize bullfinches. In today's master class we have the application “Bullfinch on a branch”.
More details: applique with a bullfinch on a branch
Winter bird feeder
Winter applique “Bird Feeder” is made of paper and cotton wool. This is a simple winter themed creative activity idea for kids.
Read more: winter applique with bird feeder
A pineapple
A craft in the form of a pineapple can be created using the same principle as a grape branch.
- You can slightly change the appearance of the craft by cutting out the base from cardboard in the shape of a fruit, and not just gluing rings onto the sheet.
- In this case, a yellow oval is cut out of thick paper, and many strips are cut out of ordinary colored double-sided paper and rings are also glued together from them.
- You need to fill all the free space on the form.
- Then a green tail is glued on top, like a real fruit.