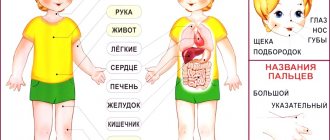
Preschoolers need to receive at least minimal information about anatomy and be able to name the parts of their body. This topic is included in the educational program for children from 3 to 5 years old. Pictures for children “Parts of the human body” help teachers of kindergartens and educational centers make such lessons not theoretical, but filled with examples, visualize new knowledge. We will tell you in our article how to structure a lesson with kindergarteners, what exercises and games help them memorize new material.
Didactic preparation of classes
The formation of ideas about the human body begins from early preschool age. Educational classes using colorful pictures “Parts of the human body” are carried out in preschool educational institutions and at home with parents.
Moms and dads set goals unconsciously, they simply strive to expand the child’s range of knowledge. Kindergarten teachers formulate goals and objectives for each lesson on the topic, based on the order of the lesson, the age of the preschoolers and the novelty of the material.
Goals
Among the goals of developmental and training sessions are the following:
- To give an idea of the human body, its parts and structure through play.
- Expand the vocabulary of a preschooler.
- Develop a desire for a healthy lifestyle, caring for yourself and your health.
On a note! When planning lessons on the topic “Parts of the human body for children in pictures,” choose clear, bright pictures where all organs are shown separately. This way, kids will better remember and understand new information.
Tasks
If the topic “Parts of the Human Body” is being taught to children for the first time, then pay special attention to introducing children to vocabulary and to activating attention and interest in anatomy. In subsequent lessons, reinforce the material, promote independent activity, and use the creative potential of preschoolers. For one lesson, it is enough to select 3-4 feasible tasks.
Educational objectives for classes:
- Give an idea of the human body, parts of the body, sensory organs and their functions (done in lesson 1 on the topic).
- Learn to correctly name and show the main organs (mandatory task for 2 and subsequent lessons on the topic).
- Give an idea of the individuality and similarity of the body structure of different people.
Developmental tasks:
- Learn to correlate words and actions.
- Develop thinking, memory, imagination.
- Provoke and improve monologue and dialogic speech.
- Develop the ability to defend your opinion and use evidence in a dispute.
- Develop fine motor skills (finger gymnastics as a warm-up, creative tasks).
- Develop articulation.
Educational tasks:
- Support the desire for a healthy lifestyle.
- Cultivate a friendly attitude towards others, interest in other students in the group.
- Teach to listen to others and not be afraid to make mistakes when answering questions.
- Develop independence.
When to start studying body parts?
So, when should you start studying body parts? Since birth. Naturally, at six months the baby won’t show you anything, but that’s not the point. In the first place is tactile contact and time spent together. It is very important that you do not just name what is called, but do it in a playful, easily accessible form. Important! In the first year of life, a child must experience the world tactilely. We advise you to give preference to live communication rather than studying with cards. Sensory experience and communication have been shown to trigger cognitive interest. Psychologist Anna Bykova
in her book
“Developmental activities for the “lazy mother”
wrote:
“Through sensory experience, relying on vision and touch, he must find similarities and differences.
“Mom also has a nose. But it's bigger than mine. And daddy's nose is bigger than mom's. And dad also has ears. If you pull dad's ears too hard, dad will scream that it hurts. And if you cover your ears with your hands, something will happen to your mother’s voice” - this is knowledge of the world, this is related to development, this is an invaluable experience, and, moreover, free.” And one cannot but agree with this.
Ways to study body parts
You can study body parts in the following ways:
- show body parts on yourself;
- show body parts on the baby;
- show body parts on a doll;
You can show it in different ways:
- show body parts on yourself with your own hands;
- use the baby’s hands to show parts of the body;
- touch the baby’s body parts with your hands;
- show body parts on other family members (dad, grandma, grandpa, brother, etc.)
Bend over so that your baby can see your face clearly. Smile. Don't show everything at once. At first, show only the nose, mouth, eyes, etc., so as not to overload the baby. Some babies show body parts by the age of one year, others show the results a little later. Don't rush the baby. Everyone has their own unique pace of development.
Progress of the lesson
A lesson in a preschool institution can be structured according to the following approximate plan:
| Lesson stage | What does it include | Duration | |
| 1. | Organizing time | We activate the children's attention to the beginning of the lesson. We greet you, seat you, create silence. | 1-2 minutes |
| 2. | Introductory part | We motivate interest in what is happening. You can ask a provocative question (Who knows how many body parts a person has? And others). Or tell an interesting story about a fairy-tale character who could not find and list all the parts of his body. Offer to help the character. | 3-4 minutes |
| 3. | Setting the task and goals of the lesson | We discuss with the children what we will do in class today, what new and interesting things we will learn (with children 3-4 years old), and create a problematic situation with children 5-6 years old. | 1-2 minutes |
| 4. | Games | Choose games aimed at memorizing the names of organs and their functions. Games can be carried out in the form of physical education. | 4 minutes |
| 5. | Warm-ups | Finger gymnastics. Performs two tasks: developing motor skills and learning the names of each finger | 3-4 minutes |
| 6. | Practical part | Let's look at the pictures. We find parts of our body from a friend, on a doll. We color, we draw. | 10 minutes |
| 7. | Reflection, summing up | We evaluate the lesson: liked it - didn’t like it. What new did you learn? Brief repetition of the main points (vocabulary). You can include riddles in reflection. | 2-3 minutes |
For children 2-3 years old, finger gymnastics replaces games and warm-ups. Can be used at the reflection stage. Learn memorable poems, show how to stretch your fingers and palms yourself.
This finger is grandpa, This finger is grandma, This finger is dad, This finger is mom, This finger is me, That’s my whole family!
Children bend their fingers on each hand separately and shake their fists intensively on the last lines.
Exercises
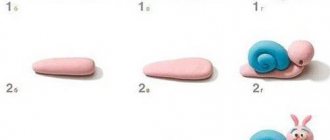
Use during the practical phase of the lesson. You will need pictures of “Body Parts” for children for clarity and example.
- Making up a person
Each child is given pictures of one part of the human body. The finished version is created in a group. Organize a competition for the elders to see who can assemble the person correctly the fastest.
- Where is the couple?
Mix up body parts for children in pictures. One pile should contain paired and unpaired parts. Task: to separate images based on pairing. Legs, ears, eyes, hands - in one, the rest - in the other.
- Call me kindly
I don’t have a hand, but a little hand, not a head, but a little head... It is advisable to combine lexical exercises with physical warm-up (stroking legs, arms, shaking your head, stretching your body to height). When naming a word, preschoolers look at pictures or photos for children “Parts of the human body.”
Important! Images cannot be printed in black and white. Pictures for viewing should be bright.
Games
Carry out game exercises in a group, actively. The main goal of the games: to provide new information in a memorable form. Positive emotions simplify the process of assimilation and consolidation.
- Why are they needed?
A game in the form of a question and answer. There are several answer options: detailed or yes - no. For children 3-4 years old, the following version of questions is suitable: Are ears needed to hear? YES! Do you need legs to eat? No! And so on.
For preschoolers in the middle group, ask a direct question: Why do they need legs, a head, etc. If possible, ask to justify the answer, give reasons.
- Robot
One child stands in the center of the group and completes several tasks from the children. For example, turn your head, wave your hand. The main thing is that when setting a task for a robot, preschoolers should use the names of body parts.
- Guess how much
The teacher shows a selection of photos on the topic “Sense organs pictures for children” and asks. How many ears, nostrils, tongues, eyes does a person have? Asks you to prove the correct answer by showing yourself.
Skeletal system
Digestive system
Respiratory system
Circulatory system
Puzzles
Lay out pictures or photos for children on the topic “Body Parts” on a large table. Gather the kids around him. Make riddles, the answer will be a raised card with a picture of the answer. Be sure to ask the respondent to name the correct organ and show it to yourself or a neighbor.
- No one sows them, no one plants them, they grow on their own! (Hair).
- In two holes the air wanders, then comes out, then comes in. (Nose).
- I’ll open my stable and show my friends the little white sheep. (Lips, mouth, teeth).
- If it weren't for him, no one would say anything. (Language).
- Ten brothers live in different houses. (Fingers).
- What do you need most at lunch? (Mouth).
- People have it. Animals have it. The person is smarter. (Head).
- Do you hear the water babbling? Wash your face more often... (Persons).
On a note! Riddles about parts of the human body can be presented in a presentation, followed by the correct answer in pictures for children.
LiveInternetLiveInternet
Tuesday, September 24, 2013 23:12 + in quote book Lesson notes “Parts of the body” Lesson “Parts of the body” Objectives: to introduce children to the parts of the human body; teach how to form plural nouns; learn to compose sentences using visual material; teach to distinguish between the right and left hand, leg, etc.; consolidate the dictionary on this topic; develop attention. Equipment: demonstration material - pictures of people, toiletries; handout - envelopes for each child with geometric shapes. Progress of the lesson. 1. Organizational moment. The teacher displays a series of pictures: girl, boy, man, woman, grandmother, grandfather. Children remember the sequence and pronounce it (the sequence of pictures changes several times). -What is the name of what is drawn in these pictures in one word? (People, person.) -Who do you think we will talk about? (About a person, about yourself.) The teacher shows a drawing of a person. — What is the name of the largest part of the human body? (Torso) The teacher shows where the chest, stomach, back are, then asks riddles: 1. For the animal - on the top of the head, and for us - below the eyes. (Ears) . What are ears for? 2. Two Yegorkas live near the hill. They live together. And they don’t pet each other. (Eyes) . 3. He can be very different: Kind, harmful, Proud, important, Long, small, hunchbacked, Long, small, hunchbacked, Thick, thin, freckled. (Nose) . -What is the nose for? A person also has a forehead, cheeks, eyebrows, eyelashes, nostrils, lips, and chin. (Children show the named parts of their faces). 2. Didactic game “One - many”. Ear -ears, neck-, eye-, hair, head, face-, nose-, mouth-... 3. Physical education minute. Girls and boys Children jump on the spot, Jumping like balls. They stomp their feet, they clap their hands. They clap, nod their heads, and quietly curtsy. squat slowly. — Guys, what were you clapping for just now? (Hands). -Show your right hand, your left. The teacher names the parts of the hand, and the children point to themselves (fingers, nails, palm, elbow, shoulder). -What did you stomp on? (with legs) 4. Similar work is being carried out. 4. Didactic game “Choose the words.” The teacher asks the children questions one by one: “What kind of eyes do you have?” (My eyes are beautiful, gray, large, etc.) - What kind of hair do you have? (My hair is thick, long, shiny, etc.) - What are your nose, mouth, ears like? (Similar work is being carried out). 5. Reading and discussion of an excerpt from K. I. Chukovsky’s poem “Moidodyr”. Oh, you ugly, oh, you dirty, unwashed pig! You are blacker than a chimney sweep, admire yourself. There's polish on your neck, There's a blot under your nose, You've got such hands that even your trousers have come off, Even your trousers, even your trousers. They ran away from you. — Guys, who do you think these poems are about? (About a slob, a dirty person.) - What should you do to be clean? (Wash your face, wash your hands, body, etc.) -Show me how to do it. Children stand one after another and imitate movements, showing how they wash themselves, wash their hands, feet and other parts of the body. -A person must be neat and clean. It is always a pleasure to communicate with such a person. To do this, you need to wash your hands, comb your hair, clean and iron your clothes, and clean your shoes every day. 6. Didactic game “What things does a person need to be clean and tidy?” Various objects are laid out on the table: toothbrush, soap, iron, washcloth, etc. Children choose any object and make up sentences. For example: A person needs a comb to comb his hair, etc. 7. Educational task - create a human figure. 8. Summary of the lesson. Children name the main parts of the human body in a “chain”.
| Categories: | Teaching is not a job, but a way of life
|
Tags:
Lesson notes “Parts of the body”
Cited 1 time
Like share
0
Like
- I liked the post
- Quoted
- 0
Saved
- Add to quote book
- 0
Save to links
Liked
0
Rhymes about body parts
nursery rhymes and short sonorous rhymes
in games with your child . This will not only help him learn body parts, but also develop his speech. We have made a selection of the best poems.
Here are the Pink Heels lying in the crib. Whose heels are these - soft and sweet? The goslings will come running and pinch your heels. Hide quickly, don’t yawn, cover with a blanket! We play with the doll. We perform imaginary actions: We wash our hands, feet, and wash our face.
My mouth can eat, my nose can breathe and my ears can listen, my little eyes can blink and blink, my hands can grab and grab everything.
I. Ilyina
These are the eyes to see. This is a nose for breathing. These are ears to hear. These are legs for running. These are arms to hug your mother very tightly.
Spider, spider, grab Anya by the side. Frog, frog, grab Anya by the ear. Deer, deer, grab Anya by the knees. Doggie, doggie, grab Anya by the nose. Hippopotamus, hippopotamus, grab Anya by the stomach. Wasp, wasp, grab Anya by the hair. Grasshoppers, grasshoppers, grab Anya by the shoulders.
Games for learning body parts for 1.5 - 2 years old
Here are a few more games for older children (1.5 - 2 years old)
What is missing?
Draw the child's face and cut out the body and face parts separately. Collect the little man together. Then remove any body part and ask what is missing. “Oh, the ears are gone. The boy doesn’t hear anything” “Oh, the eyes are gone.
The boy doesn’t see anything,” etc. You can play on a magnetic board (draw a face with a marker and glue body parts to the magnets) or make a reusable educational toy from felt and Velcro.
Mirror
Sit with your child in front of a mirror.
Touch different parts of the body, and let him repeat. Repeat after me, raise/lower your pen. Repeat after me, and grab yourself by the nose/and press on your nose. Repeat after me, open your eyes wider/blink your eyes quickly. Repeat after me, pinch your ears/repeat after me, rub your ear. You repeat after me, open your mouth / repeat after me, little mouth, now speak (we chant vowel sounds).