Animals from circles
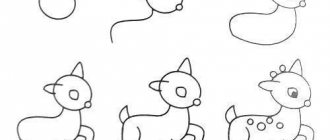
The easiest way to teach a child to draw domestic and wild animals is to use ordinary circles as a basis. This option is perfect even for kids of preparatory age.
Look how easy and simple everything is! Each time the starting point when creating a drawing will be an ordinary circle. The young artist’s task is to strictly follow the sequence of actions.
Start with the simplest characters - a puppy and a goldfish, or a curled up cat and a cute owl
Do you want to portray a forest dweller? Why not draw the face of a kind bear cub. Please note that the basis of the picture is made up of only a few circles of different diameters.
What do you think of this snail with a house on its back? To create it, you need to perform only 6 simple steps: draw teardrop-shaped figures of the body, draw eyes and a mouth, and design the twisting spiral of the house.
Creating a drawing of the inhabitants of the underwater kingdom will not cause any particular difficulties. To the round body you only need to draw the head and limbs.
The idea of such drawings is simple: the circle is simply “overgrown” with ears, noses, eyes, paws and tails. Using this simple technique, it will not be difficult to depict not only animals, but also cartoon characters beloved by many, for example, the same Smeshariki.
We portray a cat
When talking about things for children, you shouldn’t lose sight of everyone’s favorite puppies and kittens. After all, kids usually begin to learn the drawing process from them. So, in pencil? Draw the head and torso in the form of two flattened circles. To make the picture more symmetrical, you can draw a vertical line. The next stage is drawing the eyes. To make them more expressive, make the tone at the bottom much lighter than at the top. Please note that all lines must have a smooth transition. In the form of an inverted triangle, draw a nose, from which lines will go to the ears and eyes. The cat's mouth is depicted in the form of an inverted English letter Y. That's basically it, all that remains is to correct the shape of the animal with soft lines.
On the topic: methodological developments, presentations and notes
Non-traditional technique - drawing with foam rubber.
Summary of a lesson on visual arts in non-traditional drawing techniques for the senior group on the topic: “Multi-colored butterflies.”
Non-traditional techniques: tearing and rolling napkins and cotton wool. Purpose: To improve skills in free experimentation with materials; consolidate the ability to crumple a napkin (cotton wool.
Program tasks: Exercise children in laying out and pasting images of geometric shapes; fixing the names of the shapes; improve the ability to draw balls with cotton swabs; educate ac.
1. Introduce children to this image method, such as blotography, and show its capabilities. 2. Learn to complete the details of objects during spontaneous and...
lesson notes on visual arts “Cheburashka”.
Source
Create your own zoo!
The main thing when we learn to draw animals is to learn that the important thing is the construction, which always has the same basis and principles. Move with your child from simple animals to more complex ones. Try to depict them in motion, combine how many individuals in one picture: fish and dolphins, playing kittens. Soon your zoo will grow, but the young artist’s imagination will not dry out.
Understanding the principle of how to draw animals is easy. In most cases, everyone, both domestic animals and forest animals, has approximately the same body structure. But what makes one “blank” a wild wolf, and the other a cute and funny kitten? This is what we'll talk about.
Lion is the king of the animals
Representatives of the cat family rarely leave anyone indifferent. These graceful pets make children very happy, keeping them company while they play. But true delight is caused by a truly royal cat - a lion. So why not invite your child to draw it?
Cute lion cub
There is nothing difficult about drawing a charming lion cub:
- First, at the top of the sheet, closer to the central point, draw the animal’s head. It has the shape of a circle. To maintain symmetry, we divide the circle into 4 sectors by two perpendicular lines. Since the lion cub is located at an angle, we make the lines curved and slightly shifted to the left.
- We add a torso to the head, depicting it in the form of a slightly curved oval. Please note that the oval is somewhat narrowed at the top and widened at the bottom. In the area of the lower sectors of the head we draw a smaller circle. This is the basis for the future muzzle.
- In the lower part of the oval we highlight the area of the hind legs, in the upper part we draw the outline of the erect front legs. All paws fit tightly to the body of the body. We draw the tail, depicting it with two parallel curved lines.
- We draw the details of the muzzle. To do this, closer to the crossing of the lines we outline the contours of the eyes, a little lower - the nose, shaped like a heart. We add the lower jaw to the circle of the head, first forming the outer contour, and then the inner one - the lower lip. Around the nose, extending to the lower jaw, we highlight the area of the cheeks. The cheeks should be symmetrical.
- Can there be a lion without a mane? To highlight the shaggy head, stepping back 2-3 cm from the contour, we outline another circle of a slightly larger diameter. We give its frame a jagged shape.
- At the final stage, all that remains is to remove the auxiliary lines. After this, draw the tassel of the tail, paint over the pupils with black, and make the main contours clearer.
Drawing for children 4-7 years old
At this age, children can draw various geometric shapes, and their drawings based on natural motifs are already quite recognizable. Now the fidget is able to understand how to draw animals step by step.
The diagram is not particularly complicated: we learn to draw several circles (head and torso), which will serve as the basis; then we schematically depict the paws (legs), then add details and erase the auxiliary lines with an eraser.
You should teach beginning artists that the first stage of their work should be to determine the composition: where the main object will be located, which objects will be in the foreground, and which in the background.
As you can see, the animal drawings are still quite simplified and not burdened with details. All these nuances will need to be explained to the knights of pencil and paper when they grow up a little.
Stage one: preparation for work
Of course, you can simply draw an animal in the center of a white sheet and leave it in the album. And you can make this work a real pride. First, decide what you will draw with: for paints, for example, it is better to make a larger sketch. Teach your child to use a brush or sharpen pencils and erase unnecessary lines with an eraser. Then choose which animal you want to depict. If the artist shows interest in a particular animal, then draw it. While drawing, you can tell your child about this animal. Next, decide on what background you will depict the animal. If it is, for example, a cat, then create a homely atmosphere and place a ball nearby. But if you have to depict the king of animals - a lion, then draw him in the savannah. The wolf will live in the picture, but the dolphin will live in the waters of warm seas. You can find many master classes on this topic on the Internet. There are also lessons in illustrations that advise animals step by step - but they also need to be voiced so that the artist understands why he draws certain lines. You can draw, or you can come up with an image yourself. So, we draw animals step by step. Let's look at the lesson using the example of several animals.
Where to begin
How to depict animals step by step so that they are easily recognizable can be explained to both a three-year-old child and a schoolchild. Of course, a kindergartener’s instructions will differ from those of a 12-year-old child, but some common features will be visible.
- To teach a child to depict animals step by step, you need to explain what shapes (circles, ovals, rectangles) this or that animal consists of.
- Show how to make sketches that will later become detailed.
- Start teaching novice creators with simple plots. We learn as we go, so don't expect your baby to succeed right away. Gradually, the baby will learn to recreate more complex objects step by step.
Before moving on to the process, stock up on paper, an eraser and pencils: simple for sketching and colored for coloring.
Contents of lessons on drawing pets
Click on the desired option and you will go to it.
| 1 option | Option 2 - Video | Option 3 |
| Option 4 | Option 5 - Video | Option 6 |
| Option 7 | Option 8 - Video | Option 9 |
| Option 10 | Option 11 - Video | Option 12 |
| Option 13 | Option 14 - Video | Option 15 |
| Option 16 | Option 17 - Video | Option 18 |
| Option 19 | Option 20 - Video | 21 options |
| Option 22 | Option 23 - Video | Option 24 |
Pictures for kids
You can show your little one how to draw step by step those little animals that he is already familiar with. The simplest drawing technique is circles. True, for this you need your child to master these simple figures.
There is a simple algorithm for teaching little ones how to draw basic shapes: you need to take the child’s hand in yours and draw a circle with a pencil. If your little one has mastered drawing a circle, show him how you can use this shape to draw funny little animals:
In this way, you can learn to portray not only funny cats and dogs, but even your favorite cartoon characters (for example, Smeshariki).
