PROJECT “NON-TRADITIONAL TYPES OF APPLICATION IN PRESIDENTIAL EDUCATIONAL INSTITUTIONS”
In older preschool age, children master more complex cutting techniques - symmetrical, silhouette, multi-layered, as well as tearing and weaving techniques. They can combine techniques.
Preschoolers are learning new ways to attach parts: sewing them to fabric. In this case, children receive two options for the image: planar and semi-volumetric (when cotton wool is placed between the base and the part). In the second case, the image is more expressive. A semi-volume applique is also obtained by partially gluing parts, for example, only the middle of a snowflake, flower, butterfly, etc.
The content of the application is expanding. Children create more complex decorative patterns from both geometric and plant shapes. Subject applications with a large number of details become more complex. At an older age, children make an applique from straws, spreading glue on the outline of the object and gluing cut straws onto it.
Preschoolers can make multi-layered plot applications from paper, fabric, and dry leaves. This type of application is the most difficult. Unlike a drawing, in a multi-layered plot appliqué there is always a strictly defined sequence of arrangement and gluing (sewing) of forms: first, the general background (earth, sea, sky). Then the background objects are laid out and glued, and then the middle and foreground ones. Children 6-7 years old can be asked to make a pencil sketch of their future work.
Preparatory group.
New to the program material in this group is silhouette cutting. In this regard, the nature of the use of various teaching methods is changing.
When analyzing nature, the teacher draws the children’s attention to the features of the contour of the object, tracing it with his finger. You can invite children to do the same. Tracing the outline should begin with the part of the object from which cutting will then begin.
In the preparatory group for school, it is envisaged to make appliqués from objects, the outline of which includes any details (fins on a fish, needles on a hedgehog, etc.).
Since it is difficult for preschoolers to simultaneously concentrate on creating a general outline and cutting out small details, they should be shown a method that consists of two stages: first, a generalized shape is cut out from a pre-prepared piece of paper of appropriate sizes, and then details (needles and legs) are cut out along the edge of this shape hedgehog, fin and tail of a fish).
Pre-K children learn more advanced cutting techniques from folded paper. First, they consolidate the skills they acquired in the senior group when cutting out shapes from paper folded in half. As tasks they offer more complex symmetrical shapes - a Christmas tree, animals, people. When preparing the shape of a Christmas tree for appliqué, you should show how to preserve its cone-shaped structure: a rectangle bent in half is cut diagonally, and then the branches of the resulting triangle, also bent in half, are cut out along the edge. This technique can only be used in the preparatory group, since six-year-old children can proceed in constructing an image from the general to the specific and from the specific back to the general. A more complex cutting technique - from paper folded several times - is used to make napkins, snowflakes, and flowers. The teacher shows how to fold a piece of paper in the shape of a square several times (3-4), how to cut out, depending on the contour of the object being created, one or several parts located around the center (the corner of the folded square). When deployed, the cut part will be repeated 6-8 times. In the future, preschoolers will be able to use this technique independently when doing decorative work.
Thread applications
Another interesting type is thread applique. To work, you need yarn for knitting or embroidery (floss), scissors, glue, thick cardboard of several colors.
In order to make a cute lion cub, you need to draw its silhouette on colored paper. The figure is cut out and attached with glue to an A4 sheet that serves as the base. The muzzle can be drawn on white paper, cut out and carefully colored with colored pencils.
For the mane, cut a bunch of threads. Each thread should be about three centimeters long. It will take about fifteen strands. You can do more, it all depends only on your imagination. The finished threads are glued using PVA onto a round base with a diameter of 2.5 cm (that is, the base should be smaller than the mane so that the threads look free and natural). Then the lion cub's muzzle is fixed on top of them.
For the tassel on the tail you need a small bundle of thread. They can be carefully wound in the middle with a longer thread so that short strands do not come out and become disheveled. You can make a bombon or a classic thread tassel for the tail tassel. The main thing is that their sizes look harmonious with the entire figure.
Using this type of material has its advantages. Often at home there are thread trimmings or leftover yarn that can be used in work. By using thin material, the child develops fine motor skills and imagination.
Using Templates
Templates for appliques made from fabric or other materials are available in large quantities. These can be cartoon characters, flowers, elements of plants or animals, entire compositions. Templates for fabric appliqués are good and convenient because they contain all the details and elements necessary to form a holistic image.
For example, the photo above shows a horse. All details of the animal are drawn in appropriate proportions, which allows you to print the blank on paper of any size - from a small sheet of paper to A3 or larger.
Bullfinches made of threads
Thread applique is not just a children's craft. It provides the widest scope for creativity. Experienced craftswomen turn non-traditional types of appliqué into real masterpieces. Working with threads is very painstaking and requires great precision and perseverance. When starting to master this direction, it is worth practicing making small plots, mastering the creation of individual elements, experimenting with the shape of objects and the quality of the thread. Then you just need to start implementing the big plot.
To make bullfinches you will need:
- green melange threads for grass;
- white threads for the background;
- blue melange threads - sky and clouds;
- brown, black, red, gray - for berries and bird bodies;
- glue;
- thick cardboard;
- pencil.
First, a sketch of the plot is made on cardboard, which will be the basis. Bullfinches arrive in winter, most often we see them against a background of snow, sitting on the branches of trees - ordinary garden or spruce. This is exactly what needs to be drawn.
It is important for yourself to decide which block will be made in which color. This way, there will be no confusion in the location of the threads.
The background elements are done first. The base is carefully painted over with PVA glue, and then the threads are glued. The first strand can be laid in any order, but all subsequent strands will definitely follow the contour. It is more convenient to start from the bottom, first bypassing all the difficult places, and then completing a large field. After the sky and branches are ready, they begin to make the bodies of the birds. It is necessary to work carefully; the beak and paws require special precision in laying the threads. The last to be done are the berries. To make them look like real rowan, the red threads are twisted in a spiral. This makes the berry more textured and voluminous.
If desired, the base can be fabric. In this case, the threads are laid out on the base or glued as described above. Then, several stitches are made by hand or on a sewing machine, which additionally secure the threads. This applique can be beautifully decorated with a pillow or bedspread; it can also be used as an element of clothing decoration.
This thread painting will decorate any interior and will attract the admiring glances of guests.
Compliance with safety regulations
Children's creativity is a fascinating process. But it is important to remember that in the hands of a child, scissors, glue, needle and thread, buttons and small craft items can be potentially dangerous.
Parents must show how to use all this correctly so that trouble does not happen.
Making applications is an important part of the pedagogical and educational process. By working with simple images, fine motor skills of the hands develop, spherical imagination and abstract thinking are formed.
However, when working with preschool children, it is important to ensure that the child uses scissors correctly, does not put buttons in his mouth, or tastes the glue.
Safety rules for preschoolers are taught in kindergarten. Children whose mothers and grandmothers sit at home often do not know basic things. Therefore, in the absence of adults, potentially dangerous items should be kept out of reach.
Children, wanting to repeat the creative process, may take something without permission and use familiar objects in some other way.
Applications for children 4-5 years old
At this age, colored paper applications and templates for them become more complex. By preparing, together with an adult, elements for a future picture, the child shows more independence: cuts, selects colors and, thus, gains an understanding of composition.
This activity develops logical thinking and allows you to show creative inclinations.
For children 4-5 years old, a fun activity is making cards, which they then give to their parents and friends.
The base is folded in half and elements are glued inside the postcard to form a plot picture.
The templates developed by specialists are only examples indicating the direction of work.
Parents and educators can contribute their ideas. For example, using a cut out outline of a baby’s palm in an applique – such pictures evoke amazement and delight in children.
Applications with palm
The technique of appliqué using only circles reveals for the child the relationship between the parts and the whole.
When developing a child’s creative imagination, you should show him various techniques for working with paper: for example, folding it in the shape of an accordion. For such a picture you need to prepare a base and draw contours. The gluing process also becomes more complicated.
Non-standard creativity
To develop your imagination, some types of applique can be improved. Conventional technologies combined with non-standard materials or approaches can give interesting results.
For example, a standard applique, in which flowers are the main motif, will sparkle with other colors if you use an unusual material.
To work you need:
- thirty pieces of cotton swabs;
- green paper;
- three pieces of yellow plasticine;
- blue or white paper for background.
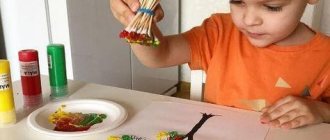
First, you need to carefully trim the heads of the cotton swabs with scissors. This must be done carefully to avoid injury.
Then on green paper you need to draw the outline of dandelion leaves and stems. The cut out leaves are glued to the base.
From yellow plasticine you need to roll three approximately equal balls, which are then flattened with your thumb. Cotton swabs are carefully pressed along the edges of the plasticine with the plastic bases inward. Then the resulting blanks are carefully lifted and, using the same piece of plasticine, attached to the stems of the flowers. The resulting applique, the flowers in which are made in such an unusual way, looks very interesting. Using this technique, you can make a hedgehog by gluing sunflower seeds or buckwheat onto PVA instead of needles. Any natural material, as well as any scraps of fabric, leftovers from handicrafts, etc. can be used.
Complex techniques for paper art
Moving from flat applique to more complex types of paper crafts, it is worth recalling other varieties:
- Volume applique. Combines several other subtypes of working with colored paper. It is intended to use flat, three-dimensional, convex and curled paper fragments in one image.
- Application made of thin tubes. Old rolled up newspapers are a great material for crafts. These are “twigs” for a nest for Easter eggs. You can weave a bread box or basket out of them, painting them like wood. Imitation of metal elements will help to decorate an old sugar bowl, samovar and teapot for a cottage in a “vintage” style.
- Decoupage. A popular technique for which you will have to purchase special napkins with a suitable image in order to update kitchen utensils and interior items.
As you can see, applique, planar and volumetric, has great potential for those who want to do some kind of creativity at home. It's much easier than painting pictures, crocheting blankets or weaving macrame.
You can choose just one or master several types of Japanese origami, which adults are often keen on.
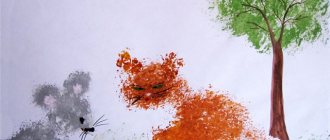
Autumn themed applications
The bright colors of autumn make it possible to create colorful pictures of autumn nature. For applications on this theme, both colored paper and natural materials are used: multi-colored leaves, petals of late flowers, seeds, spikelets, twigs and other objects.
When making autumn-themed applications from colored paper using templates and in a free composition, the main attributes are preserved - flowers, mushrooms, fruits, acorns, and tree silhouettes are cut out and painted. An obligatory component is autumn leaves.
When working with natural material, you need to prepare it. The collected leaves must first be leveled and dried under pressure. If the leaf needs to be given any shape, then a fresh leaf is used for this, which is then dried.
For collages and mosaic paintings, you can prepare cardboard templates onto which the elements are glued.
Autumn nature is fertile ground for the flight of children's imagination. Leaf applications placed in a photo frame will decorate any interior.
Autumn lanterns will also be a spectacular decoration. To do this, the outside of the glass vessel is covered with multi-colored leaves (paper or natural), and a small candle is placed inside.
Creativity on fabric
Applique on fabric is an interesting way to decorate clothes. This way you can decorate both adult and children's things. Many couturiers, from classics to modern ones, deservedly pay great attention to this type of decoration.
To decorate clothes or bags like a fox, you need several pieces of fabric - 10 by 10 cm orange, 5 by 5 cm white. You also need black thread and an embroidery needle.
First, a blank is drawn on paper - the fox's head, body and tail. Then draw two triangles - for the muzzle and for the chest. The resulting designs are transferred to fabric and cut out.
The blanks are sewn to the base from the front side. You can do this with a sewing machine or sew on by hand.
To create a plot, flowers and butterflies are sewn near the chanterelle. You can cut them out of fabric and use curly buttons.
The edges of the fabrics can be processed or left free - any option has a right to exist. A fox does not have to be red - even a purple animal will look interesting.
Applique on fabric is a universal way to decorate things, simple and affordable. Since the work requires scraps of material, this gives a lot of scope for imagination.