DIY creativity corner
Irina Serganova
Do-it-yourself creativity corner
Creativity corner (decoration)
in the second junior group.
Hello my dear friends, colleagues and just guests of my page of our favorite site! I hasten to share with you photos of the design of the creativity corner in my group . I try to decorate from available materials, such as cardboard boxes. This is a very good material not only for decoration, but also for kindergarten crafts.
At first it was just a table with two drawers, which was placed between the cabinet and the theater screen. The table was turned towards the wall with drawers so that children could not open them for safety reasons.
I bought a shelf at Fix Price on which I placed plastic cups with colored pencils.
I drove two nails into the wall, tied a string, and attached the children's work to clothespins.
The corner has everything you need for children's creativity : there is glue, brushes for glue and painting, stamps.
Stencils for tracing
Albums and a large number of coloring books for both girls and boys.
Colored paper, cardboard, plasticine, gouache.
Easel for drawing and exhibition of children's works.
This is the design I came up with for the children's creativity corner .
Thank you so much to all colleagues for your votes and support!
Do-it-yourself busy board A child who learns about the world around him strives to touch and try everything. To give them the opportunity to play with all sorts of things to their heart's content. Do-it-yourself busy board The child enjoys exploring the world around him. He is interested not only in toys, but also in all objects around that may pose a danger: DIY games Hello, SUMMER! So much sun! How much light! So much greenery all around! What is this? This SUMMER is finally rushing into our house. There is a diversity of songbirds. DIY felt painting of a corner of nature Hello, this time I would like to tell you about a visual aid I made with my own hands. Naturally, the idea is not new and is possible somewhere. Do-it-yourself carpet rug A carpet rug is a fascinating and unusual educational tool for children of any age. It can be used in groups and individually. Do-it-yourself laptop on traffic rules In connection with the implementation of the Federal State Educational Standard for preschool education, every teacher is looking for new approaches, ideas, forms and methods in their teaching activities.
DIY frame DIY frame. Objectives: Educational objectives: to expand students’ knowledge about the variety of crafts made from waste material; introduce the species.
Do-it-yourself theater A preschool child is a real listener, dreamer, researcher. When playing a fairy tale, children use various types of theater. Question. Do-it-yourself sensory development corner in an early age group Bondarenko I. A., Barsukova L. I. DS “Cosmos” Volgodonsk Sensory development of a small child is a necessary component for.
Source
Do-it-yourself art corner.
Larisa Savchuk
Do-it-yourself art corner.
Corner of fine arts “Country of Creativity”
with your own hands for children of the fourth year of life .
One of the main tasks of the educational field “Artistic and aesthetic development”
are: development of
artistic and creative abilities of preschool children, interest in independent creative activities ( visual , constructive-model, musical, etc.); satisfying children's need for self-expression.
The most important condition for the implementation of tasks is the creation of a developmental, subject-rich, emotionally comfortable, aesthetically attractive, accessible, safe and other educational environment in accordance with the needs, interests, age and individual characteristics of children.
In our group, we try to create all the necessary conditions for the development of creative expressions by all available means that encourage self-expression.
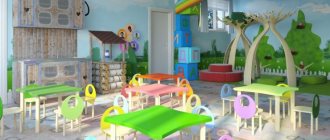
such a cozy, bright and attractive art corner for children. A large poster was placed on the wall: “The Land of Creativity .”
We placed a desk on the right and placed pencil cups on it, also made by us.
Cups of different colors correspond to the colors of the rainbow. Each glass also has its own place - a flower.
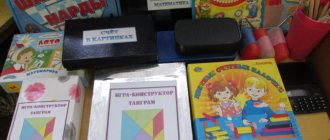
Also on the table is a box with stencils made of thin, colored plastic.
Pencil holder made from 6 identical cream boxes, glued together and covered with self-adhesive paper
Covered boxes for coloring books, papers for free drawing
Next to the table, on the wall there is a small stand for children's work. To make it, we used a mosquito net for plastic windows, stretching colored ribbons over it.
On the left side they placed a small cabinet with shelves and decorated it.
On the top shelf were placed pencils made of thick cardboard and covered with colored self-adhesive wallpaper.
We pasted over different boxes containing a variety of materials for visual arts with children.
On the wall are our irreplaceable voluminous pencils, which are restored year after year.
Caterpillar placed on the wall of the cabinet
we have such a bright and attractive
And for parents in the reception area we have a large stand “Our Creativity ” made of ceiling slabs
Corner “Our creativity”. Design option for a creative corner for an exhibition of children's work
Oryshchenko Galina Andreevna
Corner “Our creativity”. Design option for a creative corner for an exhibition of children's work
Hello, dear colleagues, friends and just guests of my page! I present to your attention an option for designing a creative corner for an exhibition of children’s works in the reception area “ Our Creativity ”.
When we moved to a new group, we did not have a special corner for hanging our children's creative works . And then a brilliant idea came to my mind! Why not make a corner “ Creativity of our children ”
with your own hands! And this is what came of it!
To create it I needed:
• Paint “Ruduga-26”
for ceilings and walls
(for children's institutions)
water-based, acrylic white, matte, economical;
• Kohler paint of different colors;
• Clothespins or clips for fastening works ;
• Glue liquid nails + gun;
• Colorless acrylic varnish for finished works ;
• Wide wooden slats for decorating birch trunks ;
• Thin plywood for the tree crown;
• Artificial leaves for decorating tree foliage ;
• Decorative elements of butterflies and flowers to decorate the finished corner ;
The creative corner turned out to be bright and big! Children like to display their work on a stand and then look at it with their parents in the evening.
DIY art corner. Design ideas
Larisa Savchuk
DIY art corner. Design ideas
Hello, dear colleagues! I bring to your attention an option for decorating a corner of visual activities . In the new school year, my students and I moved to a new group, and since this only happened on September 10 and the school year had already begun, it was necessary to urgently arrange the play and learning areas. There was no time to think for a long time, there was no time to make anything special, and I had to quickly design my art corner in a matter of days. And here is the result.
I cut out pictures from colored self-adhesive wallpaper: rainbow, sun, palette, etc.
I made funny blots from thick transparent film and self-adhesive wallpaper. The idea of making blots was borrowed from
Olga Molyashcheva.
A big THANK YOU to her!
I selected various suitable color pictures. I covered them with tape and cut them out.
To make a stand for children's work, a mosquito net from a plastic window was useful. I inserted decorative buttons onto the sides of the mesh frame and pulled colored laces (braid, ropes)
and hung small clips.
Then I designed the stand and the wall .
Children's works made in different techniques were placed next to the stand.
And these are paints made from a candy box.
This is what the corner of visual activity and sensory development looked like when we were in the junior, middle group.
And this is how is decorated . It is made of ceiling tiles. Children like to display their work on a stand and then look at it with their parents in the evening.
Here in the reception area there is also a sports corner . Due to lack of space, all material is placed compactly and in boxes.
Information for parents is posted on such stands.
THANK YOU FOR YOUR ATTENTION!
Our group “Sunshine.” Design ideas. Dear colleagues! I would like to invite you to visit our group “Sun” and share some design ideas. I love it very much. Design of the group “Squirrel” I invite you, dear colleagues, to our group “Squirrel”. I want to share with you ideas for designing my group. I work in a new kindergarten.
Source
Art corner in kindergarten
Drawing and modeling not only develop fine motor skills, stimulate imagination and imaginative thinking, but also teach you to compare the resulting result and the original, analyze the shape of objects and ways of conveying it. Creative activity forms in a child perseverance, determination, a desire to try something new, to express himself and show his vision of the world.
A striking example of how to properly design a fine arts corner in a kindergarten
Therefore, in the kindergarten group it is necessary to provide a place for artistic activities. A place where a child can independently engage in creativity should be characterized by the presence of all the necessary materials:
Reproductions of paintings, folk crafts (painted nesting dolls, clay toys, trays and patterned wooden spoons) and small plastic sculptures will help expand your understanding of the beauty of the surrounding world.
It is also important to provide a stand in the group to display children’s drawings and plasticine figures.
Important! Praise encourages the child to continue creating and he becomes more confident.
Decorating a corner in the junior group of a kindergarten with your own hands: Russian folk art
Decorating a corner in the junior group of the kindergarten “Russian Folk Art”
Author: Beloglazova Elena Aleksandrovna, teacher of the kindergarten “Alyonushka”, Novokuibyshevsk, Samara region. Description: this publication will be of interest to kindergarten teachers. Goal: Decorating a corner in the junior group of the kindergarten “Russian folk art” Objectives: - to introduce younger preschoolers to the origins of Russian folk art; — to involve parents of pupils in the design of the corner - “Russian folk art” My work as a kindergarten teacher began in the junior group, we got the group after kindergarten graduates, so the important point was the design of the group, the creation of a subject-spatial environment that would be comfortable and met the age requirements of children. Dear colleagues, I propose to your attention the design of the “Russian Folk Art” corner in the group. We all understand the importance of introducing children to the origins of national culture from an early age. Having explained to the parents of the pupils the importance of this area in the development and upbringing of their children, having received their approval and support, we began to design the corner. We allocated a place in the group so that it was open and accessible to children, and started decorating. Since the birch tree is a symbol of our Motherland, people wrote songs, proverbs and sayings about it, I chose it to decorate the wall. The birch trunk is made of whatman paper, which I bent and decorated, the leaves on the trees are made from ready-made decorative decorations, artificial leaves that I inserted on top.
As you can see, the first Russian antiquities appeared on the shelf: this is a samovar, which was given to us by the grandmother of one of the pupils, on which we hung a bunch of drying sacks. Next to the samovar we placed a loaf of salt dough made by our parents, (the loaf in the photo below) appeared jars, wooden spoons, and a matryoshka doll. And of course, the main decoration of the corner is our Russian beauty, in a red sundress, who is rightfully considered the owner of the corner, she was also given to us by our parents.
Our corner continued to take shape, and soon a Russian beauty appeared on the wall, leading a round dance around our birch tree. We designed the inscription for the corner “Russian folk art”, the letters were cut out of colored paper and glued to tape.
Soon, Russian folk instruments appeared in our corner: balalaika, accordion, bells, pipe, etc.
So gradually our corner was transformed. Due to new fire safety requirements, we slightly changed the design on the wall, we left the birch symbol, but now we painted two birch trees with paints, the inscription on the corner was also made with paint. Now our corner looks like this:
Together with parents, we continue to replenish and enrich our corner. For children, a folder was created with drawings for Russian folk tales, which were made by parents and children at home. Children love to look through the folder with drawings while in the corner and share their impressions of which fairy tale they like painted with my parents.
Here are some works: Fairy tale “Snow Maiden”
Fairy tale "Bubble, straw and bast shoe"
Fairy tale "Kolobok"
Together with my parents, poems and nursery rhymes about the nesting doll were decorated in the corner, in the form of a collection of “Matryoshka’s poems and nursery rhymes,” which I read to children during special moments.
This is not the end of the design of the “Russian Folk Art” corner in our group; we continue to replenish it and expand the material. I would be very grateful to hear your wishes and recommendations. Thank you all for your attention!
We recommend watching:
Physical education and health corner in kindergarten Do-it-yourself group and reception room decoration Welcome corner in kindergarten Do-it-yourself nature calendar in kindergarten
Similar articles:
DIY Autumn panel
Federal State Educational Standards requirements for creation and design in preschool educational institutions
According to the requirements of the educational standard, an activity corner must be provided in a well-lit place. Furniture and materials must be of high quality. The content of the corner should correspond to the age of preschool children, and creative materials must be changed from time to time or supplemented with new ones.
The most optimal furniture for a corner is a cabinet with open shelves on which you can place inspiring items (albums, reproductions of paintings), and isolate the materials necessary for creativity (paper, glue, scissors) from children and store them in a closed bedside table or drawers. Or it could be a table combined with a shelving unit.
For your information! For organized storage of all necessary materials (cardboard, paints, plasticine), you can use boxes of different colors or plain ones with bright symbols of the contents.
To maintain a creative mood, you can add an easel, on which it is useful to mount a painting by a famous artist for inspiration or the best work done by the children.
For storing pencils, brushes, as well as natural (cones, shells, grain, etc.) and waste (buttons, sequins, beads, etc.) materials, plastic or tin glasses of the same size and bowls are suitable.
Analysis of the design and operation of the art corner
In kindergartens, competitions are often held for the best design of the art corner.
An example of furniture arrangement in the fine arts corner
However, any teacher can analyze the pictorial corner in the kindergarten - you just need to answer the following questions:
An art corner organized in a group in a kindergarten helps develop a child’s creative abilities, instill artistic taste and teach children to independently look for ways to depict their fantasies.
Source
Guidelines for decorating a creativity corner
Zhanna Dilman
Guidelines for decorating a creativity corner
Guidelines for decorating a creativity corner
According to the modern educational standard (FSES),
the design of creativity centers in a group must meet the following requirements:
1. The corner is located in a well-lit area (near the window)
place.
2. The equipment meets the needs of the given age. After all, each age category is unique. For example, younger preschoolers are in the process of adaptation, so the teacher does not need to change the design . Children's attention should not be distracted by unnecessary details. In addition, the creativity corner should contribute to the development of children’s sensory skills. At an older age, conditions for self-expression are more important.
3. Materials for creativity and aesthetic development (for example, picture albums)
should be freely available to preschoolers so that they feel like
“masters”
in the group.
4. High aesthetics. A good corner attracts children's attention with its beautiful design . The guys should feel comfortable there. “childish” that is important
design - inclusion of
game characters in the design (pictures and dolls, creative works of students .
5. Multifunctionality. The gaming environment can be modified depending on the learning situation, combined with other zones. After all, groups are not very large rooms, so every meter must be used rationally Equipment and materials should be easily transformed to create a new game. For example, with the help of the creativity corner you can organize a role-playing game “In the artist’s workshop”
(combined with
the theatrical corner ) .
6. Variability. The equipment of the zone changes periodically: new material for creativity , children's demonstration works and design . In addition, conditions should be created the corner (for example, drawing, modeling, coloring pictures)
and group activities.
7. Safety and high quality of materials used in creating the zone. This applies to both furniture and means for directly equipping the corner (for example, scissors and glue should be stored in boxes with a lid)
.
8. Compliance with the gender principle. As you know, boys and girls have their own preferences. The teacher should take this point into account when selecting material in the creativity (in particular, offer coloring pages with cars, airplanes, robots and princesses, flowers, butterflies, etc.).
Occupancy of the creative center in groups :
1st early age group and 2nd early age group
Materials for creativity are given to children under the supervision of an adult.
Senior and preparatory groups
Paper of different sizes, shapes, textures and colors, colored pencils from 12 to 24 pcs, gouache 9-12 colors, watercolor 12-16 colors, jars for washing paint brush lint, fabric napkins, colored wax crayons, felt-tip pens, brushes, plasticine, stacks, modeling boards, oilcloths for covering tables, equipment for appliqué: scissors, paper of various sizes and colors, glue brushes, napkins, stencils for dishes, vegetables, fruits, etc. Silhouettes of animals, birds and humans, coloring books for girls and boys, materials on non-traditional drawing techniques: pokes, candles, toothbrushes, cotton swabs, stamps, samples of mixing paints (for example, white + red = pink, etc., the presence of diagrams of the sequence of drawing, sculpting, applications taking into account age and gender specifics.