Clay crafts
In the old days, potters were revered people. They produced household utensils, dishes, and made toys from the remains of clay. Clay was mined near the village. Plastic fatty clay without impurities is located in the soil between layers of black soil and sand. It was soaked in a wooden trough, diluted with boiling water, mixed and placed on a small layer of ash.
Stir until smooth. The images surrounding them were created from the clay mass: domestic animals, peasant young ladies, birds and animals. Bear cubs with a barrel of honey became a symbol of goodness, birds brought happiness to the house, and horses represented a rich harvest.
The figurines were fired in a Russian stove, where dry wood created coals with a temperature of 600 - 700 degrees.
In the morning, the products were taken out of the cooled stove and dipped into a lime solution. After drying, they painted the crafts using natural means - paint from a decoction of onion peels, soot extracted from a chimney, and beet juice. Experienced craftsmen felt the clay and its structure. The hand and soul of the master was felt in every sculpted toy.
Matryoshka
To create this beautiful doll you will need:
- Colored paper or colored cardboard;
- Velvet paper for decoration;
- Scissors;
- Glue;
- White sheet of paper;
- Hole puncher;
- Colored pencils or markers;
- Glue;
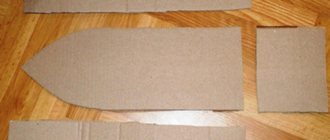
- Matryoshka doll model, it can be made from cardboard.
Manufacturing process:
- Take the stencil and apply it to colored cardboard. We trace with a pencil;
- We carefully cut out our future matryoshka doll along the contour;
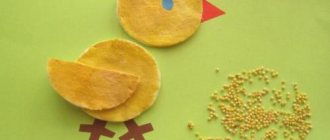
- Cut out a small circle from white paper. This will be the face of our nesting doll. It needs to be glued to the doll;
- You need to cut out a small rectangle from velvet paper. We also glue it to our nesting doll;
- Cut out white stripes from white paper. Their width and length can be very different. Use a hole punch to make holes on these strips. In addition to the holes, you can try making openwork curls around the edges;
- We glue these strips on the sides of the triangle;
- Using felt-tip pens or pencils, draw the face of the nesting doll;
- Cut circles of different sizes from paper of different colors. We will make patterns from them. These parts are attached to the apron of our nesting doll. You can arrange them in any order.
Russian crafts for children are not very different from each other. They have the same patterns. But despite this, they look very presentable and beautiful.
Wooden toys
Scenes from the surrounding life became the theme for creating wooden crafts. In villages, children played with dolls made with an axe. With the advent of the plane and other woodworking tools, toys began to transform and improve.
Tumblers, which are now made of plastic, first appeared in the 19th century. Back then they were made of wood. They were painted to look like merchants, clowns, and funny fat women. Using a knife, two halves were cut out of linden, and a weight was attached inside the round blank. Both parts were glued together, painted, dried and varnished. This traditional Russian toy was the first toy in life for many generations of children.
Ancient folk traditions are being revived again. Russian art, dormant in grandmothers' chests, is becoming more popular every year. It evokes admiration among foreigners and pride among descendants. Now there are many sites on the Internet where master classes show and tell in detail how to make a folk craft yourself.
Winter beauty
Making a kokoshnik for the Snow Maiden with your own hands will not be difficult if you consistently follow all the steps:
- Determine the size and shape of what it should be - like a dome, flower petals, the outline of a snowflake.
- For symmetry, the paper is folded in half and then the base is cut out. The core is made with an indentation of two centimeters;
- Cardboard blanks are cut out using the resulting templates.
- If the cardboard is not colored, then it is covered with fabric on both sides, allowed to dry, then folded and glued the edges;
- The best way to decorate a dress for Santa Claus's granddaughter is with snowflakes, arranging them with rhinestones. It is good to emphasize the contours with fringe or tinsel;
- A beautiful ribbon is sewn to support the headdress on the child's head. Additionally, you can use invisible ones.
Amulet dolls
Rag dolls-amulets were popular folk crafts in Rus'. These are traditional Slavic crafts that have a certain symbolism. Each doll has its own purpose:
- “For good luck” is a female talisman
- “Family” is an assistant in creating a family and a guardian for an already created one.
- “Krupenichka” is a symbol of prosperity
- “Wisher” - an assistant in the implementation of plans
- “Herbalist” protects the house and creates comfort.
The names of the dolls are also known: “Vesnyanka”, “Uteshnitsa”, “Pelenashka” and others. The dolls were dressed up, but their faces were not depicted. According to beliefs, it was believed that a faceless, inanimate doll was inaccessible to the instillation of evil forces and evil spirits into it.
The craft was created from scraps of old clothes; they believed that worn things retain human warmth and themselves ward off misfortunes. The dolls had a simple design, but they always included the outline of a female figure and a long braid.
Rag dolls were an analogue of ritual figurines associated with wealth, fertility, peace and harmony in the home, and the veneration of motherhood. From an early age, the child realized the importance of the mother, her role in giving life.
The toy's head was stuffed with millet, straw, and shreds. The dress, aprons and scarves were different in color. Clothes were decorated with lace and embroidery. The image of the doll reflected the character and occupation. Amulet toys brought good luck to the house, drove away illnesses, and comforted children. Now these cute souvenirs immerse you in the mysterious world of your ancestors and the uniqueness of their culture.
Birch
This tree can become not only a souvenir, but also a talisman that will protect you from misfortunes and bring good luck, health and wealth.
We make a circle out of wire. And we will make the tree itself from large and coarse thread. The thread can be multi-colored, and the branches can be made from beads of different colors.
We recommend reading:
Craft bullfinch: detailed description of how to make a bird with your own hands (115 photos)Crafts from vegetables: 100 photos of the best crafts for children and a review of recipes for adults
- Craft ship: 120 photos, templates, drawings and step-by-step instructions on how to make a boat
To make the threads hold tighter, you need to make a wire model, and then wrap them with thread of the desired color. The roots are brown, the trunk of our birch tree is white and black.
Straw masterpieces
Straw is the stems of cereals. The basis of the toy for peasant children was a bundle of straw, folded in half and tied with a rope. The fan-shaped straws resembled a sundress. These were the first straw creations.
Over time, this type of creativity improved, and ideas arose for creating not only human images, but also all kinds of little animals, golden-maned horses, and deer.
Skillful weaving and artistic taste, imagination and ingenuity of talented people led to the creation of wonderful plates, boxes, chests, hoops, bracelets and many other original souvenirs.
Crafts made from material saturated with the sun, nourished by mother earth and the warmth of human hands, create a certain style for a fashionable interior.