If you don’t know what craft to make for school on the topic of fire safety, then read the article and look at the photo.
It is very useful for a child to know that fire is not a toy. Thanks to classes in kindergarten or school, children clearly learn how to behave in the event of a fire or how to prevent it. Teachers or educators, in order to reinforce the material, assign homework - to do work on the topic of fire safety. Some parents can't figure out what to do.
Don't worry - the task is only difficult at first glance. In fact, crafts can be made from various materials, and they come in varying degrees of complexity. Even five-year-old kids can do some of them under your guidance.
Three-dimensional crafts on the theme of fire safety: photos
Such works can be made from various materials:
- colored cardboard
- plasticine
- cardboard
- unnecessary boxes
- wood, natural materials
- test
- fabrics
There is a wide variety of subjects for creativity. Look at the images below. You can make a small copy of a house, a fire truck, a small model of an apartment, or just a fire extinguisher, etc.
Three-dimensional craft - Firefighters are going to put out a fire in a house Craft on the theme - Matches are not a toy for children
Craft for the competition – Fire safety
IMPORTANT : Thanks to such joint crafts, your kids will successfully learn the material about fire safety.
More complex crafts
As you gain certain skills, you can move on to more complex crafts. Already at school age, interest in other technologies appears. Attention is paid to quality of execution, volume and layout.
Volume projects
Volumetric crafts are created in different ways:
- Volumetric figure. An example would be a campfire, a common cause of fire. Logs (cylinders of thick paper) are laid out on a sheet of cardboard; a bunch of “flames” cut out from colored paper in red, yellow and orange are collected in the center.
- Three-dimensional pictures are made in the form of a double-leaf postcard made of thick paper. On the inside of one of the halves, various figures are glued to the bent edge: an image of a fire, trees, which are pressed by the second flap, but when it is turned away, they take a vertical position. On the second half, a drawing or appliqué is made. When positioned vertically, it creates the main background of the picture.
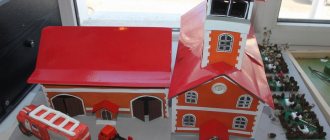
Complex crafts are available for older children. The photo shows the three-dimensional composition “Fire Extinguishing”. In it, each element is made in different ways. For example, in the photo the fire truck is made of Lego, the firefighters are made of plasticine, and the burning house is made of wood rods laid in the form of a log house.
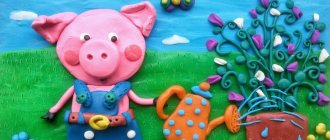
Crafts on the theme of fire safety from plasticine: photos
From this material you can create applications on cardboard or original, three-dimensional figures. The sculpting process itself captivates not only children, but also adults. From plasticine of different colors you can make an excellent fire truck with a ladder and firefighters.
Thanks to the creation of such products, children will learn not only the ability to do handicrafts, but also master fire safety rules. After all, during the process there is usually a conversation, and senior interlocutors tell how to behave in a particular critical situation. Children absorb information with attention. In the future, they will know what to do correctly when a threat arises.
DIY fire truck made from plasticine
If you have a talent in fine art and a rich imagination, then making a picture from plasticine will not be difficult for you. You can create real sad consequences that arise from a fire. Also explain to your child why fires happen, how to behave in case of a fire, and where to call in case of trouble.
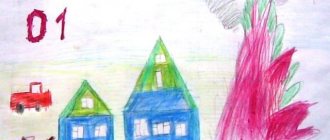
Plasticine painting - Call 01
Brave firefighters - warm hearts!
So that children are not afraid of their uncle the fireman, but know that he is always ready to come to their aid, we are launching the “Fireman” application.
- Take an A4 sheet of paper and place it horizontally in front of you. Better blue or dark blue.
- We find an image for the blank and transfer it to regular cardboard. We cut out the blanks.
- We outline the blanks on colored paper on the reverse side.
- Cut out parts of our applique image.
- We collect them on a sheet of blue paper and glue them.
- Now the fire. It will consist of several flames of different colors. You can draw it yourself or use blanks. Don't forget the firewood. If you have chosen birch trees, draw them. If on another tree, colored paper will always come to the rescue.
- A pipe can be cut out of paper, even water that was used to put out a fire.
All you have to do is learn a song about fire rescuers and the job is done for 5 or more!
Paper crafts on the theme of fire safety: photos
If you urgently need to do work on such a topic for school tomorrow, then perhaps the fastest way to create it is to create three-dimensional models from paper and cardboard.
Paper crafts for the competition – Fire safety
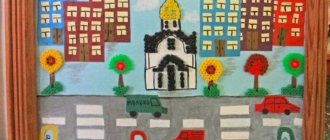
You can also use pictures for the background, as in the photo below. For this you will need felt-tip pens, pencils, and paints.
Fire safety in the forest
Applications
One of the most common trends in fire themes is applications. A simple craft in the shape of a fire truck is made from colored paper. The photo shows a cutting diagram. The outline of the parts is drawn on paper and cut out. On a thick sheet of paper on which the desired color background is created, the largest parts are first glued, and then the small ones are attached to them.
It is more difficult to make a composition. The photo shows a firefighter fighting a fire. His figurine can be cut out from a magazine or printed on a color printer, assembled from a certain number of parts cut out of colored paper. Lines and very small details are drawn with a felt-tip pen.
Crafts on the theme of fire safety from salt dough: photo
What child doesn’t love making all sorts of dough figures? Any child will love this activity. But before you start working, you will need to prepare the dough itself and the necessary tools.
Dough recipe:
Components:
- Fine salt - 220 g
- Flour - 220 g
- Sunflower oil – 130 ml
- Water - 1-2 tbsp.
- Colored gouache, or vegetable juice for coloring dough
Preparation:
- In a separate bowl, mix salt, flour
- Then add oil, water, gouache or juice there
- Knead the dough until the color is even.
To make a craft from salt dough, prepare tools and auxiliary materials, without which you will not be able to make figures. You will need boards, a knife, brushes, paints, rags, water, etc.
DIY salt dough crafts. Firemen
IMPORTANT : After you make crafts on a given theme, you will need to dry them. There are several ways to dry products. If there is nowhere to rush, then you can simply place the products in the room, but not on a hot radiator. Otherwise, the craft will crack. If the figures are needed by tomorrow, you should use the oven. It is enough to put the product in a cold oven and then dry it at a low temperature.
Making a fire truck
Sometimes kindergarteners get scared when they see a fire truck. And they may even cry. They can be understood. A huge car, buzzing like a beacon, rushes through the city at great speed.
In order to instill in children a friendly attitude towards fire engines and their owners, this is done with them using various methods.
Crafts from semolina
This technique is useful for developing fine motor skills. You will need gouache, semolina, glue, colored paper or pencil.
- First, let's color the semolina. We paint semolina into a bowl for works of art. Mix evenly with gouache. Then we lay it out on old paper (you can use old wallpaper) to dry.
- After complete drying, draw (or stencil) a fire truck on colored paper.
- Apply glue to the drawing.
- Semolina is taken, which is poured in this way first along the contours of the pattern, then from the edges to the center. We are waiting for it to dry completely. The excess semolina is removed and the fire truck is ready!
Craft applique
The application method is very simple. But it is suitable for both small children and older children.
- Find a drawing of a fire truck
- Transfer to cardboard.
- Cut out all the details.
- We outline the blanks on colored paper (we will need black, white and red paper).
- Cut out colored blanks.
- Draw the outline of the design on blue construction paper. We glue the parts of the fire truck one by one according to the diagram.
- When the machine is ready, you can outline the outline with a black or red marker for clarity. You can glue clouds of cotton or cotton pads to the top of your work. If the fire truck doesn't take up the entire leaf, you can create a tree next to it. Also depends on the method of application. The whole landscape will open up.
Crafts on the theme of fire safety from beads
Those who love painstaking processes will enjoy creating various crafts on the topic - fire safety from beads . From this material of different colors you can make bright applications with instructive examples of how to protect yourself from fire. If you are a master in this matter, then voluminous works in the form of a fire extinguisher and other figures will be up to you.
Fireman made of beads
Quilling
This is a very simple method to implement, but it offers a huge amount of creative potential. Its original spaces allow the flame to be conveyed in different ways. Using paper of different colors, you can create unique combinations.
Torn applique technique.
Fire can be made using such an interesting method.
A master class on this technique is very easy to conduct.
- We take blue paper with a thickness of 4. The base backing (the background color of the paper) should be thick. Otherwise, the glue will be heavily impregnated and the sheet may not hold up.
- A pencil drawing is applied to the main pattern of the background sheet.
- Sheets of paper representing flames are prepared. We carefully tear off the paper, creating pieces of different colors and sizes.
- We take larger parts and begin to fill the space with them (flame, fire, bonfire). So medium size. We end up small. Each piece is glued separately. Otherwise, the work will look sloppy.
It is necessary to ensure that the parts do not spread along the edges of the structure. Otherwise you will end up with sloppy work.
At the same time, we talk about how to put out fires. What materials do we use to extinguish? Then, quietly influencing the child, we try to convey to him the necessary information.
All that remains is to organize the exhibition and photograph it. So that the children in the future can see what beauty they can make with their own hands!
Felt fire safety crafts
For craftswomen who love to sew, it would not be a bad idea to teach their child this art. At the same time, explain to your child how to properly handle a needle (that it should not be left anywhere after the process). But such a beautiful fire extinguisher is made from a bottle with a sprayer, covered with a felt cover.
Fire extinguisher covered with felt fabric
Home Security
Home safety plays an important role in a child's development. Once children are taller and able to take things off the shelves, new safety topics need to be introduced.
Create a short comic. For this you will need felt-tip pens or pencils.
- A cooking stove is drawn on a piece of paper. The burners should be depicted in red, thereby indicating their temperature.
- A child touches the stove and severely burns his hand.
- The child decides to repeat his mother’s actions and drain the water from the pan into the sink, but cannot cope and is doused with boiling water.
- You need to eat carefully and slowly, otherwise you may choke.
- You cannot drink various liquids without adult permission.
- Well, the last picture can depict careful handling of cutlery. Especially with knives and forks.
All crafts should be created as clearly as possible and accompanied by clear explanations of the actions. It is better to show the fork and its correct position in the hand. Explain that the knife is held in the dominant hand and the fork in the other.
Fire safety crafts made from fabric
Also, by combining several types of fabrics, you and your children can sew a brave fireman who is always ready to save people caught in the clutches of an insidious fire. In addition, if you glue a house out of cardboard and then cover it with fabric, you will get an excellent three-dimensional composition on the theme - Fire safety .
Craft made from fabric on the theme - Fire safety
A funny presentation of a serious topic
When creating crafts about fire safety, set a cheerful tone. Drawings and crafts should not be alarming. Concern with a touch of humor and jokes - this is the main direction of such children's crafts. Along the way, the rules of behavior of people in case of fire are studied. What to do and what not to do.
There should be an explanation for children why they are not allowed to use matches. Along the way, crafts are made from plasticine depicting a matchbox and a fire.
And nearby there is a fire extinguisher and a man with a hose and mask. Here several useful things are done for the child at once. He gains knowledge, trains his fingers, his mind, and learns things useful for life. It turns out to be fun in the form of a game.
Fire safety crafts made from matches
When you make crafts from matches with your child, explain what dangers can arise if the material is not used correctly. From this raw material you can make both simple applications, like in the first picture, and entire layouts, which will require a lot of time and matches. But the job will be perfect.
Crafts from matches
Volumetric crafts from matches
Trimming
Unusual crafts are obtained using the trimming technique. Essentially, this is a mosaic laid out from paper elements that will have a cone shape. To do this, small squares are cut from corrugated (crepe) paper and rolled into a cone. Using trimming you can make spectacular volumetric applications and entire panels. Glue is applied to a dense base and the conical elements are carefully installed one by one. They are pressed using wooden sticks, toothpicks or knitting needles.
Crafts on the theme of fire safety - quilling
Quilling is a special technique for creating products from strips of paper. More precisely, these stripes are twisted into spirals or, as they are also called, modules. And from the modules they make either applications or three-dimensional figures. You can make this kind of firefighter yourself from round modules of different radii.
Quilling technique - crafts
Cardboard products
Working with this material is a little difficult, since it is denser. But it makes durable three-dimensional crafts. You can also use cardboard boxes. Fire extinguishers, fire trucks, shields and other equipment in the form of models will serve as clear evidence of the harm of playing with fire.
Older children in kindergarten can create entire compositions, depicting a fire in the windows of houses or brave rescuers in the line of duty.
Crafts on the theme of fire safety - crochet toys
Handicraft mothers can show their children how to crochet three-dimensional figures using a simple technique (single crochets): a fire extinguisher, a fire truck, a courageous fireman. To ensure that the products keep their shape, use hard cardboard or foam rubber as a base.
DIY fire extinguisher
Crochet products
Drawing
You can invite the kids to draw a fire and how firefighters extinguish it. Children are not required to produce a highly artistic work, the main thing is that they feel the significance of their creativity. You can draw with pencils, felt-tip pens, crayons, and at an older age - with paints.
Crafts on the theme of fire safety from cereals
The process of creating applications from cereals will require perseverance and patience. On hard cardboard you can make a machine like this from multi-colored rice if you use PVA glue. To paint cereals, gouache and food coloring are used.
Crafts from cereals
IMPORTANT : Before you start working with cereals, draw an applique design on the base. Only then glue the grains of the desired color onto the cardboard.
Road traffic
Applications on the topic of traffic rules are especially interesting. Since using paper it is easy to depict traffic lights and road crossings.
- You will need paper in three traffic light colors.
- Create two traffic lights, one with two colors and the other with three.
- Draw a man on one and a car on the other.
Sometimes it happens that a child can confuse the traffic lights and start crossing the road at the green traffic light intended for cars. If an adult does not react in time, this can cause irreparable consequences for both sides of the movement.
People should look at their traffic light, which has two lights, green and red. Accordingly, the red path is prohibited, and the green path allows movement. Picture it that way!
On a large traffic light with three colors, draw a large red cross. And on the second there is a green tick in a circle.
Through these activities, you can learn all the basic aspects of traffic that your child will need. And when the child goes to school alone, he will be able to easily navigate and not get lost when he sees two traffic lights.
- It's easy to make big cars out of paper milk cartons. The headlights are made of paper, and the bumper is made of toothpicks.
- The man can also be assembled from toothpicks using chestnuts (if the season of the year allows).
- Several installations will briefly and easily explain the dangers of the road.
- You cannot cross the road without adults; even with an adult you should look around and make sure there are no cars.
Be careful about your child's safety. Crafts are just a way to explain the correct actions in the event of a fire or other threat. Or behavior to prevent such dangerous phenomena. You can use photographs of a burning forest. They will definitely evoke sympathy for the inhabitants of the forest.
Fire safety crafts made from napkins
Napkins are easy to use in the hands of craftsmen. They can be used to make various shapes of products. Fire made from yellow, orange, and red napkins is especially beautiful. You can make this craft yourself and add something else of your own. For example, what should be done at the dacha, in the field, to prevent a fire. After the picnic, be sure to extinguish the fire behind you and do not leave it burning unattended.
Craft from napkins
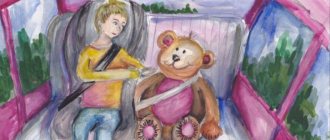
Rescue of a drowning man
With the help of crafts on the topic of water safety, you can protect your child from the possibility of drowning when swimming in a river or lake due to wrong actions. Most little children love the cartoon “Smeshariki”. So find out from your child about his favorite heroes and bring to life the idea of saving a drowning person.
Let’s say, if a child loves a pig and a rabbit, then let her swim too far, and he decides to save her with the help of a lifebuoy. All this can be played out by using materials such as plasticine.
After the work is finished, and the baby learns that he can’t swim too far and needs to stay close to adults, he can just play with his favorite characters.
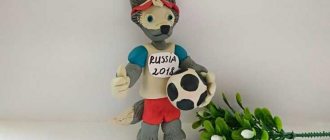
Craft according to fire safety rules
The impossible task of teachers - to teach a child the rules of fire safety - is solved with the help of such simple methods. Or rather, through creative activities to create various works on this topic. This is the method that makes it easier to explain to children how to protect themselves from fires, how to act correctly in a critical situation and not panic.
DIY crafts. Fire safety rules
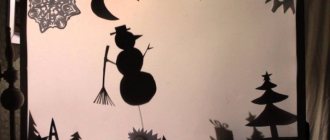
“From one small spark the forest lights up, my friend!”
When teaching fire safety, much attention is paid to open fire as a source of danger. Bonfires, lit curtains, a saucepan on the stove and, finally, the ill-fated poplar fluff.
All this requires attention and deep study.
Little attention. The children are not at all interested in the lessons. Watch a movie or cartoon - yes! However, if you interest children in non-standard works and even offer to participate in a competition, then there will be attention and persistence. As an option - the all-Russian competition “Burning Bush”. So, we conclude: “You must arouse the child’s interest in any activity!”
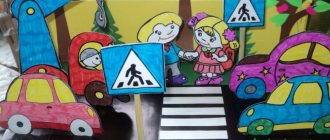
Idea No. 2. Crosswalk
The next road sign that every child should know is a pedestrian crossing. To make it you will need the simplest materials: paper and glue. The tools that will suffice are a pencil and scissors.
Parents will need to prepare (print) images of the road sign and a pendant in advance.
We follow the step-by-step instructions below:
- Draw a sketch of a cube on paper.
- Cut it out.
- Glue on an image of a road sign.
- Fold the sides according to the layout and glue them together.
Don’t forget to attach a loop and decorate the craft with tinsel.
Looking at the sign made with his own hands, the child will definitely remember where he is supposed to cross the road according to the traffic rules.
Jeans
Thick and familiar fabric for everyday use may be too tough for young craftswomen. It is quite rigid and dense, which makes work difficult, and the seam may not look neat.
However, the texture of the fabric can help in creating an interesting and original toy. Moreover, every family has old jeans that are no longer needed. The shade of jeans can set the tone and mood of the future toy.
Note!
- Master class on decoupage: step-by-step do-it-yourself decoupage schemes. Master classes on creating products for beginners (130 photos)
Bouquet of candies: TOP-170 instructions for creating a bouquet of candies + DIY design ideas
- Bouquet of Raffaello: the best instructions for creating a bouquet of Raffaello with your own hands + simple diagrams with photo reviews
Idea No. 3. Snowflake with road signs
In order not to be limited to a single sign, we will tell you how to make a snowflake on the theme of traffic rules. It’s very easy to make even for a child of kindergarten age, and the big advantage is that there is only one idea, but there are many options for execution, you can let the child show his own imagination and creativity.
So, cut out a snowflake from cardboard or other thick sheet. The form is at your discretion. But it should be taken into account that the number of pictures with road signs that need to be prepared in advance will depend on the number of “rays” of the snowflake.
Cover the snowflake with glitter. The simplest thing left is to glue road signs onto the rays. Here is a clear example of what should happen:
Velvet
And also mohair - a light imitation of animal skin, it will help create the mood.
Cotton fabrics
All cotton fabrics such as chintz, satin and calico are suitable for this. Cotton fabrics are rich in bright, life-affirming shades and colors.
What toys to create?
Traditionally, the animal kingdom wins in popularity:
- Cat;
- Dog;
- Mouse;
- Teddy bear;
- Little Fox;
- Bunny;
- Cheburashka.
Also popular cartoon and fairy tale characters. When choosing the hero of a future toy, you should rely on the gender of the child. Boys will always be happy with little heroes, and girls with cute and fluffy toys, for example, a kitten. Your child’s preferences and favorite cartoons can also help in choosing a future toy friend.