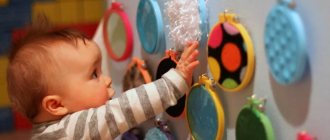
According to M. Montessori, the most important task between the ages of 0 and 3 years is sensory development. During this period, children explore the world using various senses, and the main sources of information are vision and tactile perception. In order for the baby to actively develop, parents must create an environment for the child in which he could receive new and vivid sensory experiences. Sensory boxes will help make the learning environment at home even more enriched. What to fill a baby's sensory box with? How to play with her? At what age can you start playing games like this? We will answer these and other questions in this article.
What is a sensory box?
Sensory boxes are containers with various sensory fillings (liquids, bulk materials, jelly, paste, toys, etc.). This is an extremely useful and multifunctional toy for children of early and preschool age. The baby can feel small objects, pour them in, hide them, and come up with his own story. Playing with a sensory box helps develop a child's fine motor skills, attention, imagination and speech.
It is easy to make a sensory box for a child with your own hands with minimal material costs.
This educational toy can be based on any container: box, container, basin, pan. The main thing is that the child feels comfortable playing with it. Next, the container is filled with various materials (depending on the theme of the sensory box and the age of the child). Usually these are cereals, pasta, pebbles, natural materials, water, jelly, cotton wool, etc. To make it more interesting for your baby, put small toys and tools (shovels and scoops) in the “box”.
Examples
Below are several options for educational crafts for children of different ages. They can be performed both at home and in a kindergarten group.
Filling sensory boxes
The following can be used as the main filler for the sensory box:
- Cereals (rice, peas, millet, lentils, beans, buckwheat, semolina, etc.);
- Coffee;
- Pasta;
- Stones;
- Shells;
- Sand;
- Nuts;
- Cones;
- Dry leaves;
- Jelly;
- Water;
- Snow;
- Yarn;
- Textile;
- Vatu;
- Decorative stones for aquariums.
The more different sensations your baby gets, the more benefits for his development. Try to regularly change the contents of the sensory box to keep your child interested in playing with it.
Additional items:
- Animal figurines;
- Small toys;
- Constructor;
- Cubes;
- Letters and numbers.
Tools for playing in the sensory box:
- Bowls;
- Glasses;
- Spoons;
- Scoops;
- Rake;
- Tweezers;
- Magnifier;
- Funnel;
- Sieve.
Shark made of clothespins and paper
Necessary materials:
- pin;
- colored paper;
- glue gun;
- toothpick;
- felt-tip pen.
Progress:
- Cut out two parts from blue paper: the upper part of the shark and the lower part. Draw an eye on the top.
- Cut out a small fish from orange paper. One that fits in a shark's mouth.
- Cut a small stick from a toothpick and glue an orange fish to its top. And glue the free part of the stick to the edge of the inside of the lower part of the shark.
- Take a clothespin and glue blue parts to its ends to make a shark. It turns out that when the clothespin is opened, the shark will begin to open its mouth, and the fish will try to escape. But when closed, it will again be eaten by predatory fish.
Options for sensory boxes for children from 6 months
You can start playing with the sensory box as soon as your baby learns to sit. It is best to fill a sensory box for your baby with large and non-traumatic materials, for example, fabric, ribbons, pompoms, balls, sponges, cubes. You can also supplement it with various musical toys (bells, rattles) and something rustling (polyethylene, parchment paper).
If your baby is still small, use larger objects to fill the sensory box and carefully monitor how he plays.
For children over one and a half years old, you can use sensory boxes with cereals. At an early age, interest in small objects is especially great. Your baby will be happy to find hidden objects in the cereal. They can later be sorted by color or shape. In addition, playing with a sensory box can become training for instrumental actions: the ability to hold a spoon, pouring, and so on.
To make the filling of the sensory box brighter, you can color the rice at home. To do this, add a few drops of food coloring and 1 tablespoon of alcohol to a bag of rice (this is needed to fix the paint; the alcohol will evaporate quickly). Seal the bag tightly and stir to distribute the color evenly throughout the rice. Open the bag and wait for the cereal to dry.
If you and your child are learning the names of colors, then colored sensory boxes can be a good tool for practicing. Place different items of the same color into a container. When playing with such single-color sensory material, the baby will quickly remember the desired color.
The use of various tools and tools allows you to diversify games with the sensory box. Invite your child to play with the sieve and sift the semolina. To make it more interesting, hide small toys, pebbles or larger grains in the cereal. Using a sieve, the child must separate them from the semolina. With the help of such a game you can quickly master the concepts of “big” and “small”.
Sensory boxes filled with water cause genuine delight among children. With the help of a sieve and spoons, the baby can remove floating and sinking objects from the water, pour water into glasses, and make boats from molds and other available materials. You can add a little paint to the water - this will make playing even more fun and interesting.
Preschool children (over 3 years old) will be interested in themed sensory boxes. With their help, the child will learn new things about the world around him in a playful way. Such games are also very useful for the baby because they perfectly develop memory, attention, thinking and imagination. Here are some examples of themed sensory boxes:
- "Space"
- "Zoo"
- "Farm"
- "North Pole"
- "Construction"
Tips for successful work
Before you begin your chosen work, you should listen to the following tips:
- Prepare all required materials in advance.
- Scissors for children should first of all be safe, so they are suitable only with rounded ends.
- Consider protecting your work surface. It is better to cover it with oilcloth, and put special plastic boards for modeling.
- When painting with paints, you should make sure that the water is not very cloudy. After completing the drawing, it is good to cover the paints to prevent them from drying out, and wash your hands well.
- When sculpting, if there is no goal to dry the material, you need to wrap it in a suitable material: clay - in a piece of damp cloth, plasticine - in plain paper.
- Markers should be stored with their caps tightly closed.
- It is good to sharpen pencils with a sharpener.