Drawing on the theme of autumn in kindergarten is a mandatory part of the educational program, as it allows you to better study the main signs of autumn, master the palette of autumn shades, and consolidate the ability to work with different art materials.
Autumn drawings for kindergarten can be made in a variety of techniques, using an unconventional approach, but taking into account the age characteristics of the children.
Drawing on the theme of autumn in kindergarten
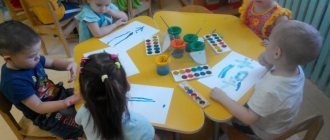
Finger painting “Autumn tree”
For example, children 3-4 years old will be quite capable of depicting an autumn tree by applying droplets of rich colors to the main trunk with their finger.
Draw leaves with your fingers
For such work, you will need to prepare in advance a palette and templates for drawings of tree trunks and branches. We invite the kids to cover the tree with leaves, choosing the most autumn colors from the palette.
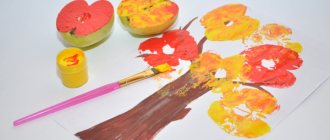
Autumn with finger paints
Kids just love to draw with stamps. Stamps made from natural materials, such as potatoes, are especially attractive. The child dips the stamp in paint and the autumn leaves are ready to fall! You can pour the paint into a small saucer for convenience. You can make saucers with different colors and several different stamps.
Autumn drawing with potato stamps
Children 4-5 years old can be offered more complex drawing techniques:
Forest through the eyes of animals
If you are already tired of drawing a regular forest, try changing the perspective. We offer you step-by-step instructions for depicting the forest through the eyes of small animals. To them, trees seem huge, like skyscrapers. It is this effect that will need to be displayed in the drawing.
1. Draw several thin vertical lines to represent the trunks. Some of them should start almost at the bottom of the sheet, others approximately in the center. The trunks should reach the very top of the leaf.
2. Draw an uneven horizon line on 1/3 of the sheet. Also draw short wavy lines to represent the uneven surface of the ground.
3. The forest will be coniferous, so around the thin trunks you need to draw abrupt horizontal lines, schematically representing the branches of the pine tree. The branches begin about halfway down the trunk and continue to the top edge of the leaf.
4. Draw stripes and curls on the trunks of pine trees, imitating bark.
A drawing of a pine forest drawn by children, unlike a deciduous forest, can easily turn into a winter landscape. It is enough to draw white snowdrifts instead of green grass.
Drawing with a white wax candle
For work we prepare thin paper, real autumn leaves (which we collect during our walk), a candle, a brush and paints.
Materials for work
We place a leaf with thick veins under a sheet of paper and run a candle along it.
We paint with a candle
Cover the entire sheet with paint.
Coloring with paint
Where the candle comes into contact with the veins of the leaf, its outline will appear.
The drawing begins to appear
How to draw an autumn landscape step by step: an easy but beautiful gouache drawing
Making the next wonderful picture will be very easy. You don’t necessarily have to have a diploma from a higher art school or attend specialized courses.
The language of our lesson is simple and will be understandable to everyone. He will describe to you all the nuances of working with materials, setting light and shade, and processing volume and perspective.
Don’t be intimidated by complex phrases, but rather get down to business quickly:
- The sketch is done with an HB pencil, it should be a light sketch, do not press too hard on the tool. Draw a horizontal line just below the center, which divides the sheet into two parts. Next, we outline the mass of trees in the distance. Then we sketch a meadow with birch trees and note the clouds in the sky.
- If your gouache has dried out, fill the bottles with water and place them in this position overnight.
The next day, drain the liquid and you will be left with fresh, wet material at the bottom. We paint the sky with a pale blue tint, with abrupt strokes, as well as its reflection in the river. The further from the center the darker the tone becomes, add blue paint to the mixture.
- We write out the long shot, the lighting will be on the left side. First, we cover the silhouettes with yellowish pigments, then we work on the halftones with a red palette. Water, like a mirror, reflects everything, so we depict a vertical smeared reflection on it.
- We outline cumulus clouds in empty spaces with whitewash, and decorate them with a pinkish-lilac color. So, we will clearly show the shadow and volume. Now we move to the foreground, make the first layer of yellow crown, mixing in a little light green.
- We use a greenish tone to express the nearby lawn and several accents on the forest background. For additional texture, add dark contrasting shadows in some places. To do this, mix ocher with blue paint and mix the desired range.
- Use whitewash and a thin brush to highlight the ripples on the river. We paint strokes of different lengths in chaotic places. We draw the ornament on the birch trunks in black. Using a purple tint we go over the background, showing the shadow.
- We place accent spots in the crowns and in the reflection on the water surface. Draw blades of grass on the field. Finally, we release a flock of migratory birds in the corner of the image.
We leave our autograph at the bottom of the masterpiece so that everyone understands who worked hard and created an incredible landscape.
Drawing with wax crayons
We again use the leaves that we collected during a walk in dry weather. They do not need to be dried because they will become brittle during the drying process. You will also need thin white paper and wax crayons.
Materials for drawing
Place the piece of paper under the sheet of paper and carefully color the entire space above it with chalk.
We drive with chalk
Where the chalk touches the veins, the clear contours of the leaf appear.
Autumn chalk drawing
To make the drawings look more impressive, we fix them on a bright background - for example, sheets of colored cardboard.
Scheme of work on the path
The path must be depicted in perspective: at first it is wider, and as it moves away it should narrow. To prevent the path from touching the horizon, you can draw a small hill in the distance, marking it with a wavy line.
The next step is to draw the trees. The first step is to draw their bases, trunks or stumps onto a sheet of paper. It is recommended to depict trees of different species and sizes.
In the distance, where the path goes, there is no need to draw the bases of the trees. Only the tops of heads that peek over the horizon.
It is important to remember that trees in a real forest are arranged randomly. For this reason, they should be depicted with a slight tilt at different angles, and not strictly parallel.
We recommend reading:
How to draw a star: 10 best options for drawing five-pointed and other stars with your own hands. Pictures of finished works with descriptions- How to draw a dragon with a pencil - the best step-by-step instructions for beginners. TOP pictures for quick visual learning
- How to draw a pony: TOP 10 best lessons for beginners. Detailed instructions for drawing My Little Pony step by step with a pencil
The bases of tree trunks can be immediately distinguished by dark shading. After this, you need to outline the shadows of the trees on the ground with light pencil lines.
The shadows from the trees will help make the sketch three-dimensional, so they need to be highlighted a little with shading.
Then you need to depict bushes and small hills between the plants in the forest.
Trees should be drawn in detail, adding branches and foliage. It is better to draw all elements in different sizes.
You need to finalize the pencil sketch using shading. Those details of the drawing that are located further should be darker. The space above the path does not need to be shaded.
We recommend reading:
How to draw lips with a pencil - simple instructions with descriptions and pictures. Step-by-step master class for beginnersHow to draw a family: a master class on creating a drawing “My Family” for kindergarten or school. The best lessons for children on drawing with pencil and paints
How to draw a bear with a pencil? Review of simple and step-by-step instructions for children and beginners (120 pictures of a bear)
In this diagram, it is the path that will help depict the forest in perspective in the drawing, and correctly executed shading will give volume to the sketch. You need to stock up on an eraser in advance to correct pencil lines.
Instead of a path, the picture can depict a hut or another large object, for example, an animal.
Autumn drawing with prints
Again we use freshly picked autumn leaves. We cover each of them with a layer of colors from the autumn palette and carefully turn them over onto a sheet of white paper. We carefully lift the sheet - a multi-colored imprint remains in its place.
Casting imprints
From such drawings you can organize a real autumn exhibition
Exhibition
Scheme of working on a winter landscape
- Draw airy wavy lines onto a sheet of paper. It is important to place the hills at different distances from the viewer. One line may slightly overlap the other.
- Draw the outlines of the fir trees, placing them in groups at different distances.
- Mark the clouds in the sky.
You can decorate a drawing of a winter forest by coloring it with colored pencils. A forest drawn by children using these techniques will look realistic and three-dimensional.
We recommend reading:
How to draw a fox with a pencil? Detailed instructions with photos and descriptions. Step-by-step lesson for children + master class- How to draw a girl - make a portrait and general drawing correctly and beautifully (150 photos and videos)
How to draw a child - stages of creating drawings and recommendations for their design (video + 125 photos)
The landscape can be complemented with fragile lines depicting light snow.
Coloring leaves
Children 5-6 years old can already cope with more jewelry work. We use well-dried autumn leaves, which must be handled carefully, as they break easily in your hands. We cover the leaves with different shades of paint.
Coloring the leaf
It is better to use gouache or acrylic paint; watercolor often rolls off the surface of the sheet.
Autumn palette
Having painted one side, dry it and paint the second.
Paint the other side of the leaf
In this case, the leaf itself is an autumn picture.
Autumn painted leaf
The result is bright autumn leaves that can be used to create various decorative compositions.
Leaves for autumn compositions
From painted leaves you can make an original autumn pendant on a branch.
Autumn pendant on a branch
Different ways to draw a forest
If you want to create an original image of the forest yourself, you can use a simple pencil for sketching or colored pencils to fill the image with color.
It will be easy for beginning artists to draw a forest using gouache.
When thinking about how to draw a winter forest, you can remember the contrast technique. In such a picture, the background depicting the night sky will be dark. But the snow and the outlines of the trees will remain white.
Drawings with a ballpoint pen look unusual. When carefully drawing shadows, you need to use rods of different shades.
After practicing with pencil and gouache, you can move on to more complex drawings, which are done using watercolors.
Using step-by-step master classes, learning to draw is not difficult at any age.
Coloring paper leaves
This work also requires concentration and perseverance, but less caution - paper sheets cannot be broken and are difficult to wrinkle.
We color each leaf on both sides.
Coloring the leaf
We dry them and use them to decorate a group or hall.
Decorated paper leaves
Autumn drawing with crayons
We cut out templates of autumn leaves from thick paper in advance.
Cut out the leaves
Place the template on a landscape sheet.
Attached to a piece of paper
Carefully paint over the entire space around it with wax chalk, directing the strokes from the center to the periphery. Coloring a birch leaf.
Birch leaf
Coloring the maple leaf.
Maple Leaf
We lift the sheet - only its outlines remain, around which we see a real explosion of bright color.
The outline remains
Such non-standard drawing on the theme of autumn in kindergarten will help develop a child’s interest in creativity and awaken in him the desire to create new interesting compositions and paintings.
Bright autumn drawing with crayons
Preview:
Self-analysis of an open lesson with non-traditional
drawing techniques “Autumn trees”
Direct educational activities were carried out with children of senior preschool age with a subgroup of 10 children.
GCD theme: “Autumn trees.”
Type of educational activity: continuous educational activities are integrated, because through various contents and activities, the main goal of the event is achieved.
Dominant educational field: artistic and aesthetic development.
The purpose of GCD: to develop children's interest in artistic creativity through the use of non-traditional drawing techniques.
Objectives of integrated educational areas:
Preliminary work: conversations, stories, observation, looking at illustrations.
The lesson consists of three parts:
The duration of the lesson is 25-30 minutes, which complies with SanPin standards.
GCD corresponded to the interests of the children, the temperament and level of preparedness of the pupils.
The organization of children's activities corresponded to teaching, developmental and educational tasks. The logical presentation of the material, accessibility, as well as the creation of a game situation contributed to the formation of children’s knowledge throughout this continuous educational activity. The transition from one type of activity to another made it possible to involve each child in an active process.
Various methods were used in GCD: verbal throughout all educational activities; visual – display of illustrative material; game - a surprise moment; practical; control and stimulation in the form of approval and praise; artistic word.
The main part of the ECD included independent, mental and practical activities of children aimed at completing all assigned tasks.
The main part of the ECD included tasks for the perception of new knowledge, systematization of children’s existing knowledge in independent activities.
In order to relieve static tension, as well as increase mental performance and reduce fatigue, physical exercise was performed.
Individualization of learning was manifested in helping children who had difficulty completing tasks, repetitions, reminders, and additional explanations.
During practical work, the children showed increased interest in the task and the children were interested; no fatigue was observed. During verbal communication while the pupils were doing work, she gave a positive assessment of the children’s activities.
The final part of the GCD summed up the activity using the method of analyzing the success of the task.
Conclusion: all the tasks set during the planning of the GCD were solved, the goal was achieved. Each child produced a beautiful autumn picture. Educational activities contributed to increasing playful motivation for learning, creative development, and cognitive interest. The level of activity of the children was at a sufficient level. All children were involved in the activity, interest was maintained throughout the entire educational activity.
Source
Drawing and application “Autumn fly agaric”
Using real leaves we draw a colored background. We are waiting for it to dry. Cut out the fly agaric cap from red paper, and cut out the stem from white paper. From a napkin we cut out a fringe for the fly agaric leg. We combine all the elements of the craft on a colored background and complement it with a dried maple leaf. All that remains is to paint the fly agaric’s cap with white dots. Our autumn fly agaric is ready!
Application and drawing “autumn fly agaric”
Drawing and application “Rowan”
A very beautiful craft in combination of a pattern and a rowan applique. Glue on a real branch. We draw the leaves with pencils (we draw some on the main sheet, and cut out some from another sheet of paper. We form the rowan from lumps of paper.
Drawing and application “Rowan”
Look at the video on how to make a beautiful autumn landscape from leaf prints:
And here is an example of a wonderful autumn drawing, drawn with watercolors and crayons. First, the outline of the drawing is drawn in pencil, then patterns are drawn on bushes, trees and grass with white or yellow chalk. After applying watercolor, the pattern will become bright and clear.
Drawing autumn with watercolors and crayons
Parents or teachers can draw the outlines of the leaves; the children will just have to color them with watercolors. After the watercolor has dried, outline the contours, veins and patterns with a black marker.
Autumn leaves in watercolor and marker
In this drawing, the contours are also highlighted with a colored felt-tip pen.
Autumn drawing in watercolor and pencil
Notes on drawing "Autumn Forest" in the senior group.
The teacher invites the children to go to the workshop, select the necessary material for work and discuss how the child will work individually, in groups or in pairs.Independent division of children into subgroups or pairs.
The teacher and the children discuss the location of the drawing on the sheet, based on the sequence of the drawing.
Guys, do you know what the autumn phenomenon is called when leaves fall from the trees? That's right...it's leaf fall. In autumn, the leaves on the trees turn not only yellow, but also red, orange, and brown. The color of the leaves depends on what the weather is like: the sunnier the leaves, the brighter the leaves. Many artists love to paint autumn nature.
Let's look at the illustrations that I have prepared for you. Do you like this autumn? Look, guys, what do these pictures have in common? Are there people here, at home? (no, only trees, sky, leaves) All this can be called in one word - nature. Such illustrations, which depict only nature, are called “landscape”. All the pictures that you see today can be called the word “landscape”. (That's it, because only nature is depicted there).
Tell me, is there any free space here where there is no image? (no, all the paintings are painted over) for these paintings, the background is first painted - the entire sheet is painted over, and then the finer details are painted.
Let's try to depict a beautiful, bright autumn!
In the last lesson, we prepared the background using red, yellow, blue gouache and a wet napkin. Let's draw a line in the middle of the sheet - this is the horizon line. This is how we got “heaven” and “earth”. Look and tell me, are the trees drawn in one row in the paintings? (no). Are they the same size? (No). Which trees do you think are closer, small or large? (big ones, and small ones further) and now let's try to draw our “landscape”. In the foreground using stencils and a sponge using the dipping method. We draw a tree trunk, a bush and a Christmas tree using gouache. Then, using a cotton swab and red gouache, we draw berries on the bush, and using cork and red and yellow gouache, we draw foliage on the trees.
Fizminutka:
The wind blows in our faces (waving hands, imitation of the wind). The tree swayed (arms raised up, swaying from side to side). The breeze is getting quieter and quieter. (sit down slowly). The tree is getting higher and higher (slowly rise on your toes).
Independent work with children.